Managing User Extended Attributes
# Overview
Bamboo Cloud IDaaS pre-configures user attributes for the user pool, such as username, organization, name, mobile number, email, gender, ID number, country/region, employment relationship, deactivation date, disabling method, etc.
When enterprises have specific needs during user management, for example, they want IDaaS to provide more attribute information for applications to retrieve. You can refer to this chapter to customize and extend user attributes.
- The built-in employment relationship attribute is by default associated with the "Employment Relationship" data dictionary. You can set various employment relationships for it within this data dictionary.
- For the built-in deactivation date attribute, once a date is set, the user status will automatically change to disabled at 00:00 on the expiry day.
# Steps
# Grouping Management for User Attributes
Each tenant is initialized with two default groups for user attribute definitions (Basic Information group, Work Information group). The two default groups cannot be deleted. User attribute fields are added under each group. Administrators fill in user information based on the groups set here when adding new users.
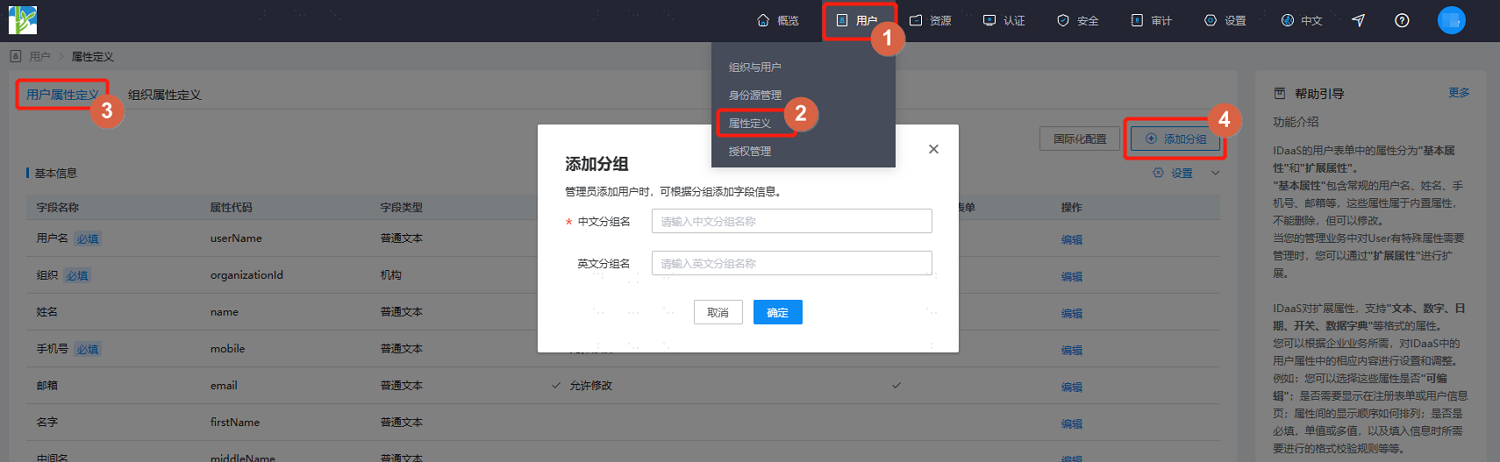
Log in to the IDaaS Enterprise Center platform, select "User > Attribute Definition" in the top navigation bar, choose the "User Attribute Definition" tab, click "Add Group" in the upper right corner, and set the Chinese and English names for the group. Support adding up to 5 attribute groups. User attributes are created under each group.
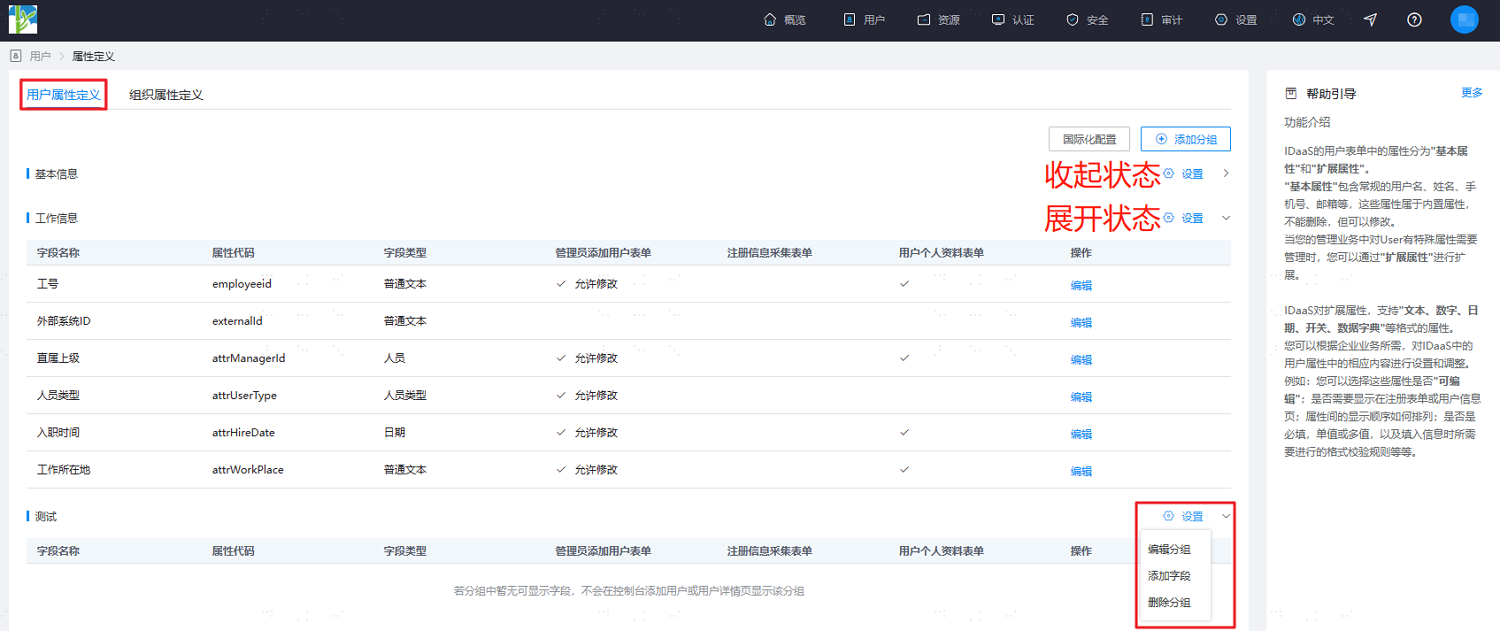
When each group is in an expanded state, hover the mouse over the "Settings" button to modify or delete the selected group, and to add fields for the selected group.
- Administrators can drag and drop to reorder user attributes within each group.
- Administrators can drag and drop user attributes across groups to move them in or out.
# Managing User Attributes
Supports setting allowed special characters and character length ranges, field rules, display configurations, etc., for built-in attribute fields.
Log in to the IDaaS Enterprise Center platform, select "User > Attribute Definition" in the top navigation bar, choose the "User Attribute Definition" tab. When each group is in an expanded state, hover the mouse over the group's "Settings" button, select "Add Field", and configure the relevant information for the attribute field.
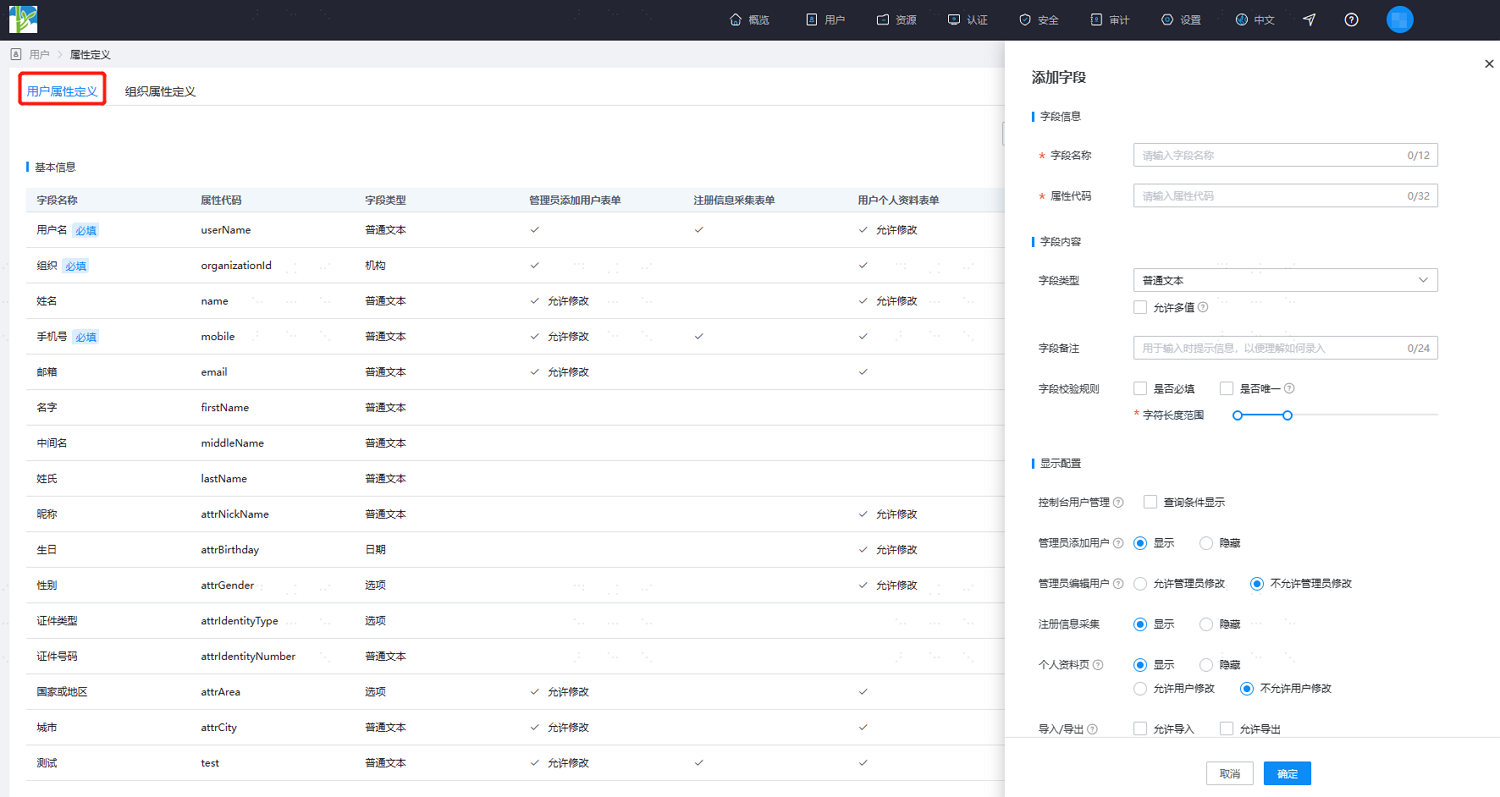
Set the basic information for the attribute field, including Name and Attribute Code.
- Name: Sets the display name of the attribute on various platforms.
- Code: Sets the attribute code, used to identify the attribute, and must be unique.
Set attribute type-related information, i.e., the display type, length, whether it supports multiple values, and other related configurations for the new attribute on various platforms. The information to be added for the attribute varies depending on the type set. Key parameters are as follows.
- Field Type: Sets the display type of this attribute field on the platform.
- Plain Text: Supports extended fields configured as this type, setting the attribute display type as a plain text box, mainly used for setting attributes like username, description, etc. Supports configuring whether the attribute field can have multiple values.
- Sensitive Text: Supports extended fields configured as this type, setting the attribute display type as an encrypted text box, typically used for configuring password-related attributes. Supports setting all text to display encrypted or partially encrypted.
- Number: Supports extended fields configured as this type, setting the attribute display type as a number input, storing integers, mainly used for attributes related to serial number ordering.
- Date: Supports extended fields configured as this type, setting the attribute display type as a time input, storing data in date format (yyyy-MM-dd).
- Switch: Supports extended fields configured as this type, mainly used for attributes like turning a parameter switch on/off, storing Boolean data (true|false).
- Dictionary: Supports extended fields configured as this type, pre-defining selectable content for parameters from a data dictionary, storing the code corresponding to the data dictionary.
- Organization: Built-in attribute type, used only by organization fields.
- Option: Built-in attribute type, used by gender, ID type, country or region fields.
- Person: Built-in attribute type, used only by direct supervisor fields.
- Person Type: Built-in attribute type, used only by person type fields.
- Field Remark: Sets the prompt information when filling in the attribute, used to guide users in filling out this attribute.
- Field Validation Rules: Sets validation rules for the attribute field.
- Required: Sets whether this attribute is a required field.
- Unique: Sets whether the attribute value must be unique. Unique and Multiple Values cannot be selected simultaneously.
- Default Value: Sets whether a default value is written for the attribute.
- Character Length Range: Sets the length range for the attribute, commonly used for text types.
- Field Type: Sets the display type of this attribute field on the platform.
Set the display configuration for the attribute.
- Console User Management: After checking "Show in Search Conditions", this attribute can be used as a search condition on the user search page.
- Administrator Adding User:
- Show: This field is displayed when an administrator adds a user on the platform.
- Hide: This field is hidden when an administrator adds a user on the platform.
- Administrator Editing User:
- Allow Administrator Modification: This field is displayed and is readable/writable when an administrator edits a user on the platform.
- Do Not Allow Administrator Modification: This field is displayed but is read-only and cannot be edited when an administrator edits a user on the platform.
- Registration Information Collection:
- Show: This field is displayed during registration.
- Hide: This field is not displayed during registration.
- Personal Profile Page:
- Show & Allow User Modification: This field is displayed in the User Center and is readable/writable.
- Show & Do Not Allow User Modification: This field is displayed in the User Center but is read-only and cannot be edited.
- Hide: This field is not displayed in the User Center.
- Import/Export:
- Allow Import: When checked, this attribute is dynamically displayed in the import template when importing user data on the platform.
- Allow Export: When checked, this attribute can be exported along with user data when exporting user data on the platform.
After completing the above configurations, click "OK" to save the properties.
Click "Edit" or "Delete" under the "Actions" column of the added extended properties to update or delete existing extended properties.
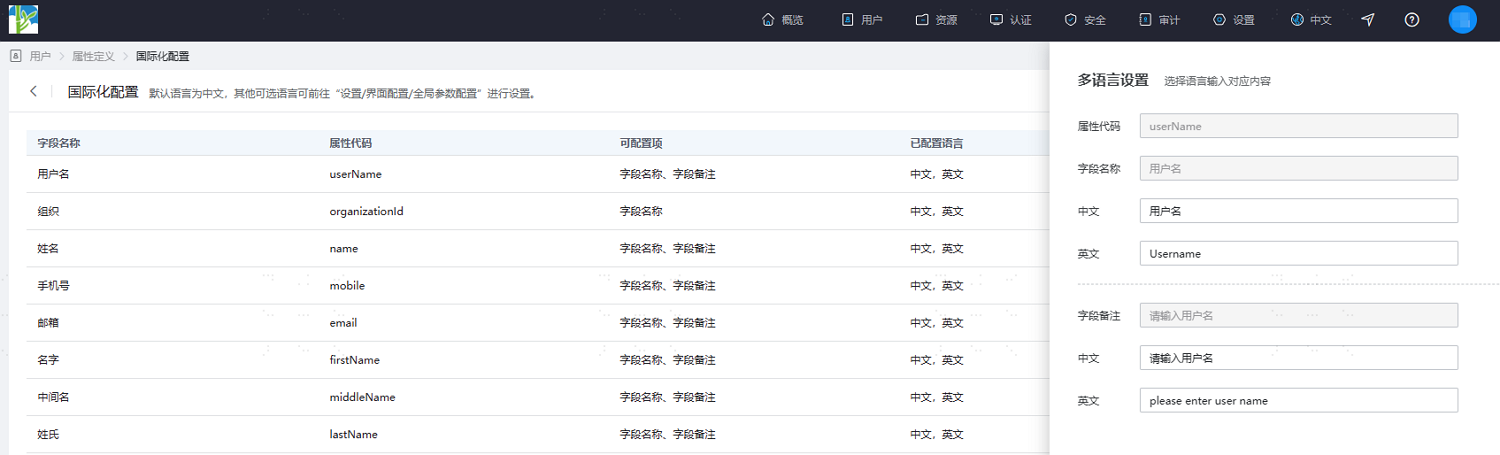
# Internationalization Configuration
In the IDaaS Enterprise Center platform, select "Users > Attribute Definition" from the top navigation bar, choose the "User Attribute Definition" tab, and click "Internationalization Configuration" to configure the Chinese and English internationalization for the names and remarks of user attribute fields. The page displays the corresponding language's name and remark information based on the current language configuration.
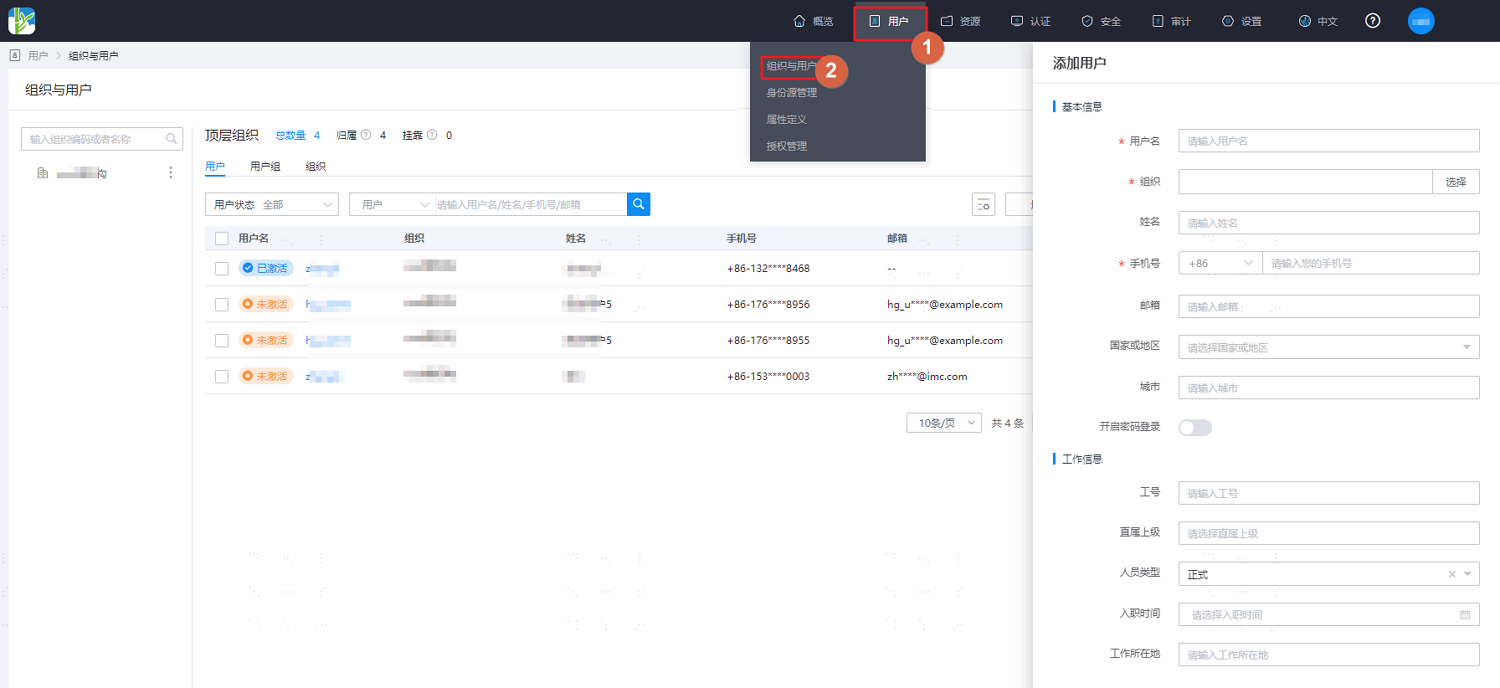
# Effect Demonstration
After configuring the user attribute fields, select "Users > Organization & Users" from the top navigation bar of the IDaaS Enterprise Center platform. The configured user attributes will be displayed when adding a user.
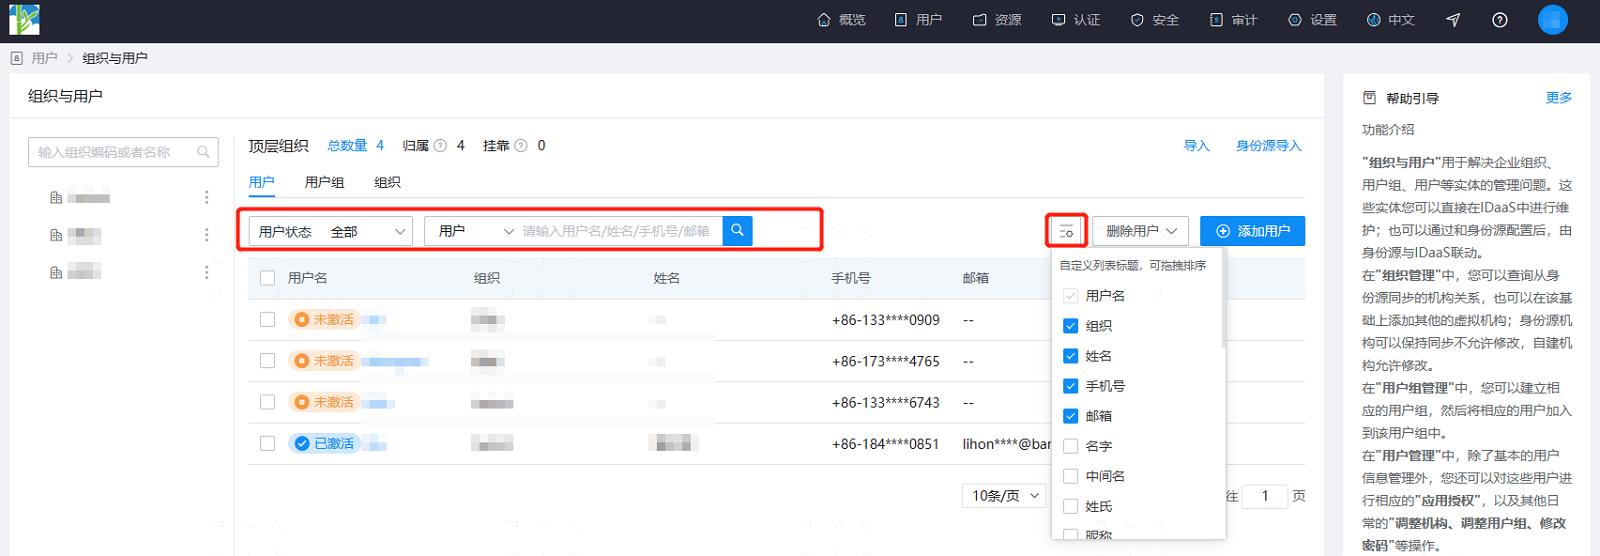
In the "Organization" tab, you can search for specific users by conditions. Click  to customize the user attributes displayed in the list and their order (the list displays from left to right).