BytePlus Single Sign-On
# Application Overview
https://www.volcengine.com/
# Documentation
This document describes how to configure IDaaS and BytePlus to achieve SSO integration based on the SAML protocol.
BytePlus offers two integration modes based on the SAML protocol:
User SSO: After completing the mutual trust configuration between the IdP and SP, when an enterprise IdP user logs in, BytePlus establishes a mapping relationship between the IdP user and the BytePlus IAM user based on the SAML assertion sent by the IdP. The enterprise IdP user can then access BytePlus resources through the corresponding IAM user. The access scope is within the permissions of that IAM user.
Role SSO: After establishing a trusted identity as a corresponding IdP role and completing the mutual trust configuration between the IdP and SP, when an enterprise IdP user logs in, the user accesses BytePlus resources by assuming an available IAM role specified in the SAML assertion sent by the IdP. The access scope is within the permissions of that IAM role.
| Identity Provider Type | Identity Logging into BytePlus | Applicable Scenarios |
|---|---|---|
| User SSO | IAM User | General scenarios, such as one-to-one mapping between enterprise users and BytePlus users, etc. When customers use SaaS products, it is recommended to achieve single sign-on through User SSO. |
| Role SSO | IAM Role | Customers assign tasks based on personnel roles, for example, the IT department uniformly logs in as the IT_admin role. |
# Prerequisites
- Have a BytePlus tenant environment
- Have a Zhuyun IDaaS tenant environment
- Have super administrator accounts for both of the above environments
# User SSO Integration Configuration Instructions
# Step Overview
- Log in to BytePlus as an administrator and create a new identity provider (type selection: User SSO)
- Upload the IDP metadata file
- Log in to IDaaS as an administrator and create a new pre-integrated application 【BytePlus User SSO】
- Upload the SP metadata file and configure it
- Perform testing after authorization
# Detailed Integration Steps
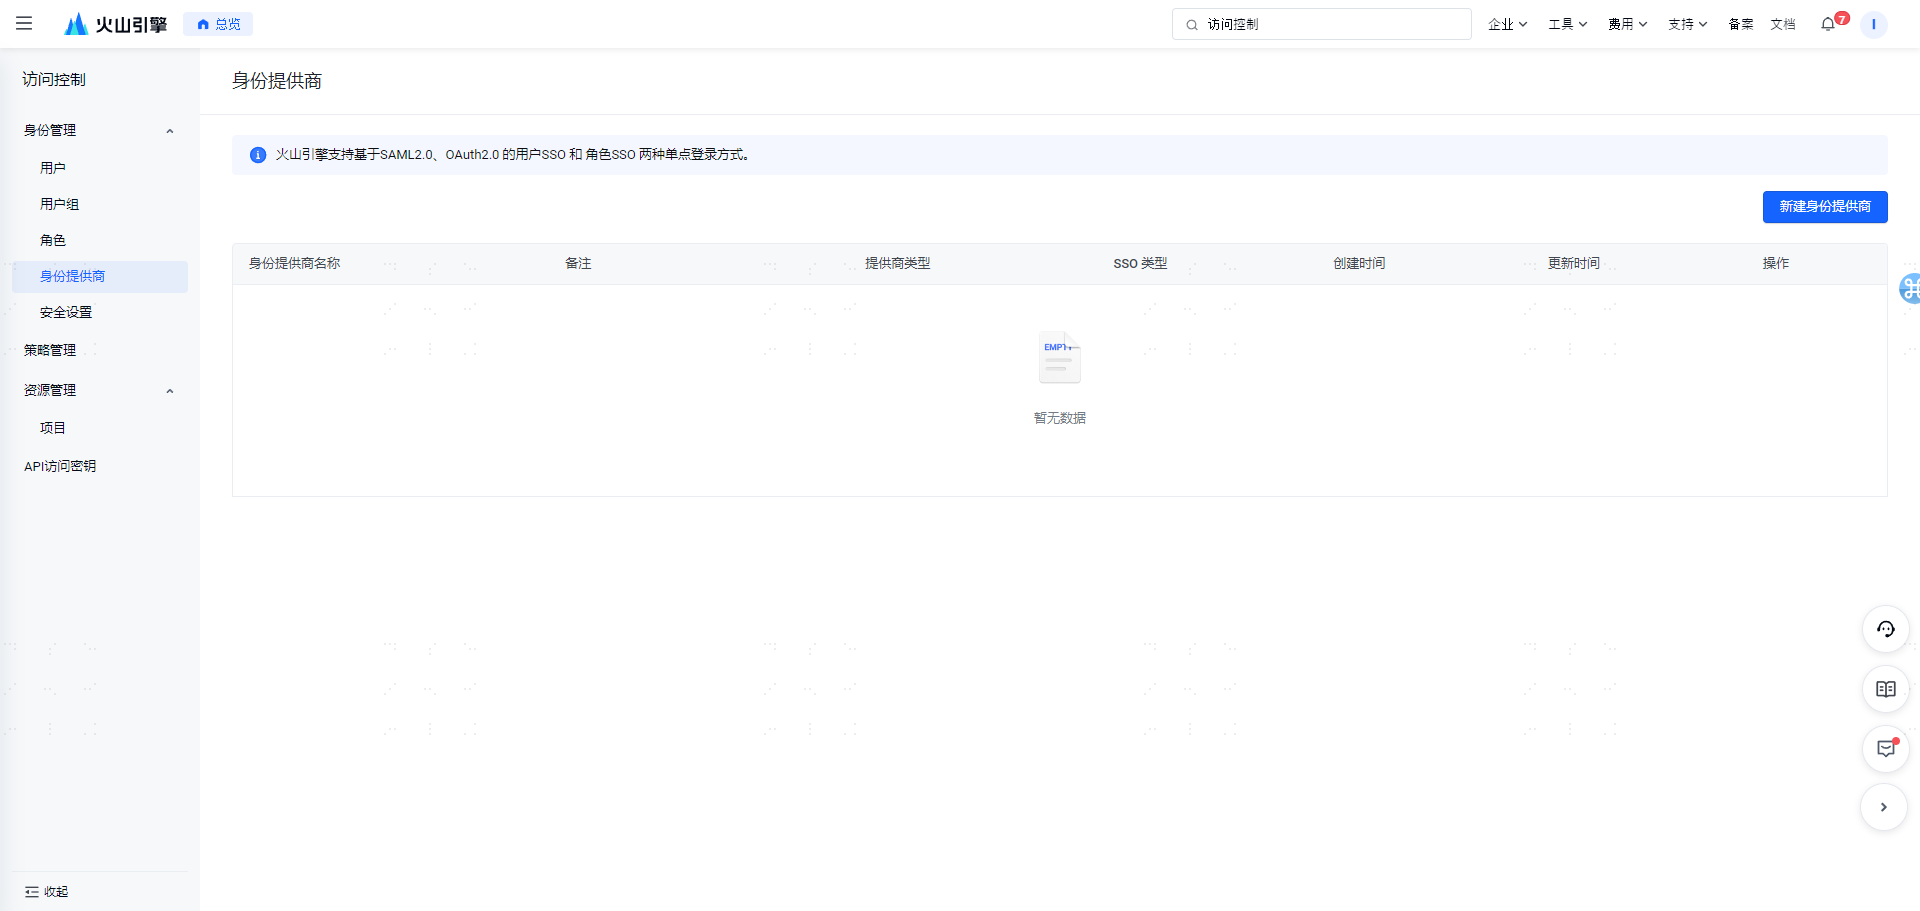
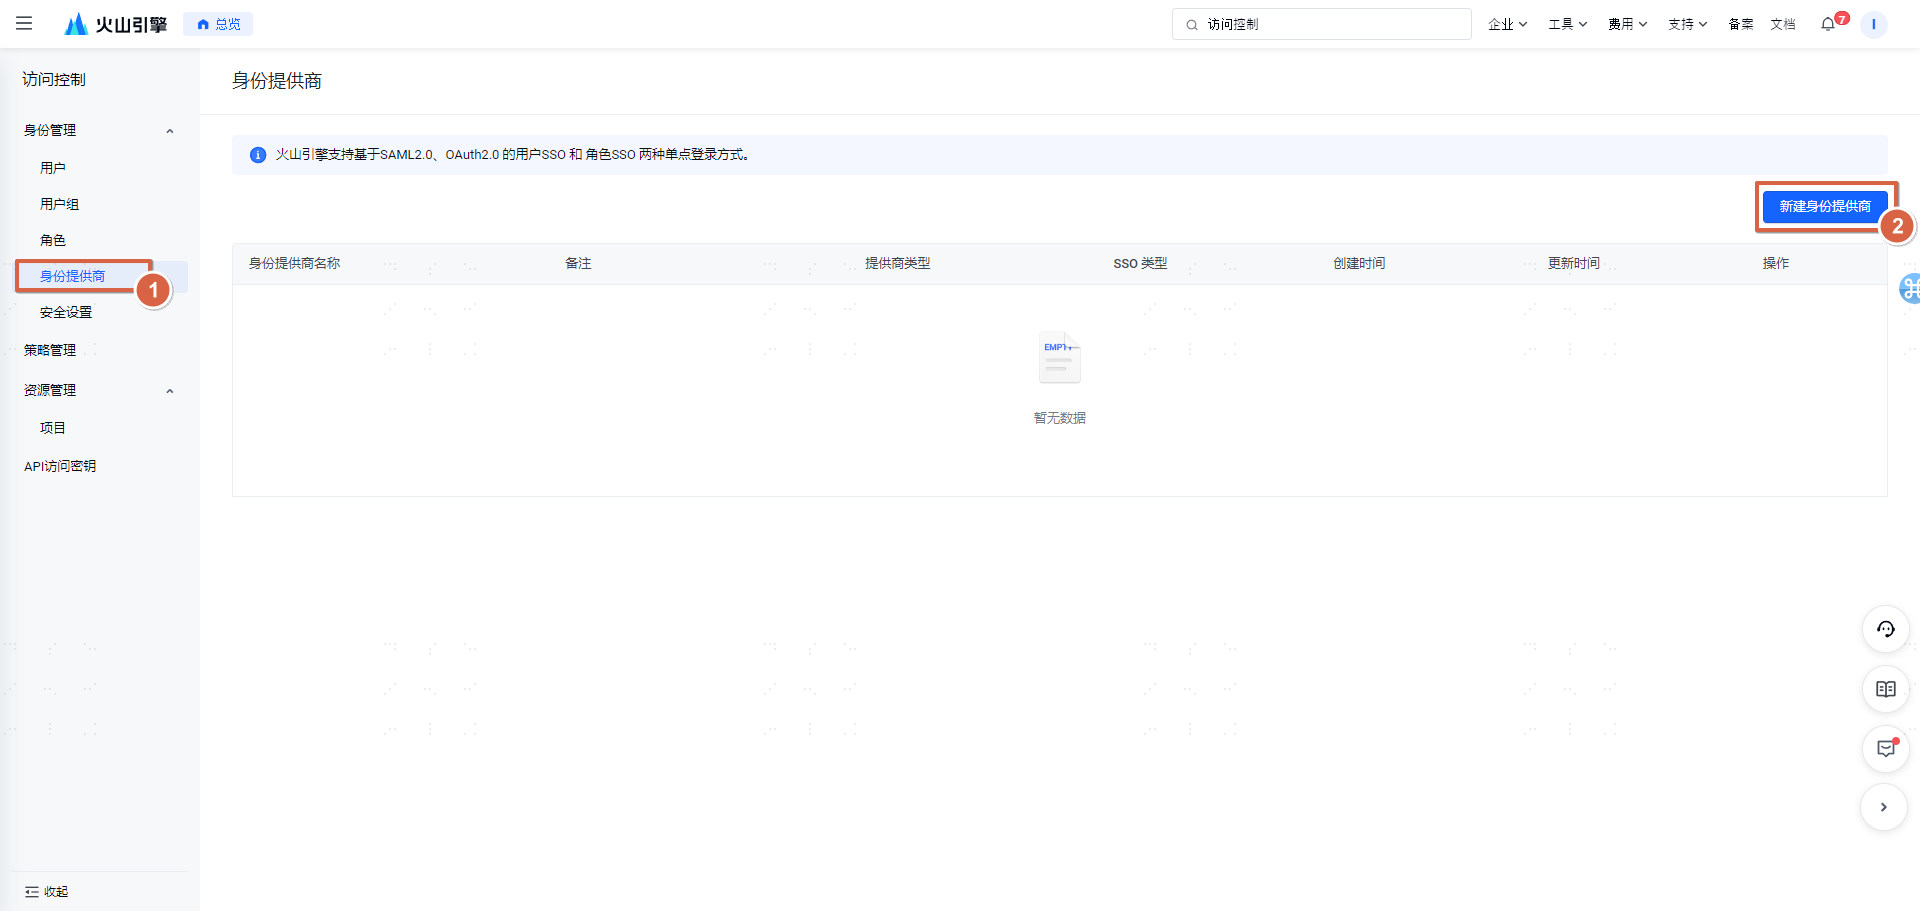
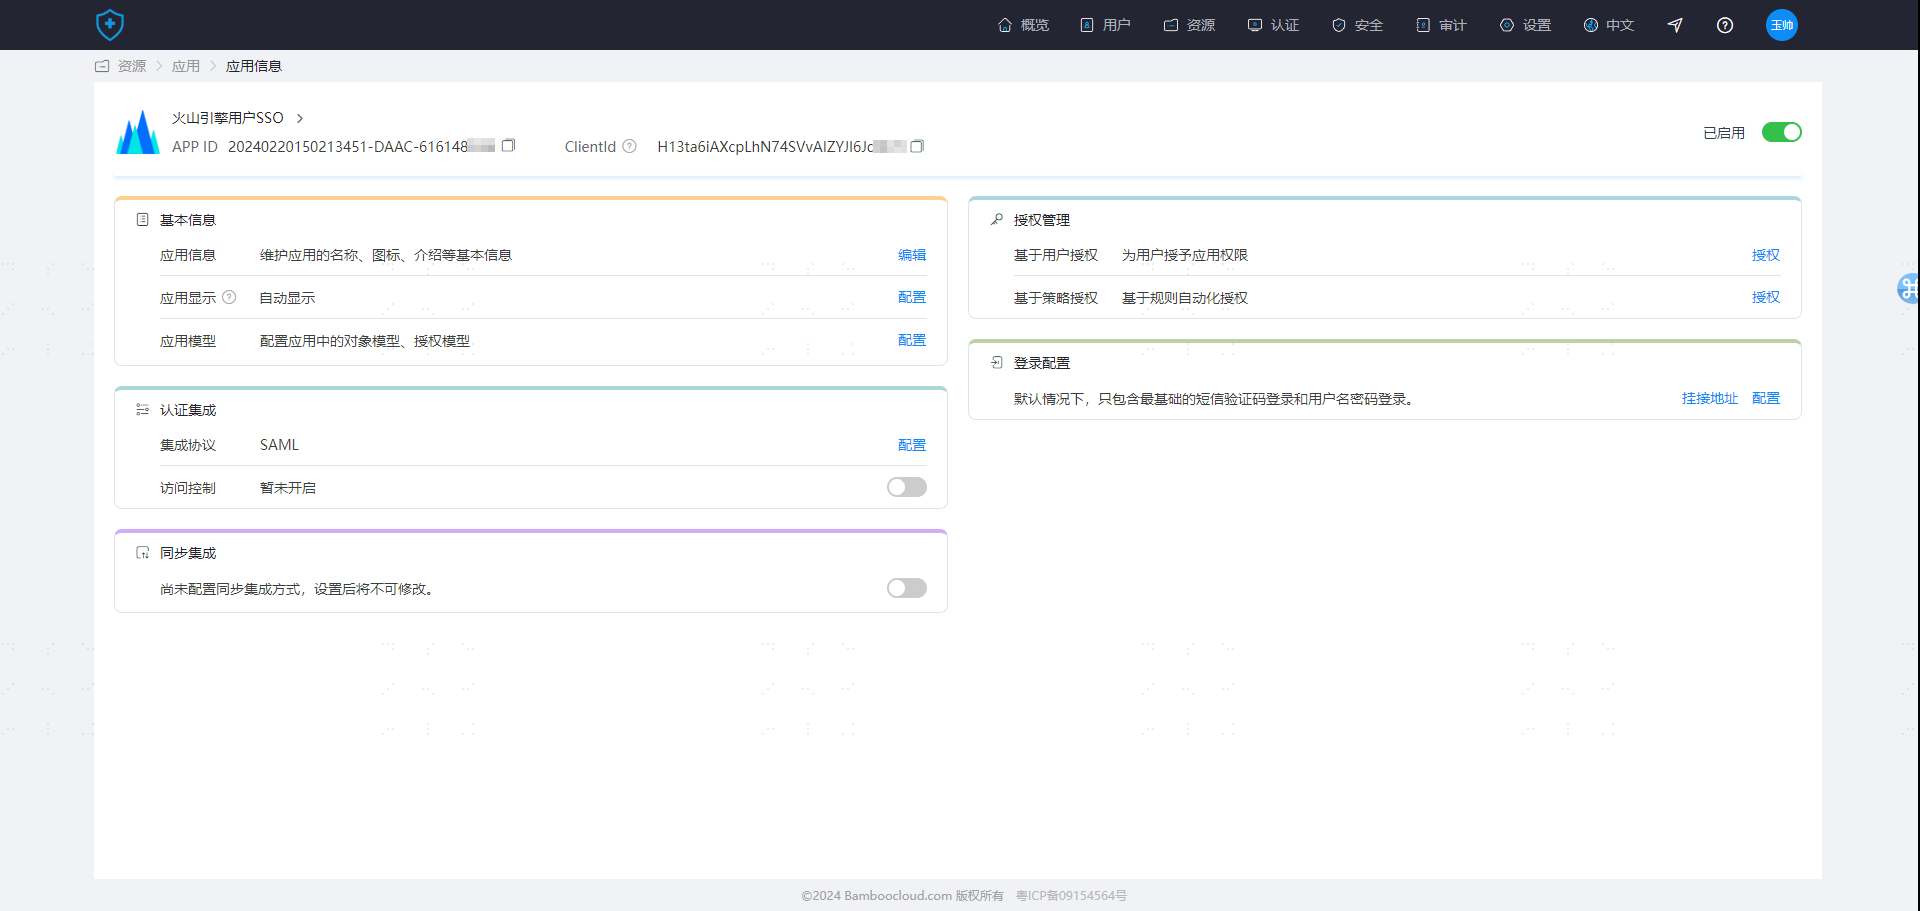
Step 1: Log in to BytePlus, enter the 【Access Control】 interface
Step 2: Create a new identity provider
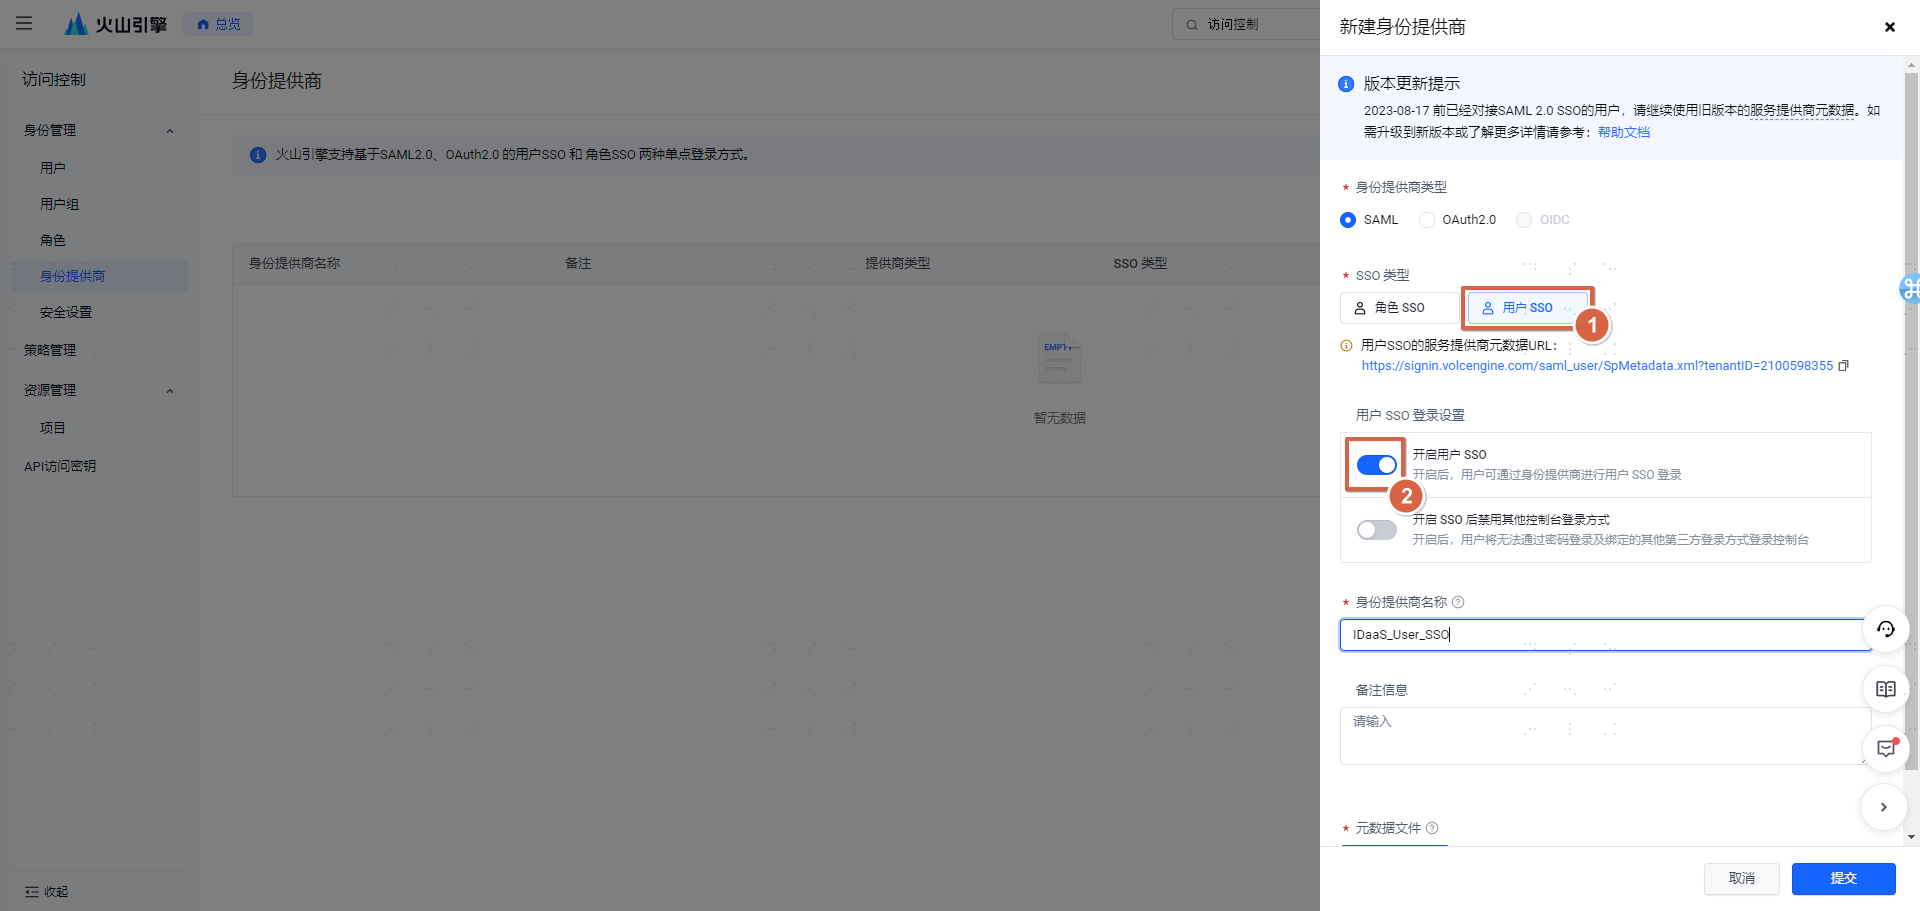
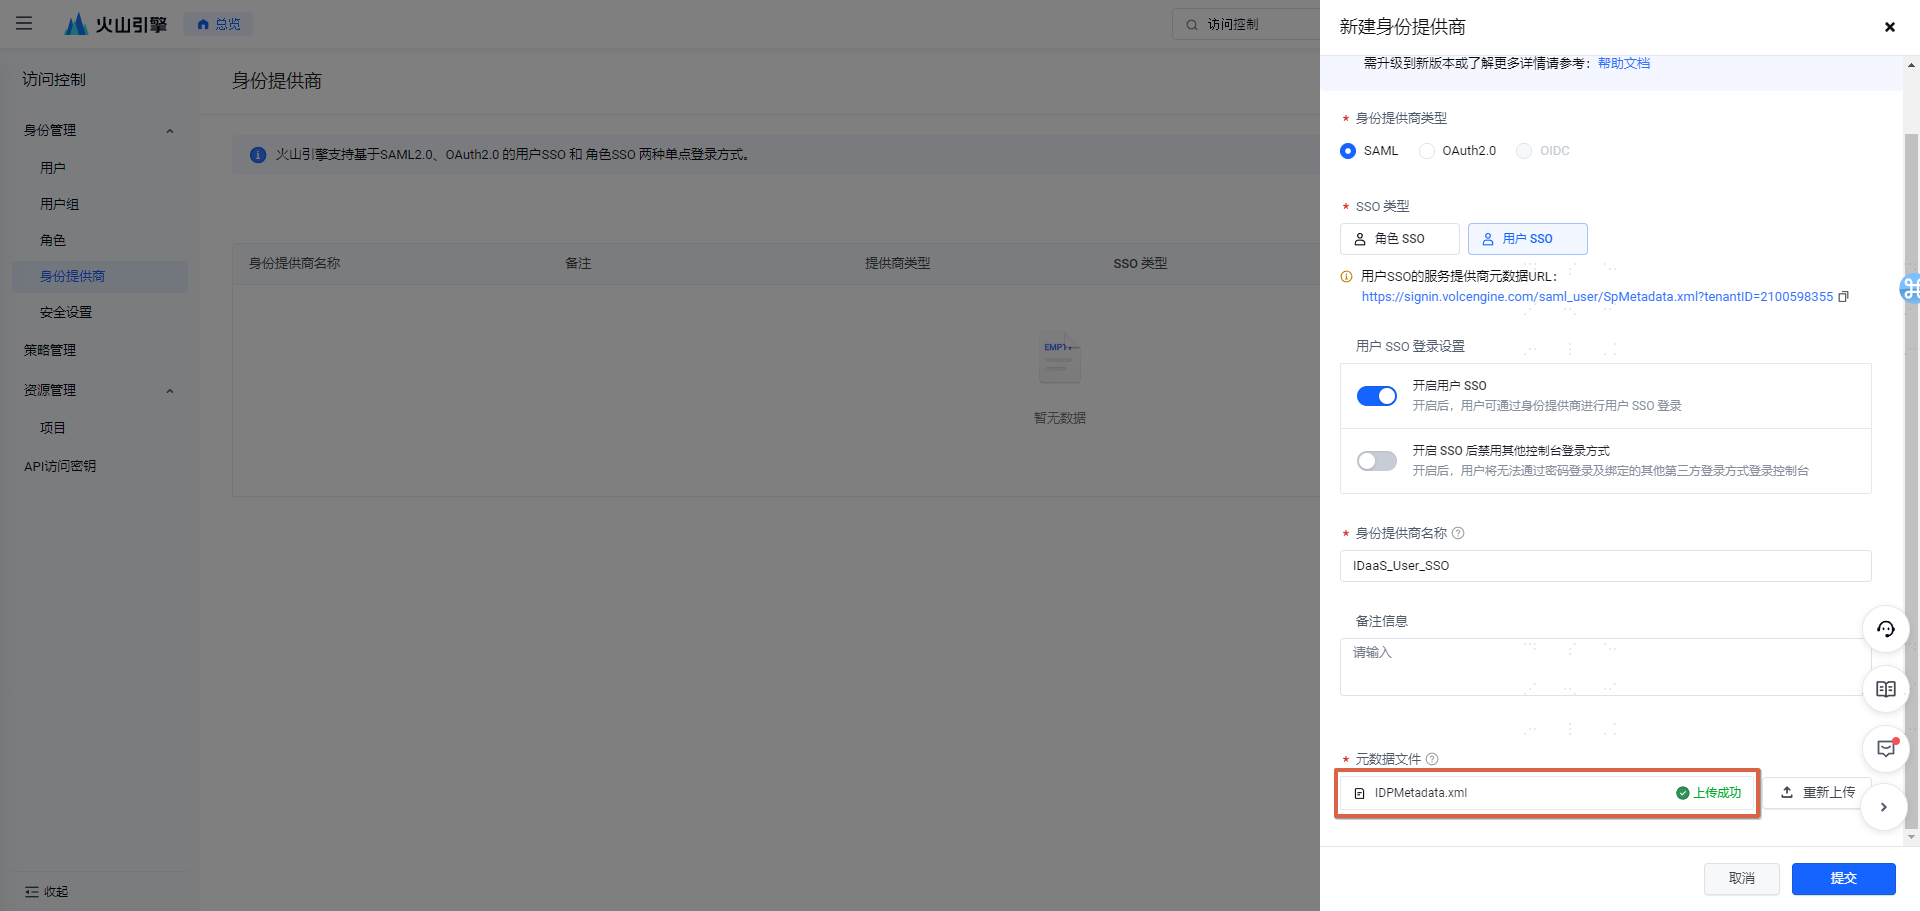
Identity Provider Name: 【IDaaS_User_SSO】
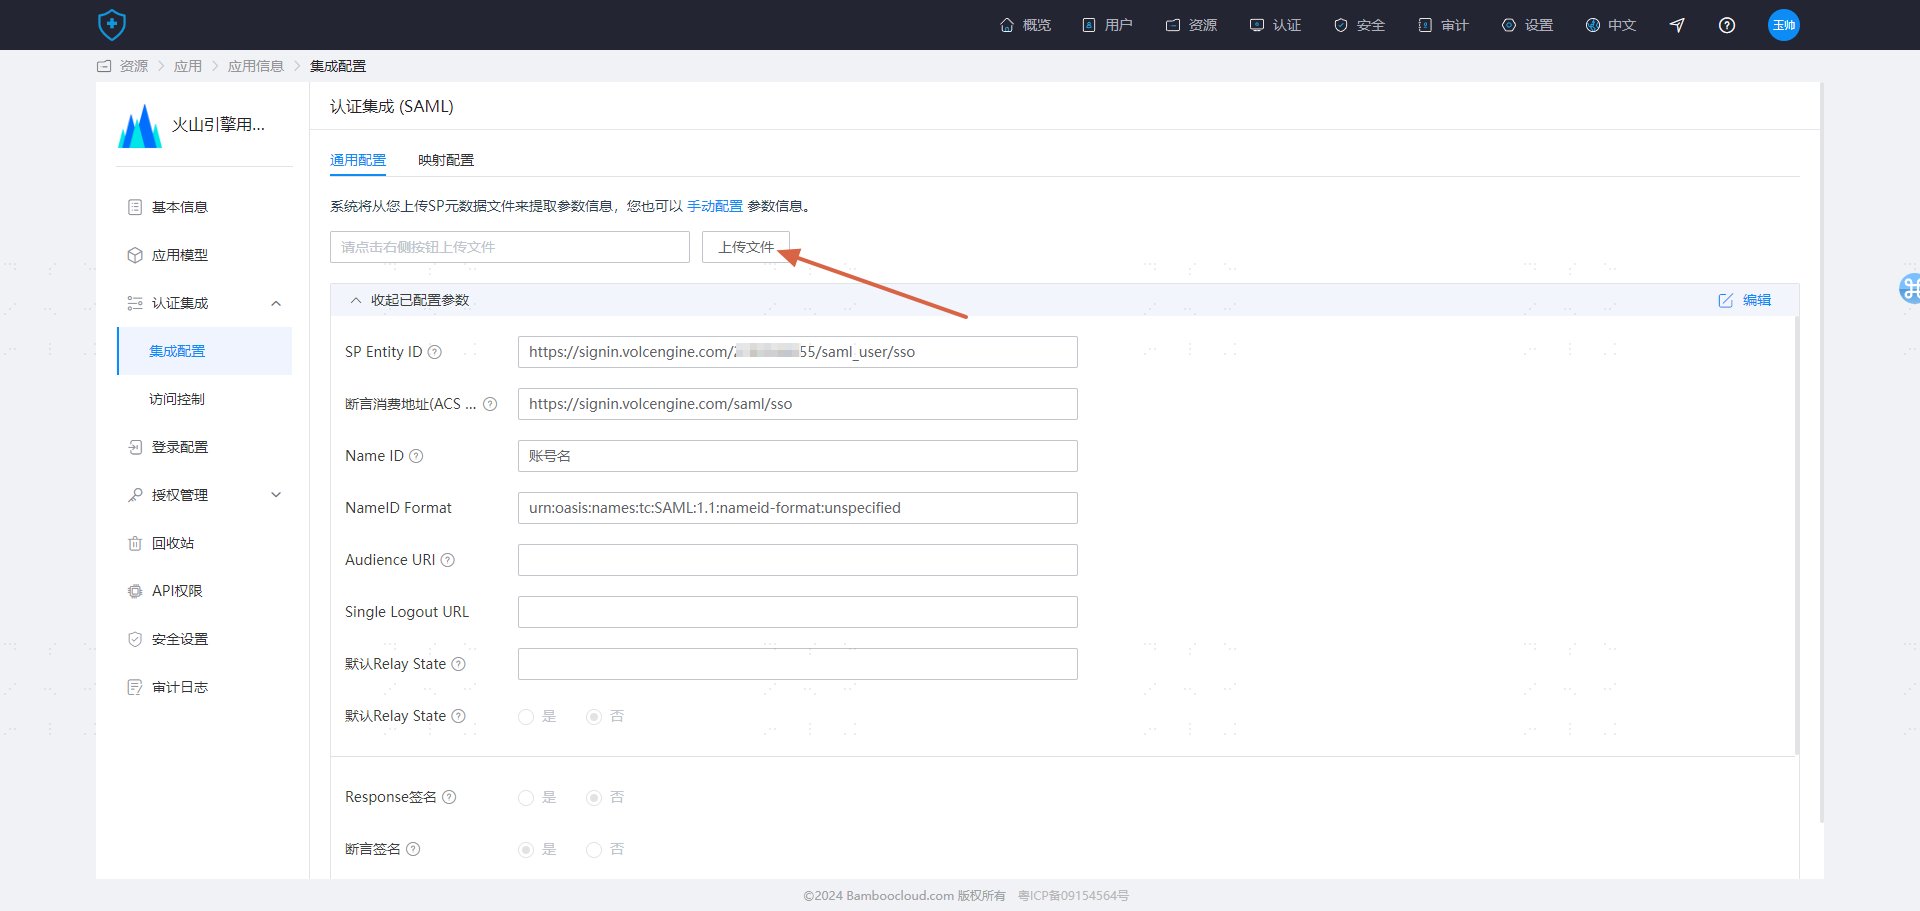
Upload the IDP metadata file (In the IDaaS Enterprise Center 【Settings】 -> 【Service Configuration】 -> 【IDP Configuration】, click download to obtain the IDP metadata file)
Step 3: Obtain the SP metadata file
 The above address can be opened directly in a browser. After opening, copy it to a text file and save it as: sp_usersso.xml
Step 4: Create a new pre-integrated application 【BytePlus User SSO】
Step 5: Upload sp_usersso.xml (Manually edit the NAME ID attribute and select 【Account Name】)
Integration configuration is complete.
# Testing and Verification
When BytePlus and Zhuyun IDaaS personnel perform single sign-on, they rely on the 【Username】 attribute field in the BytePlus personnel to match and log in with the Zhuyun user.
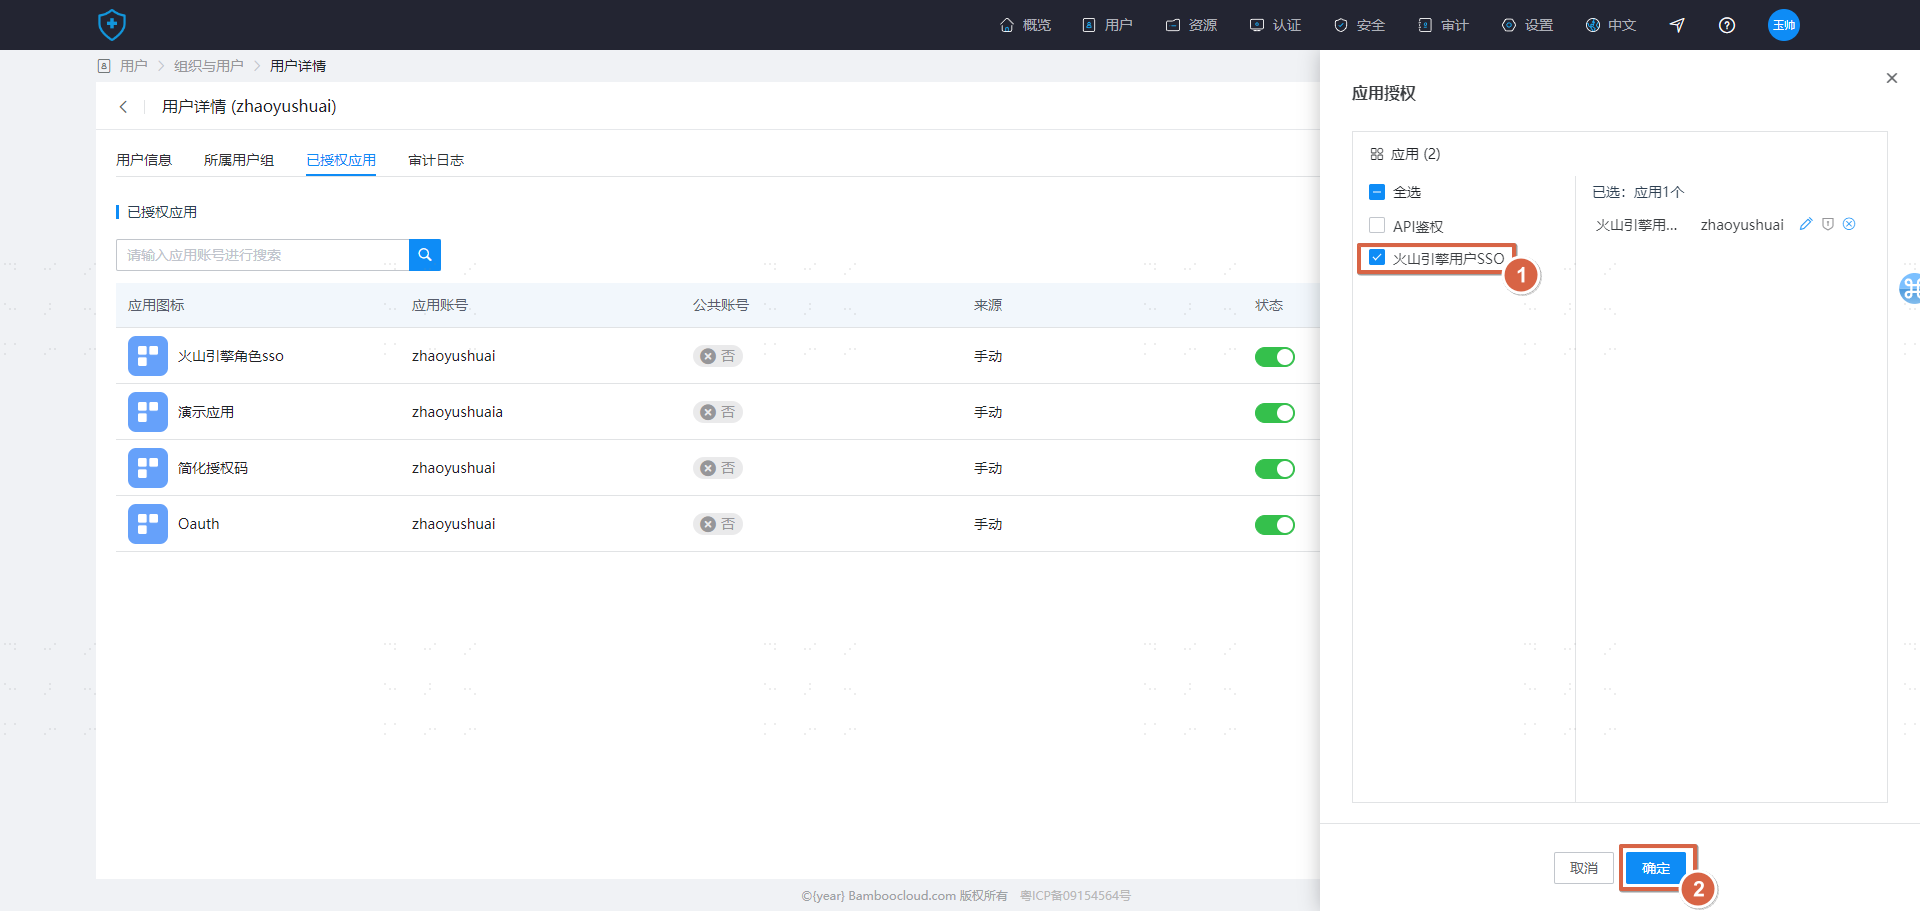
Create a user in IDaaS and assign it to the BytePlus application (ensure this user already exists in BytePlus)

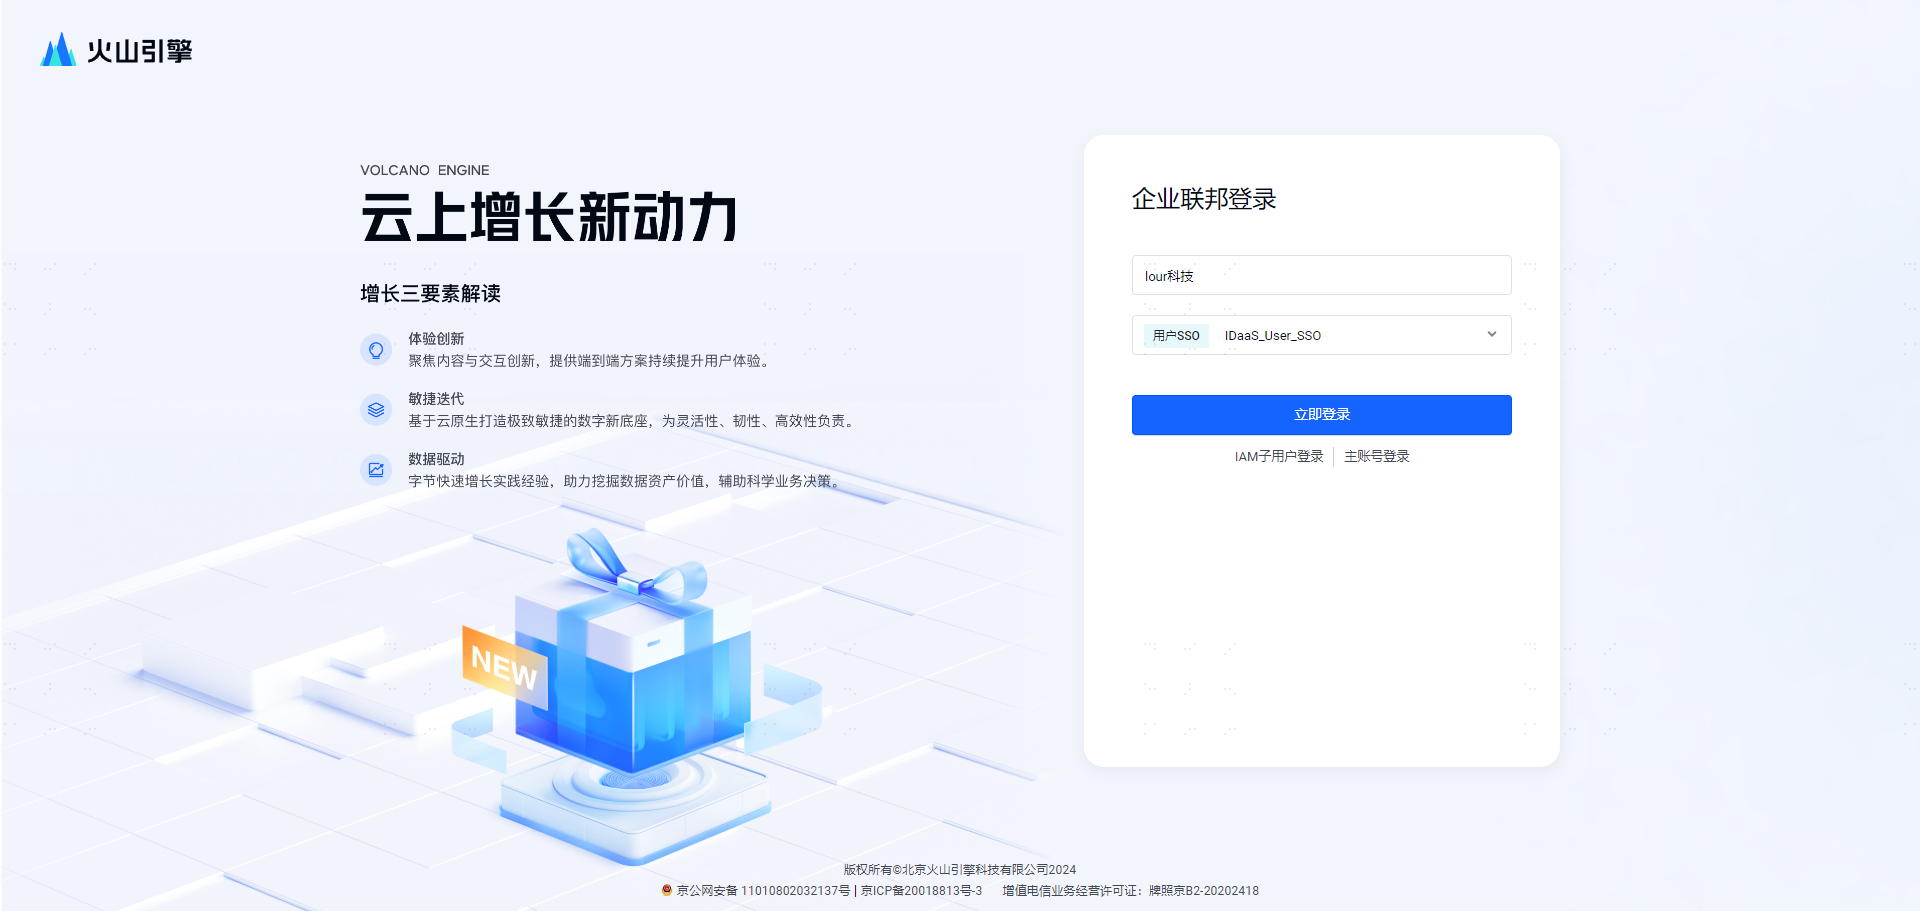
- Access from BytePlus login (SP-initiated)
On the BytePlus login page, select the "Enterprise Federation Login" method, enter the Account ID/Main Account Username, then select the corresponding identity provider IDaaS_User_SSO. You will be redirected to IDaaS for account and password login verification.
If the login identity in BytePlus matches the IDaaS user after login, it indicates successful configuration.
- Access from the IDaaS User Center (IdP-initiated)
After logging into the IDaaS User Center, click the card corresponding to BytePlus. Check the identity after logging into BytePlus. If it matches the IDaaS identity, it indicates successful configuration.
# Role SSO Integration Configuration Instructions
# Step Overview
- Log in to BytePlus as an administrator and create a new identity provider (type selection: Role SSO)
- Upload the IDP metadata file
- Log in to IDaaS as an administrator and create a new pre-integrated application 【BytePlus User SSO】
- Upload the SP metadata file and configure it
- Perform testing after authorization
# Detailed Integration Steps
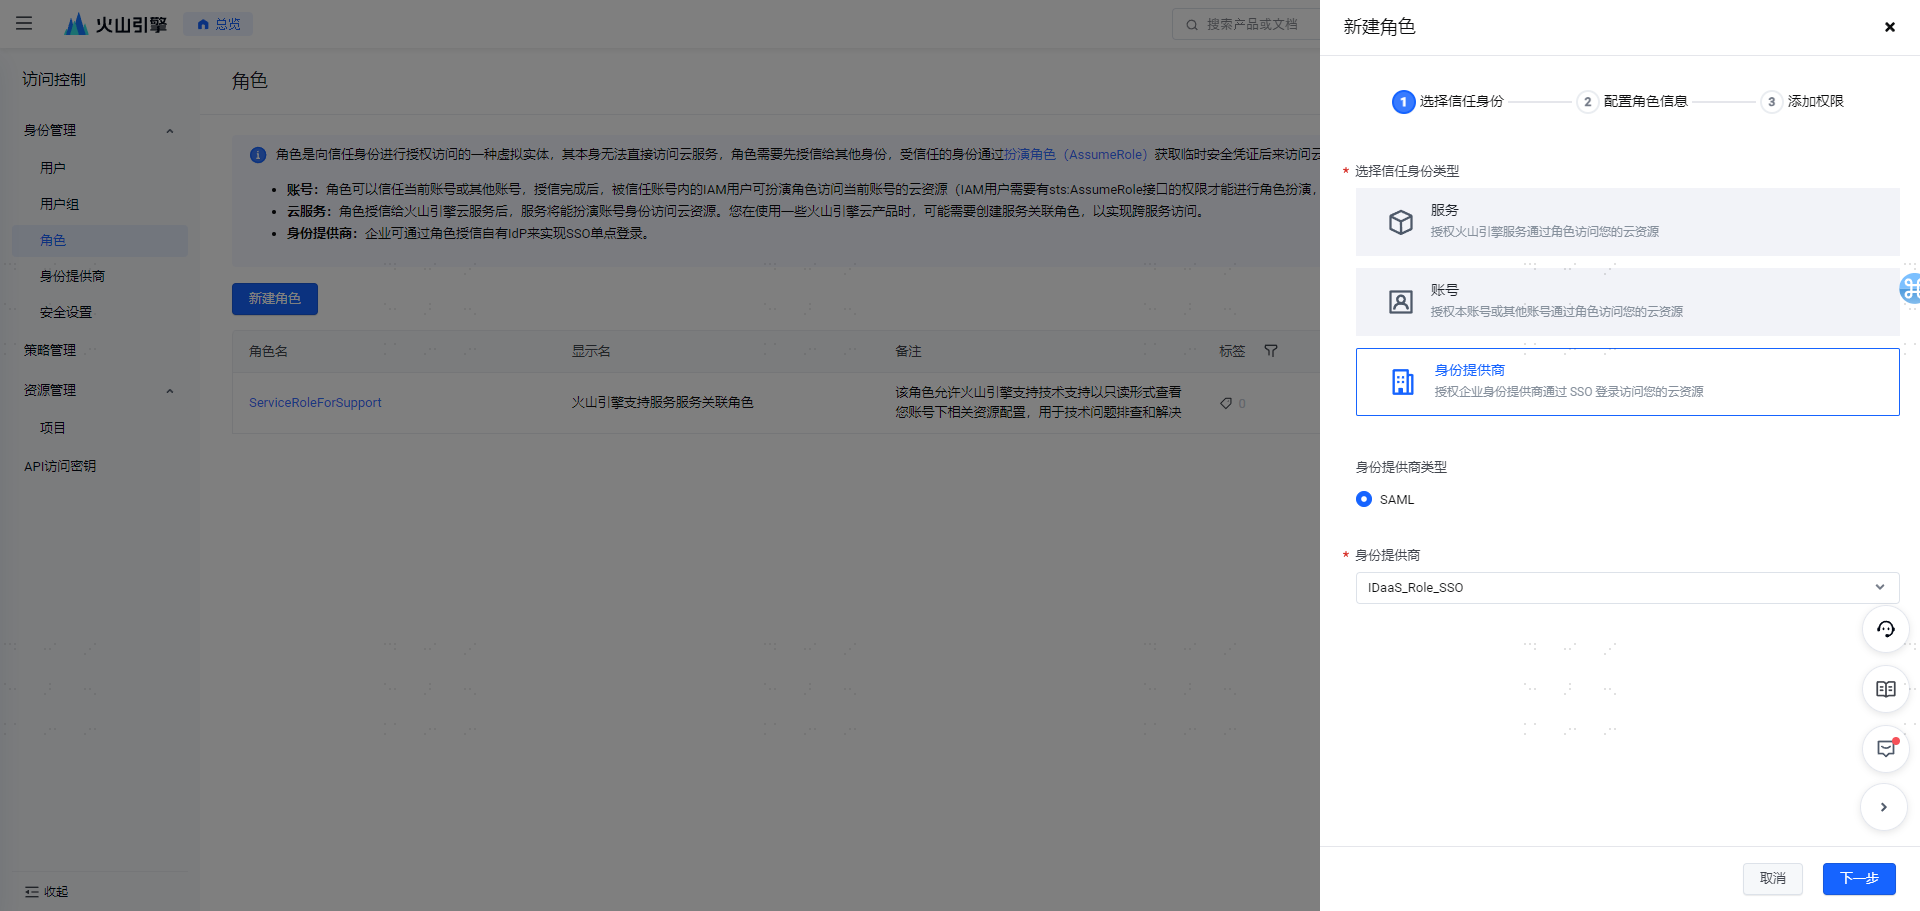
Step 1: Log in to Volcano Engine, navigate to 【Access Control】 -> 【Identity Provider】, and create a new identity provider of type Role SSO.
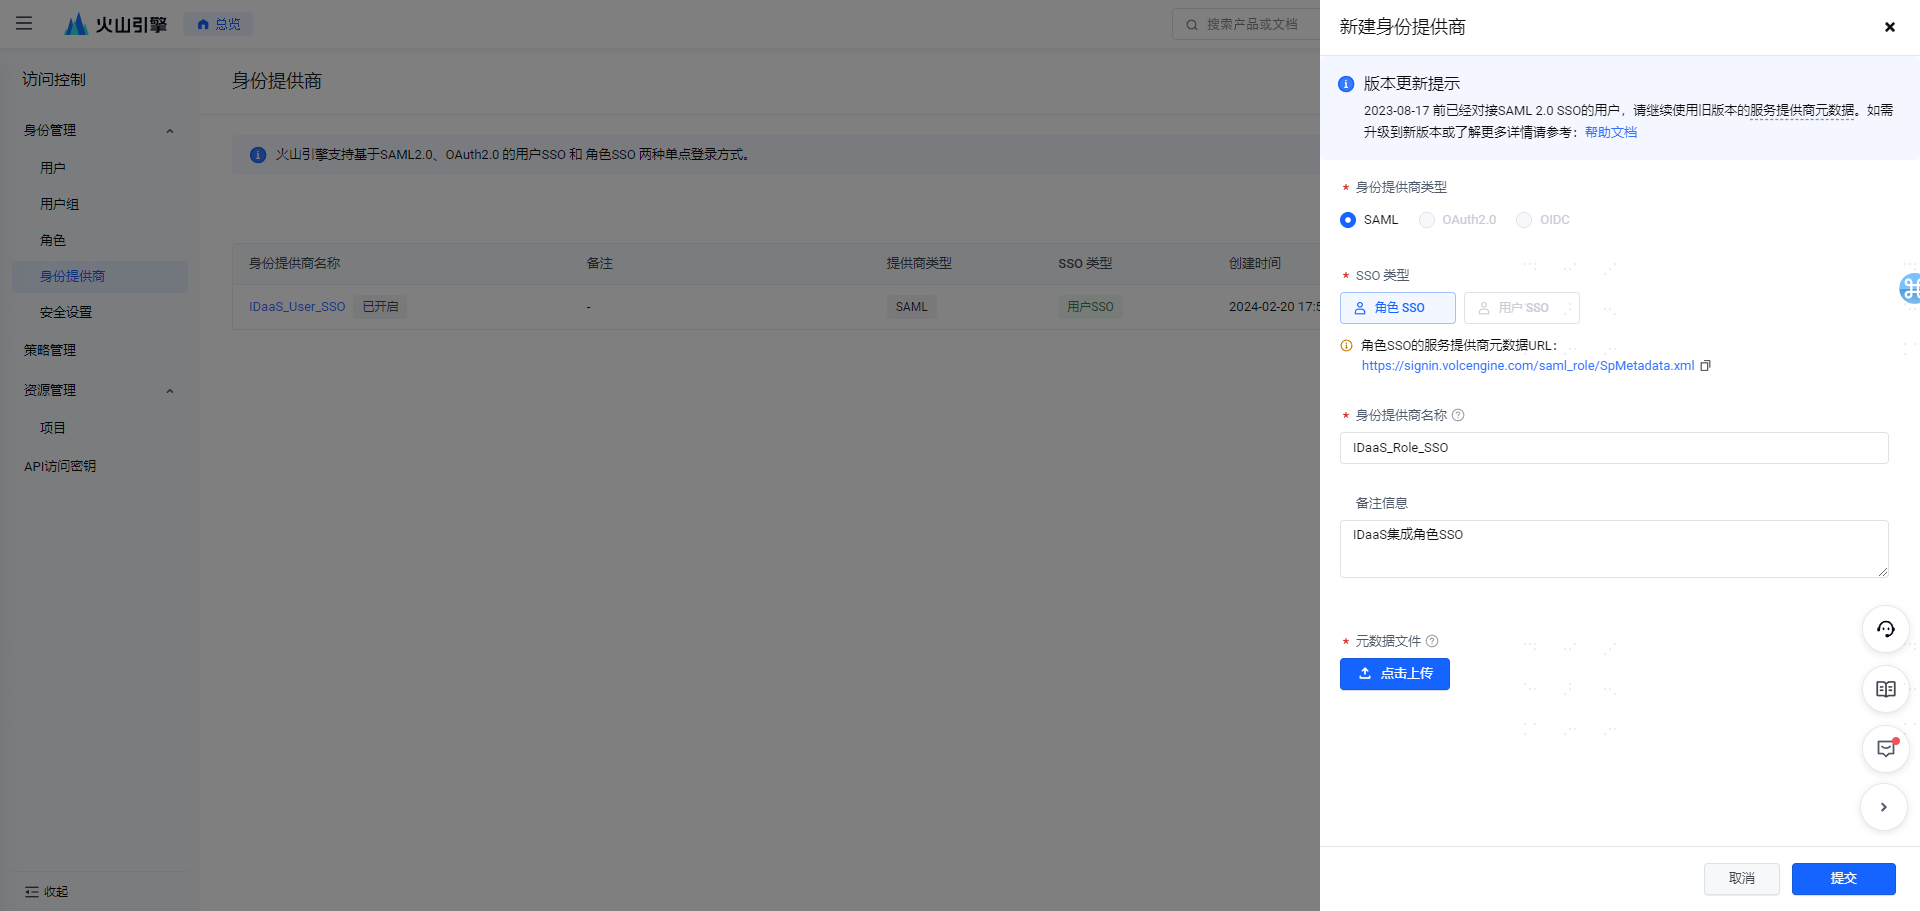
Step 2: Upload the IDP metadata file, and simultaneously save the SP metadata file sp_rolesso.xml (You can refer to Step Two and Step Three in User SSO).
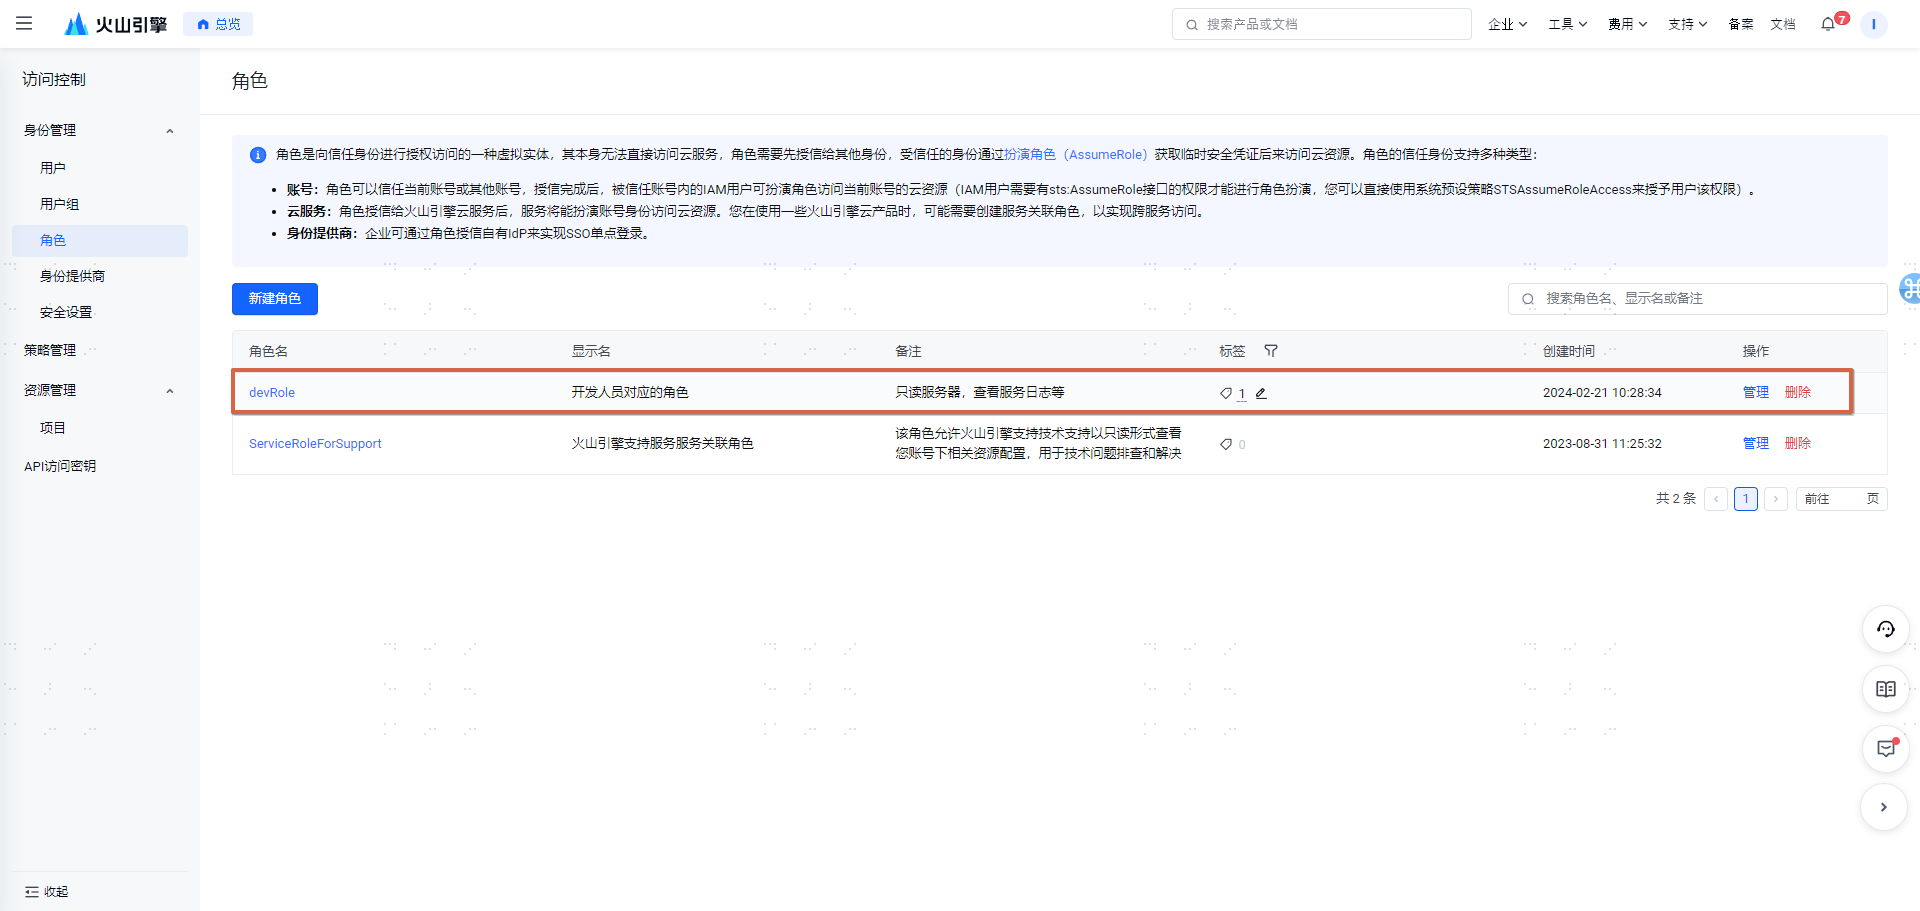
Step 3: Create a new role in Volcano Engine.
The permissions for the role can be customized. After creation, it will display as follows.
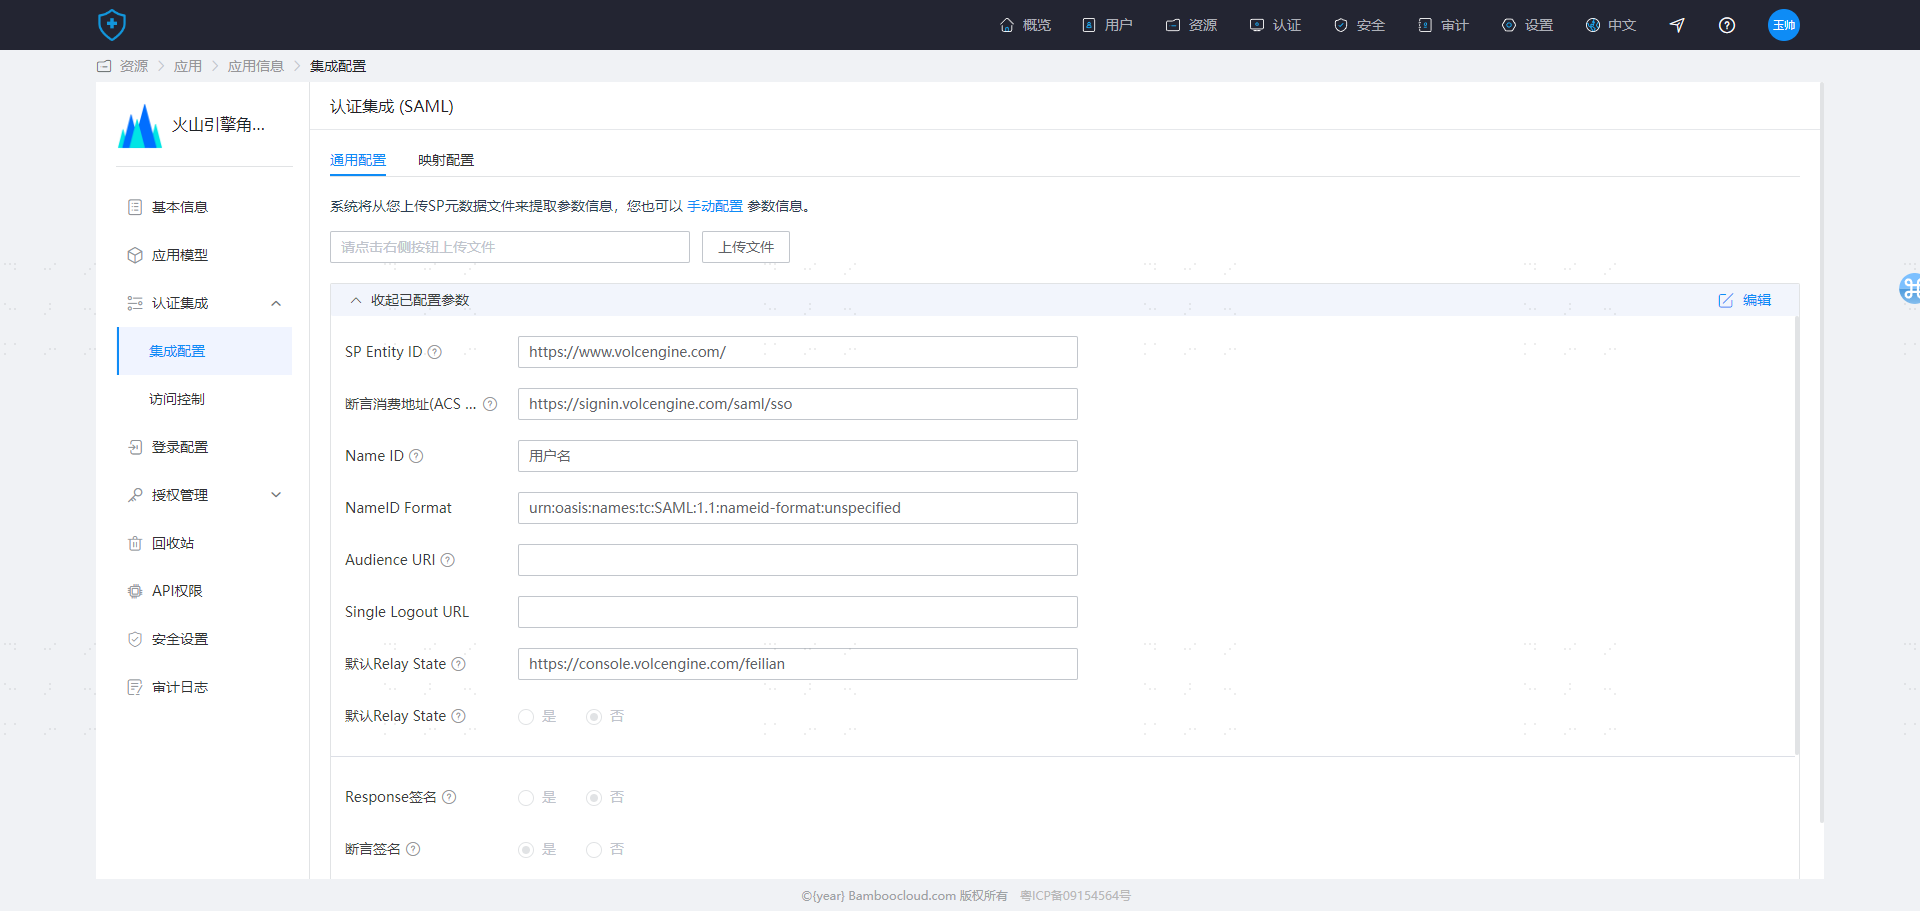
Step 4: Create a new pre-integrated application 【Volcano Engine Role SSO】, and upload the configuration sp_rolesso.xml.
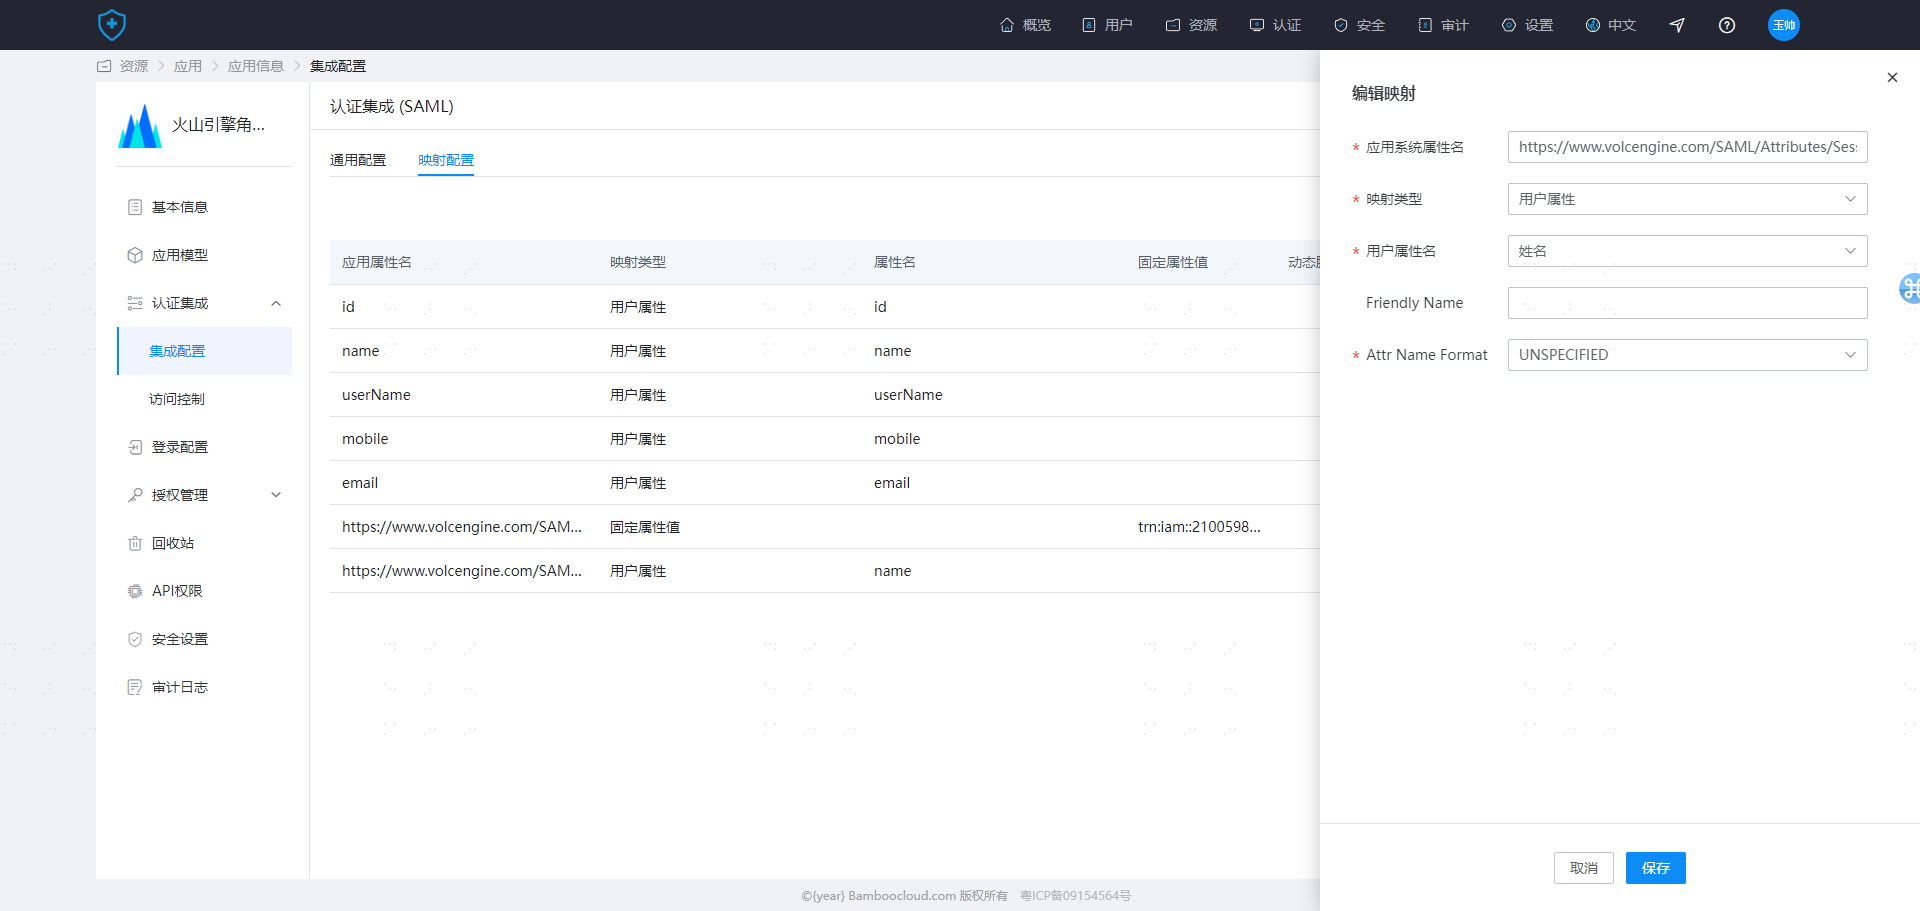
Step 4: Modify the 【Mapping Configuration】.
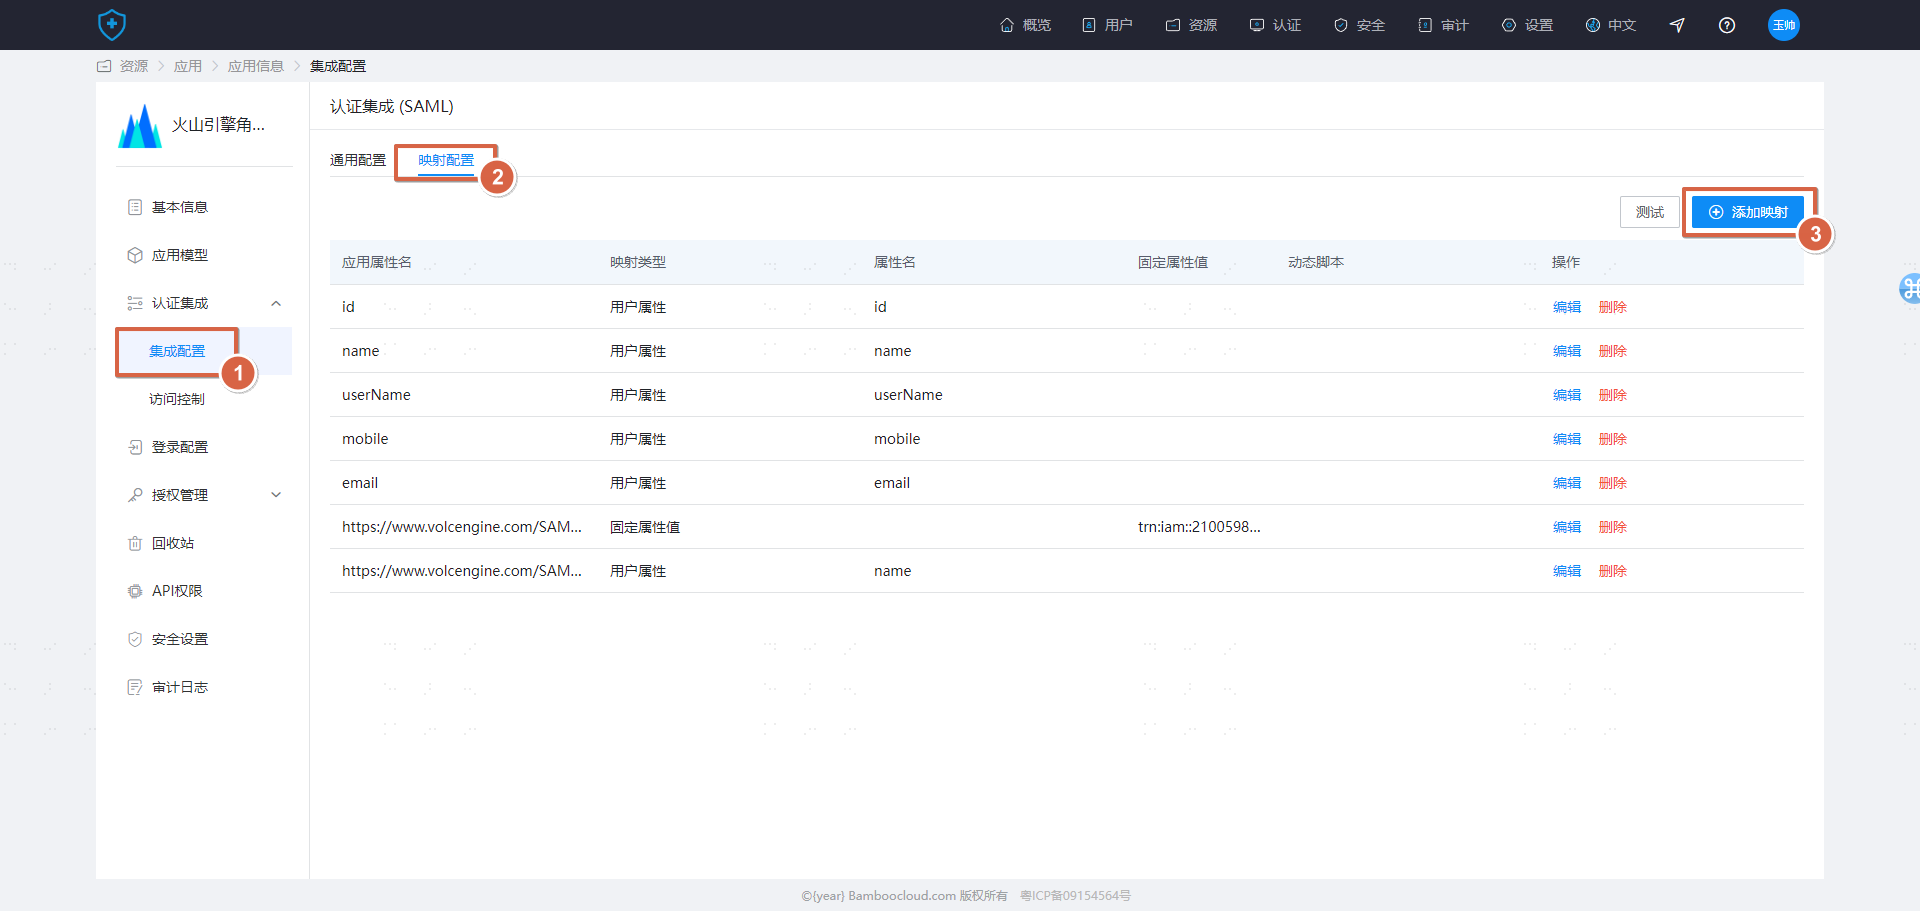
Add the following two configurations.
| Application System Attribute Name | Mapping Type | Fixed Attribute Value | Attr Name Format |
|---|---|---|---|
| https://www.volcengine.com/SAML/Attributes/Identity | Fixed Attribute Value | trn:iam::210059xxxxx:role/devRole,trn:iam::210059xxxxx:saml-provider/IDaaS_Role_sso (Enterprise needs to customize and modify) | UNSPECIFIED |
| https://www.volcengine.com/SAML/Attributes/SessionName | User Attribute | Name | UNSPECIFIED |
Attribute Description (For more details, refer to the official Volcano Engine documentation: https://www.volcengine.com/docs/6257/1130112)
https://www.volcengine.com/SAML/Attributes/Identity The value of this attribute is used to declare the information of the IAM role used for SSO login. It must contain at least one attribute value and can contain multiple attribute values, meaning one enterprise user can be mapped to multiple roles. If there are multiple, they will be listed on the login page for selection. The value is the Role Trn (which can be obtained from the role details page). Format: trn:iam:: ${AccountID}:role/${RoleName},trn:iam:: ${AccountID}:saml-provider/ ${SAMLProviderName}. Where AccountID is your Volcano Engine account ID, RoleName is the IAM role name, and SAMLProviderName is the identity provider name. Example: trn:iam::210059xxxxx:role/devRole,trn:iam::210059xxxxx:saml-provider/IDaaS_Role_sso
https://www.volcengine.com/SAML/Attributes/SessionName The value of this attribute is used to specify the session name. It must contain one attribute value, which can be customized and is used for post-login name display and auditing.

# Testing and Verification
Create a user in IDaaS and assign them to the Volcano Engine application.
- Access login from Volcano Engine (SP Initiated)
On the login page of Volcengine, select the "Enterprise Federated Login" method, enter the Account ID/Main Account Username, then choose the corresponding identity provider IDaaS_Role_SSO. You will be redirected to IDaaS to proceed with account/password login for verification.
 If, after login, a role login is displayed, it indicates successful configuration.
- Accessing from the IDaaS User Center (IDP Initiated)
After logging into the IDaaS User Center, click on the card corresponding to Volcengine. Check the identity after logging into Volcengine; if a role login is displayed, it indicates successful configuration.