AWS China Region ALB
# Description
This document describes how the AWS China Region ALB product integrates with Zhuyun IDaaS through the OIDC standard protocol to delegate user identity verification to Zhuyun. By leveraging the ALB product, you can offload the task of verifying user identities to the ALB load balancer, allowing your applications to focus on their business logic.
# Terminology
ALB: Application Load Balancer
Zhuyun IDaaS: A cloud-native identity cloud service platform that provides unified identity authentication, single sign-on, and full lifecycle user management. Hereinafter referred to as IDaaS or the platform.
# Authentication Flow
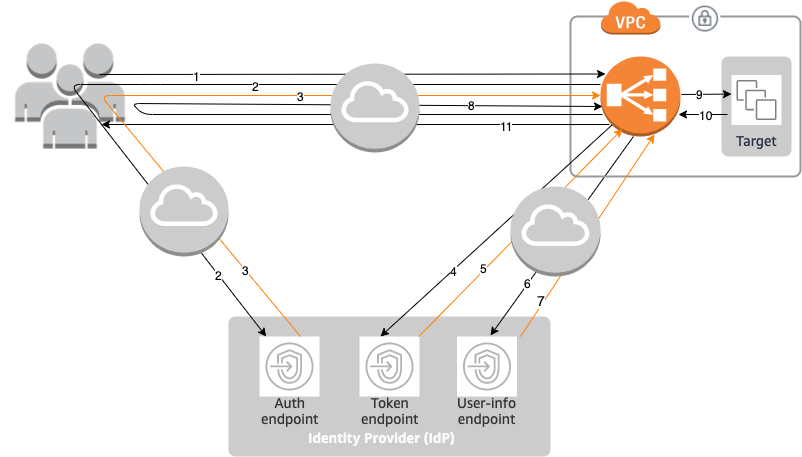
Flow Description
- A user sends an HTTPS request to a website hosted behind an Application Load Balancer. When the conditions of a rule with an authentication action are met, the load balancer checks for an authentication session cookie in the request headers.
- If the cookie is not present, the load balancer redirects the user to the IdP's authorization endpoint so the IdP can authenticate the user.
- After authenticating the user, the IdP sends the user back to the load balancer with an authorization code.
- The load balancer sends this authorization code to the IdP's token endpoint.
- Upon receiving a valid authorization code, the IdP provides an ID token and an access token to the Application Load Balancer.
- The Application Load Balancer then sends the access token to the user info endpoint.
- The user info endpoint exchanges the access token for user claims.
- The Application Load Balancer redirects the user to the original URI with an
AWSELBauthentication session cookie. Since most browsers limit cookies to 4KB in size, the load balancer fragments cookies exceeding 4KB into multiple cookies. If the total size of user claims and the access token received from the IdP exceeds 11KB, the load balancer returns an HTTP 500 error to the client and increments theELBAuthUserClaimsSizeExceededmetric. - The Application Load Balancer validates the cookie and forwards the user information to the target in the
X-AMZN-OIDC-*HTTP header settings. For more information, please refer to User Claims Encoding and Signature Verification (opens new window). - The target sends a response back to the Application Load Balancer.
- The Application Load Balancer sends the final response to the user.
Each new request goes through steps 1 to 11, while subsequent requests go through steps 9 to 11. That is, as long as the cookie has not expired, each subsequent request starts from step 9.
After the user is authenticated at the IdP, an AWSALBAuthNonce cookie is added to the request headers. This does not change how the Application Load Balancer handles redirect requests from the IdP.
If the IdP provides a valid refresh token in the ID token, the load balancer saves the refresh token and uses it to refresh user claims when the access token expires, until the session times out or the IdP refresh fails. If the user logs out, the refresh will fail and the load balancer will redirect the user to the IdP's authorization endpoint. This allows the load balancer to delete the session after the user logs out.
# AWS ALB Configuration
Log in to the AWS China Region console using an administrator account. Search for EC2, then click to enter the EC2 console. In the left-hand menu tree, find "Load Balancing".
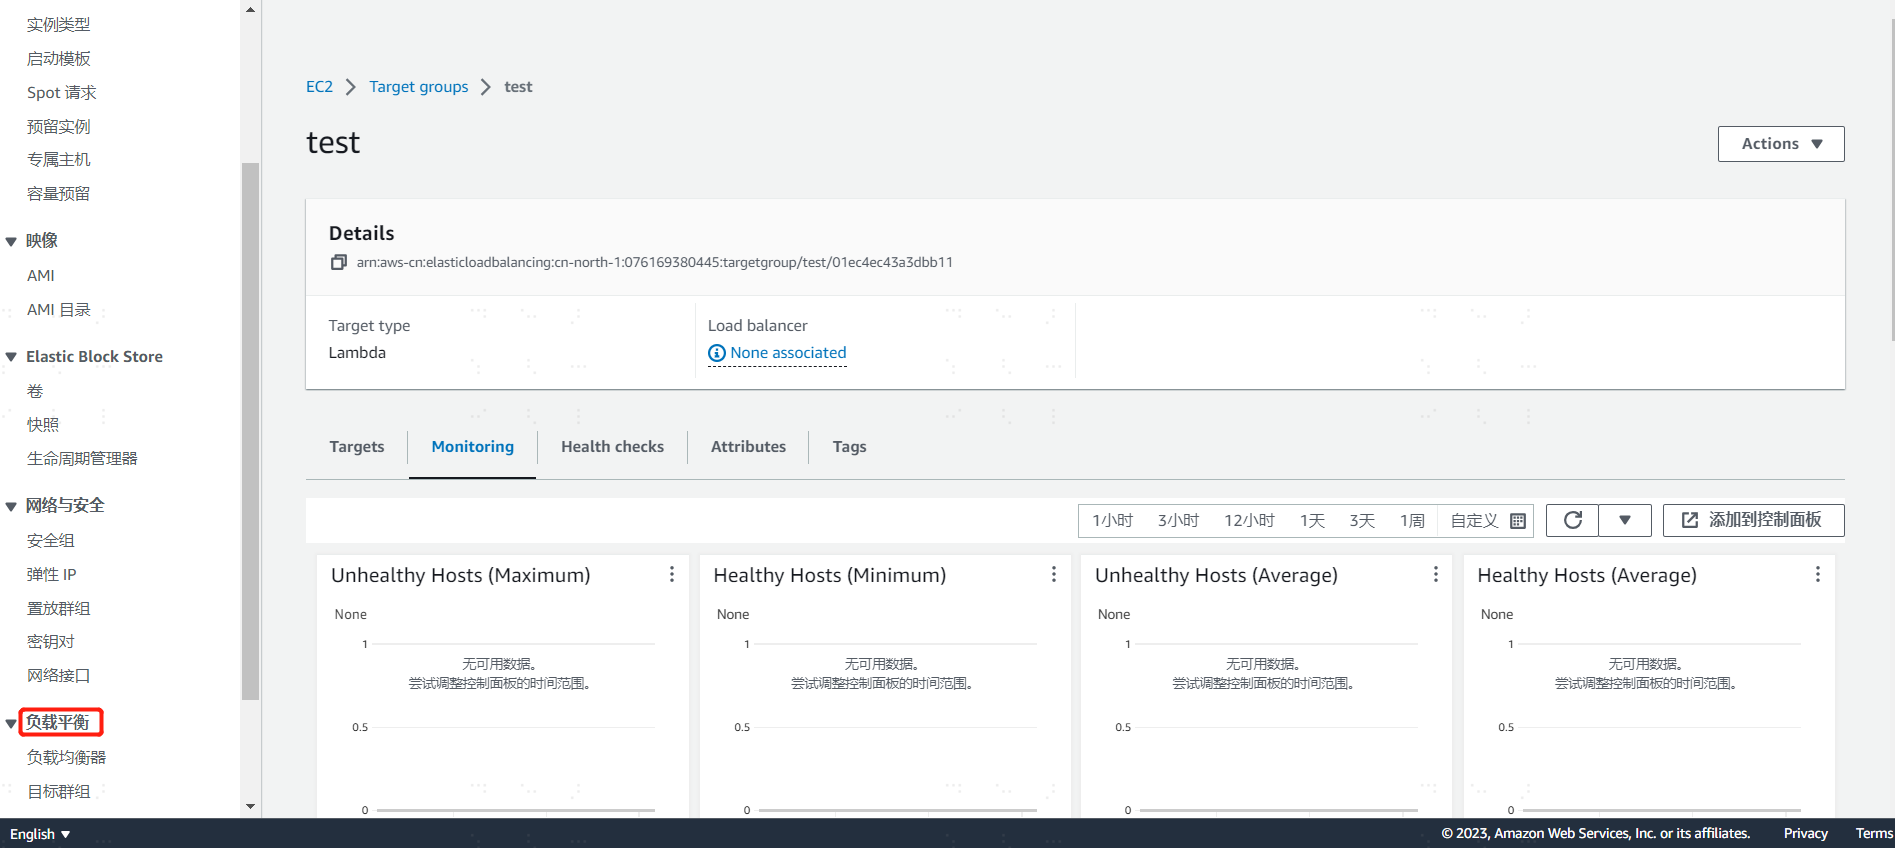
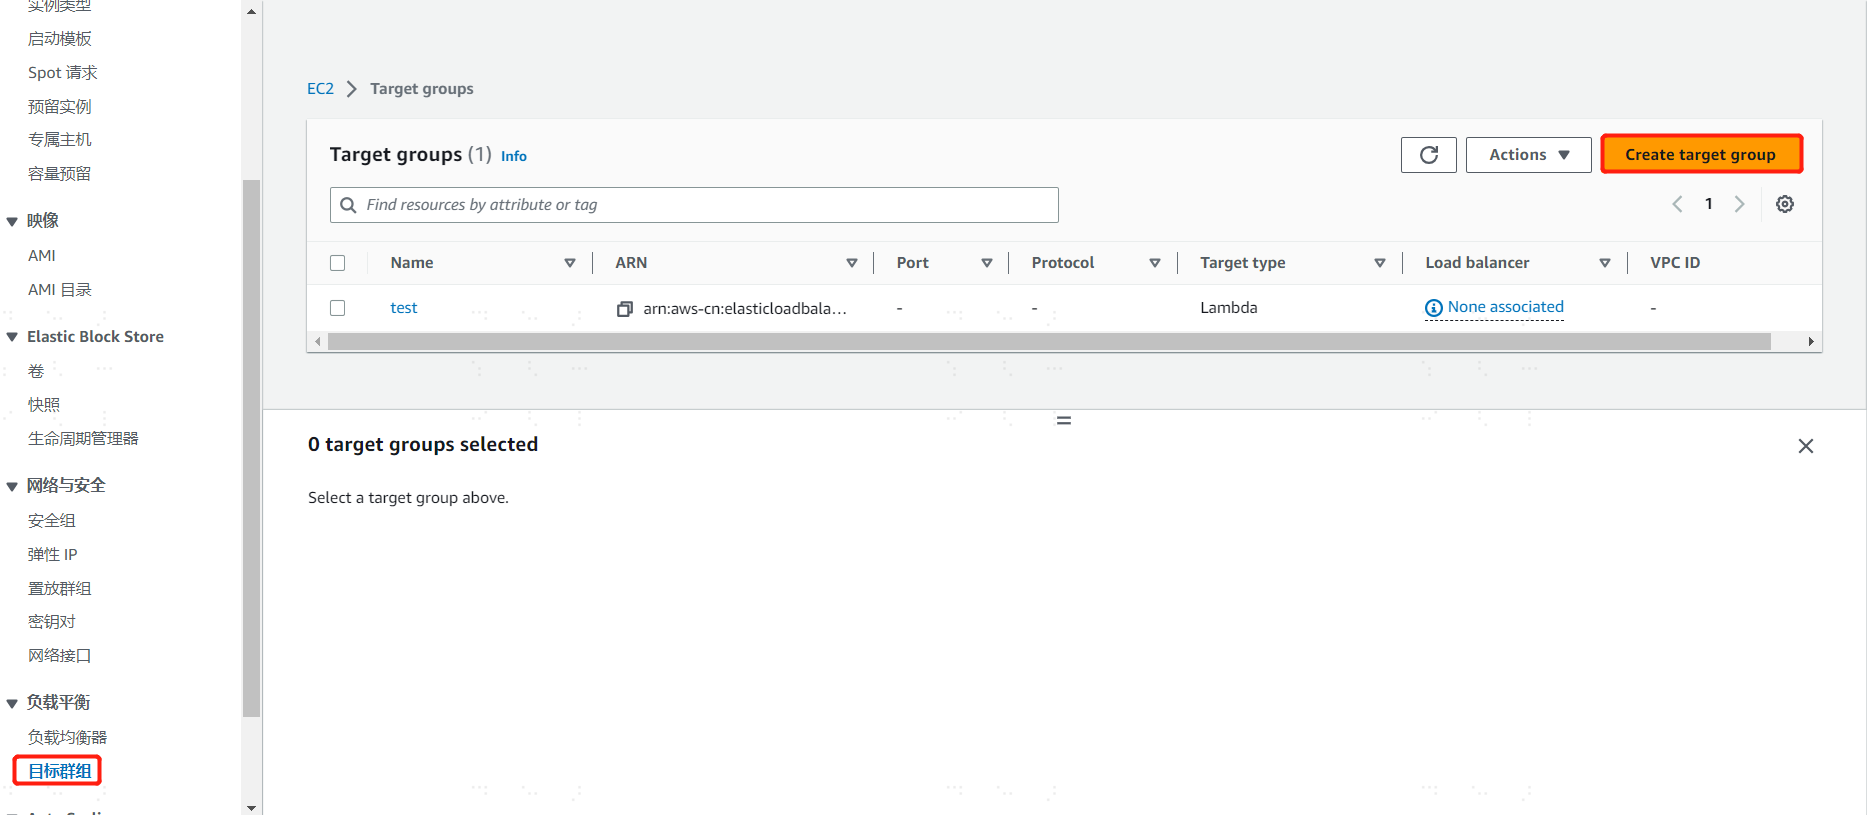
# Create a Target Group
Since creating a listener for the load balancer requires selecting a target group, you need to create a group in advance. Click on the menu Load Balancing -> Target Groups. In the workspace, select "Create target Group". Choose according to your business requirements and click save.
# Create a Load Balancer
Click on the menu Load Balancing -> Load Balancers. In the workspace dropdown menu, select "Create Application Load Balancer" and click to enter the detailed page for creating an ALB.
Basic configuration
Load balancer name: Enter the ALB name, such as test-alb
Scheme: Select Internet-facing
IP address type: Select IPv4
Network mapping
vpn: Select the default value
Mapping: Note that AWS requires selecting at least 2 Availability Zones
Security groups
Security groups: Select the default group
Listeners and routing
Protocol: Select https
Port: Select port 443
Default action: Select the "target group" created above
Secure listener settings
Security policy: Select the default value; the default is the AWS recommended policy
Default SSL/TLS certificate: Because the https protocol is selected, a certificate must be uploaded to the ALB. After preparing the certificate, use AWS's certificate import function, enter the certificate body, certificate private key, and certificate chain, then import.
After checking that the above configuration information is correct, finally click "Create load balancer" to save.
Note: The configurations filled in above should be based on the actual business system situation.
# Edit the Listener
On the load balancer's homepage, find the newly created load balancer record, click on this load balancer to enter the details page. In the "Listeners and rules" area, select the default created "HTTPS:443", click the "Manage listener" dropdown menu to edit.
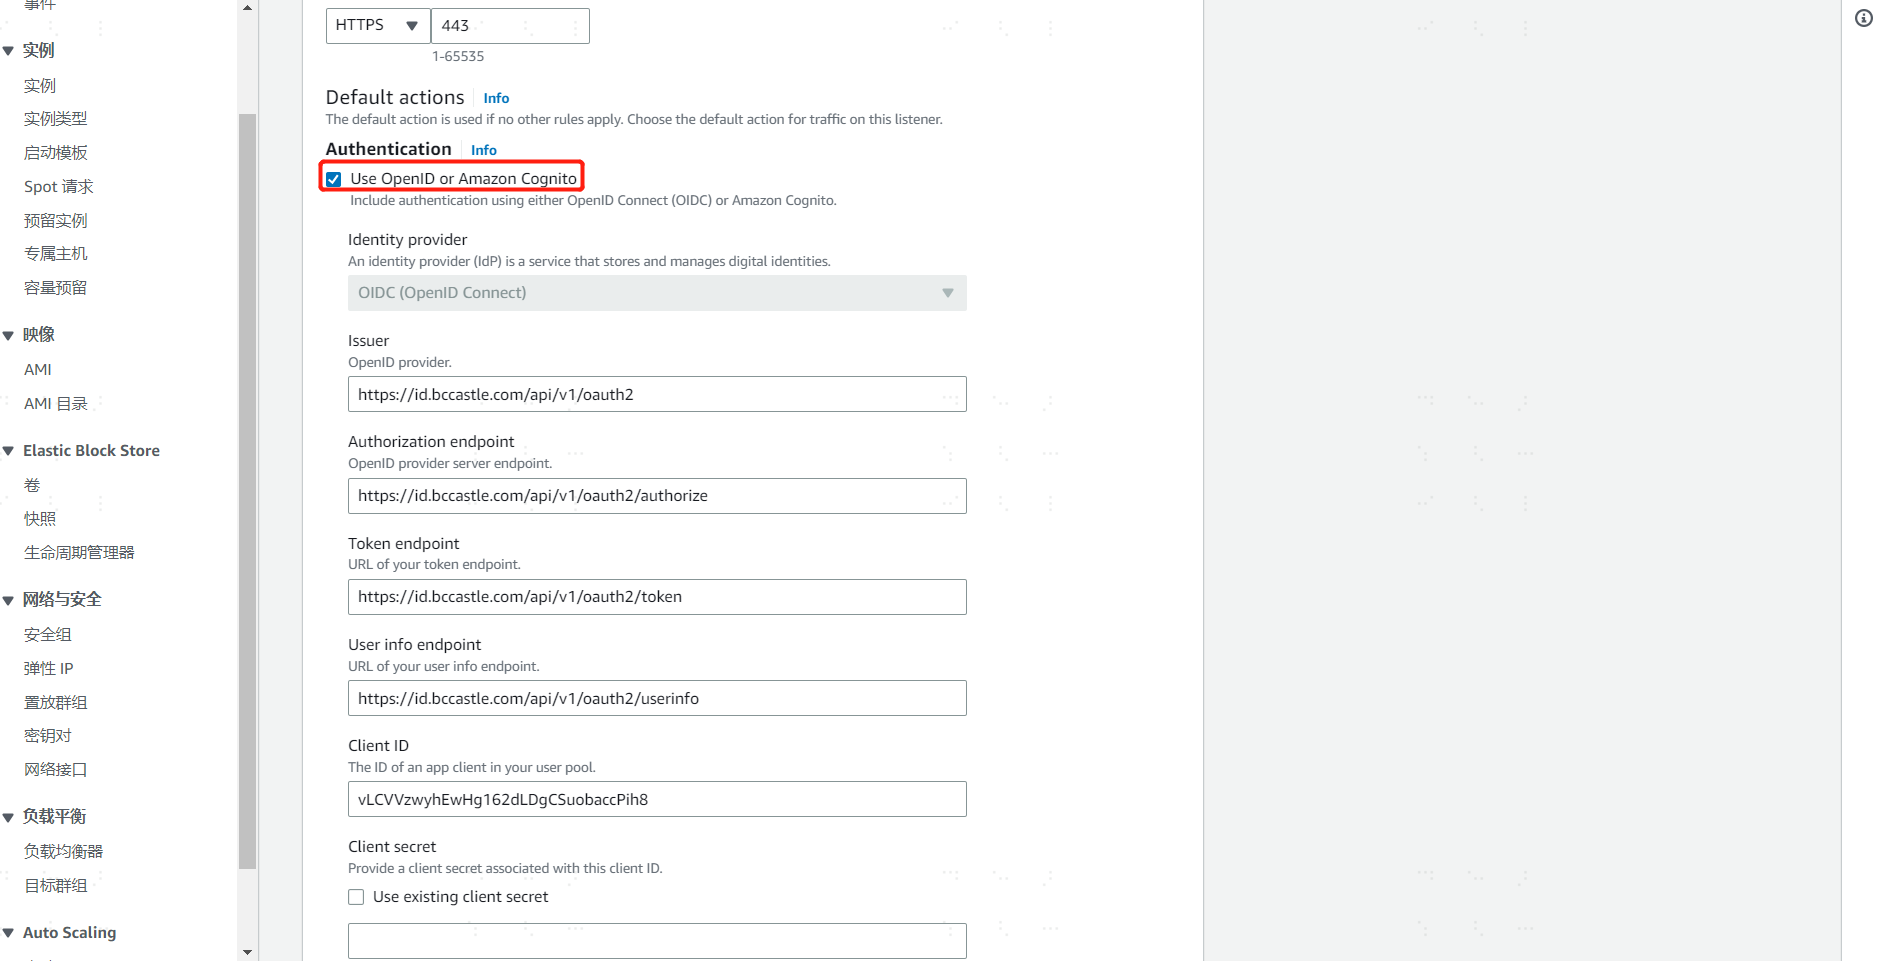
Authentication
Click to enable "Use OpenID or Amazon Cognito", enter the Zhuyun IDaaS tenant OIDC server address and the registered application ID and Secret.
Issuer: https://{your_domain}/api/v1/oauth2
Authorization endpoint: https://{your_domain}/api/v1/oauth2/authorize
Token endpoint: https://{your_domain}/api/v1/oauth2/token
User info endpoint: https://{your_domain}/api/v1/oauth2/userinfo
Client ID: After registering the application in Zhuyun IDaaS, the system automatically generates the Client ID
Client secret: After registering the application in Zhuyun IDaaS, the system automatically generates the Client Secret (After the Secret is generated, the business system must save it themselves; if forgotten, it cannot be retrieved, only reset)
In the above parameter values, replace {your_domain} with the domain name of the opened Zhuyun IDaaS tenant.
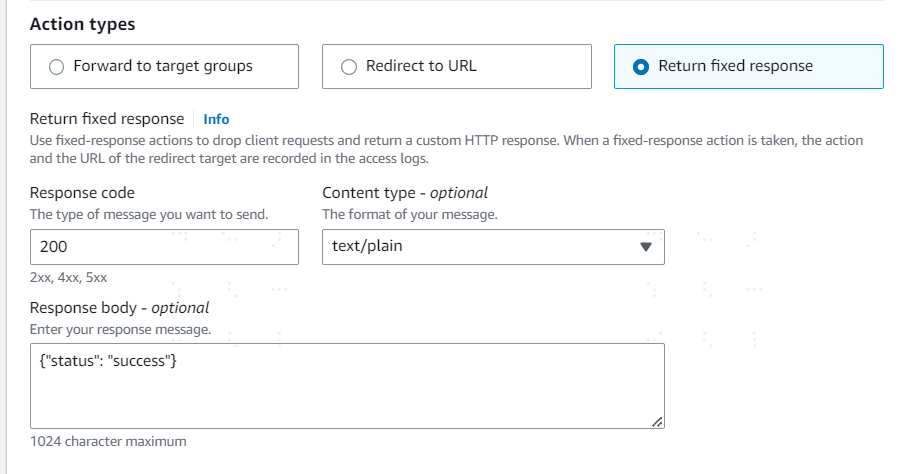
# Action types
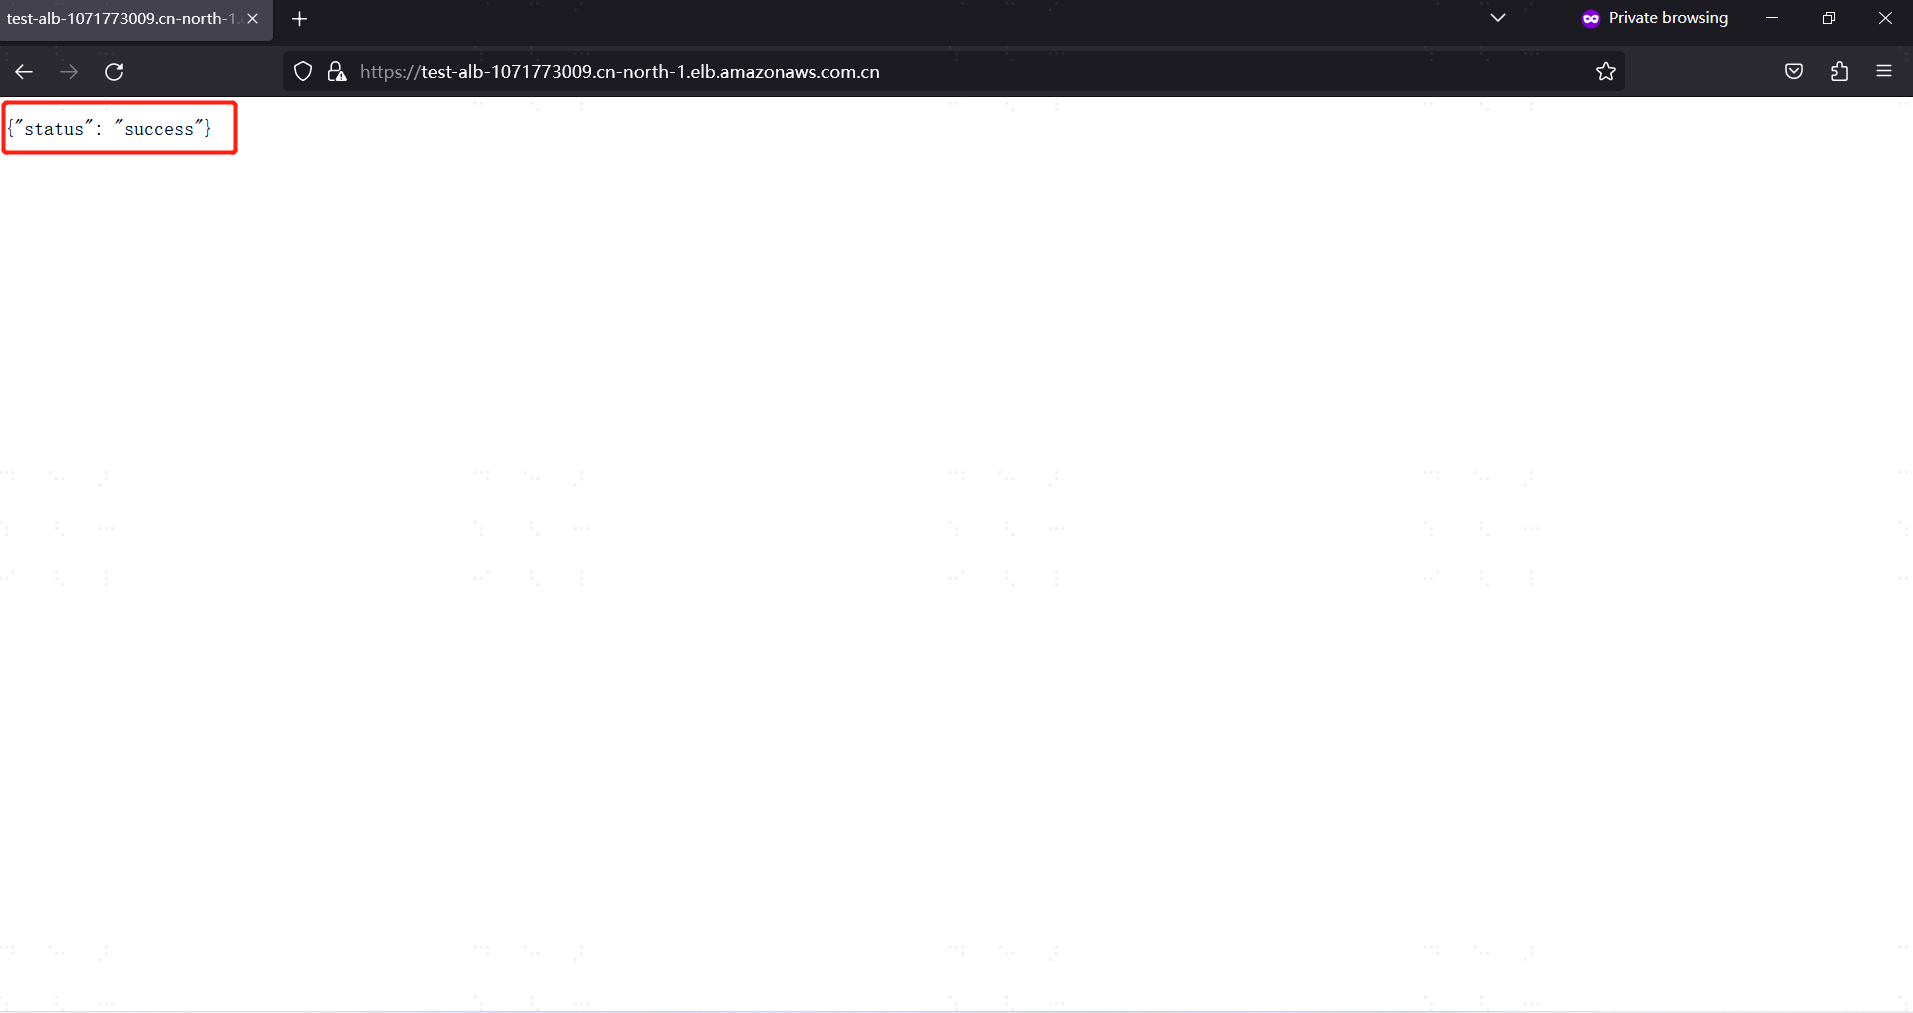
After the ALB requests Zhuyun IDaaS to complete user identity authentication, it is desired that the ALB take what kind of action for the next step. For example, select "Return fixed response", define the response code as "200", response message: {"status": "success"}.
When configured as above, after a user accesses the ALB and passes IDaaS authentication, the ALB will display the content in the browser page: {"status": "success"}
Note: Configuration should be based on actual business needs; this example is only for functional verification.
Finally, click "Save changes" to save the listener's configuration.
# Other configuration items
In addition to configuring the listener, the load balancer can also perform operations such as Network Mapping and Security. Since ALB needs to call IDaaS-related interfaces when integrating with IDaaS via OIDC, if it involves Security -> Outbound rules, you can consult IDaaS personnel to obtain the service IP and then set up IP network policies.
# Zhuyun IDaaS Configuration
# Register the ALB Application
The administrator logs into the Zhuyun IDaaS management backend, clicks Resources -> Applications, in the self-built application area, clicks "Add self-built application", enters the application system's Logo and name, and clicks save to complete the application registration.
# Authentication Integration Configuration
Click on the newly registered application system to enter its configuration page. Select "OIDC" for authentication integration and save. After clicking the "Authentication Integration" configuration, you will enter the application system's configuration page.
General Configuration
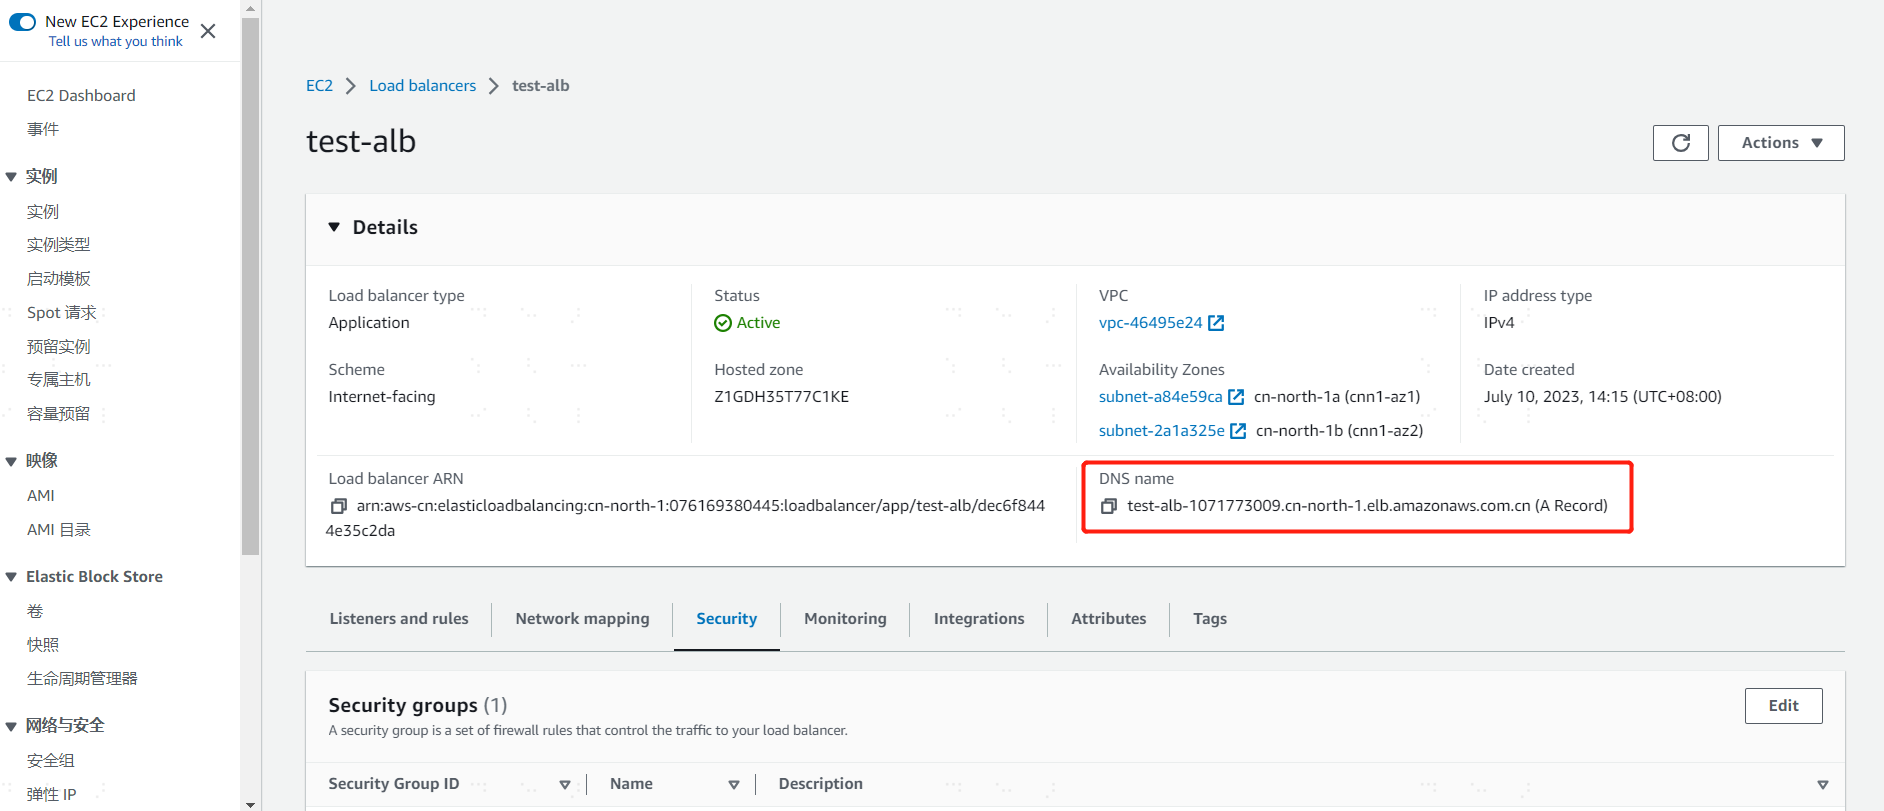
Callback URL: After the user passes IDaaS authentication, the IDaaS platform calls this address to return the temporary authorization code information to the ALB application. The ALB callback URL format is: https://
DNS/oauth2/idpresponseIn the AWS console, find the newly created ALB and click to enter its details page. The DNS Name is displayed on the details page. Click to copy it and replace the actual DNS in the callback URL format.
Mapping Configuration
When a user accesses the ALB, after successful identity verification by IDaaS, the ALB obtains the current logged-in user information through the OIDC interface and forwards this information to the backend business system. The ALB retrieves the current logged-in user from the IDaaS platform via the
subfield and encapsulates it into the HTTP headerx-amzn-oidc-identityfor the business system to use.Add a
subapplication attribute in the IDaaS platform. The business system can choose to use platform attribute names including identifiers such as User ID, Username, Mobile Number, Email, etc., based on actual needs.
Note: The IDaaS platform must add a sub field attribute to be returned to the ALB application. Otherwise, after the user passes IDaaS identity verification and IDaaS returns the temporary authorization code to the ALB, the ALB system will prompt a 500 Internal Server Error.
# User Authorization
Select the newly registered application system, click on Authorization Management -> Application Account "Configure" link to enter the application system's user authorization page. Choose to add a user and authorize access to the ALB application.

# Login Verification
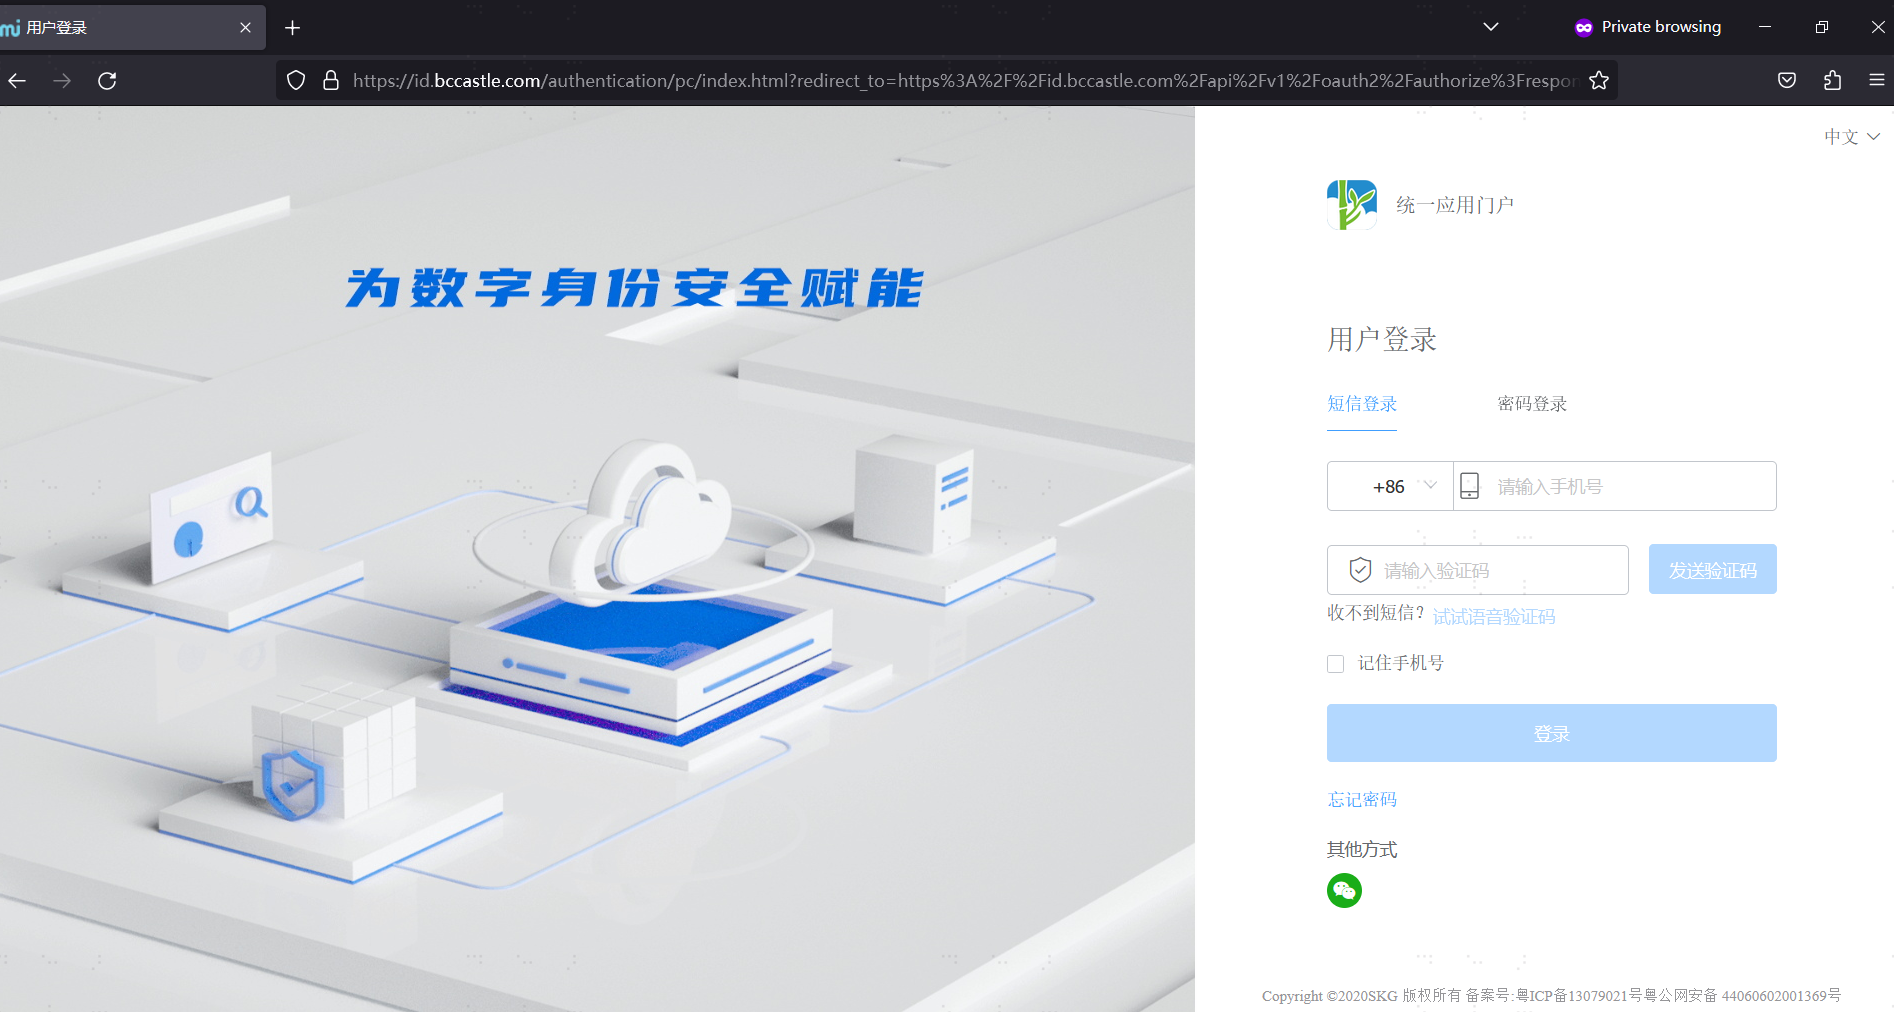
- Access the ALB
Open a browser and access the ALB's DNS domain address, e.g., https://test-alb-1071773009.cn-north-1.elb.amazonaws.com.cn/. The browser will redirect to the Zhuyun IDaaS unified login page.
Display Success Information After Authentication
On the unified login page, enter credentials such as username and password. After successful authentication by Zhuyun IDaaS, the OIDC authorization code information is passed to the ALB via the callback URL. Since in this example, "Return fixed response" was selected for the ALB's "Action type", the ALB directly prints
{"status": "success"}, indicating that the entire authentication integration configuration was successful.