ADFS Integration
# Description
This document mainly explains how IDaaS integrates with ADFS to achieve unified login via IDaaS when accessing applications integrated with ADFS.
# Prerequisites
- The customer side has already completed the integration of the application with ADFS and has implemented redirection to the ADFS login page when accessing the application.
# Integration Overview
- IDaaS adds a SAML authentication protocol application for ADFS authentication.
- ADFS adds a Claims Provider Trust for IDaaS authentication.
- Configure mapping matching rules in both IDaaS and ADFS respectively.
- Integration testing.
# Detailed Step-by-Step Instructions
# IDaaS Operations
- Log in to the IDaaS enterprise console, create a new application, enable SAML authentication integration, and import the SP metadata file provided by ADFS.
ADFS SP metadata file download address. Note that contoso.com should be replaced with your ADFS domain name.
https://contoso.com/federationmetadata/2007-06/federationmetadata.xml
2
- Modify the mapping configuration. By default,
userNameis mapped to the username. You can set specific attribute values according to the actual scenario. - Authorization management: Add application accounts based on user policies or authorization policies.
- Go to 【Settings - Service Configuration - IDP Configuration】, click to download the IDP metadata and save it. This will be needed in the subsequent ADFS operations.
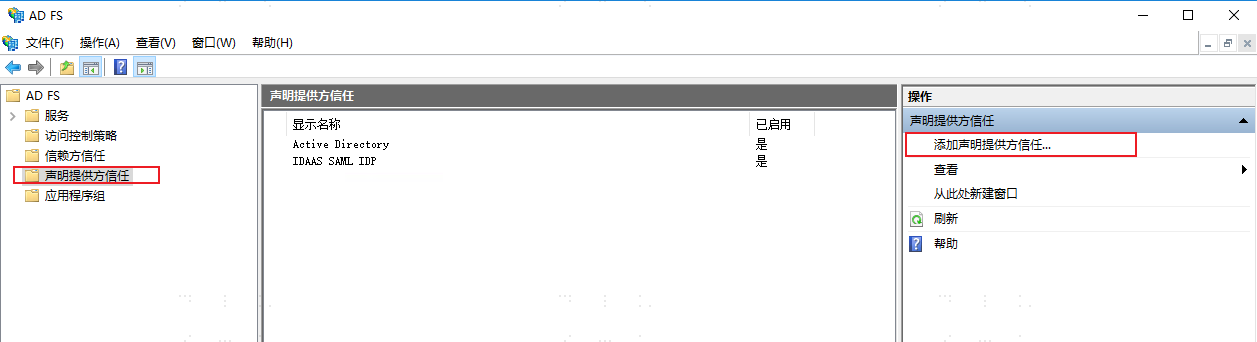
# ADFS Operations
Open the ADFS console, select "Claims Provider Trusts", and click "Add Claims Provider Trust" in the operations.
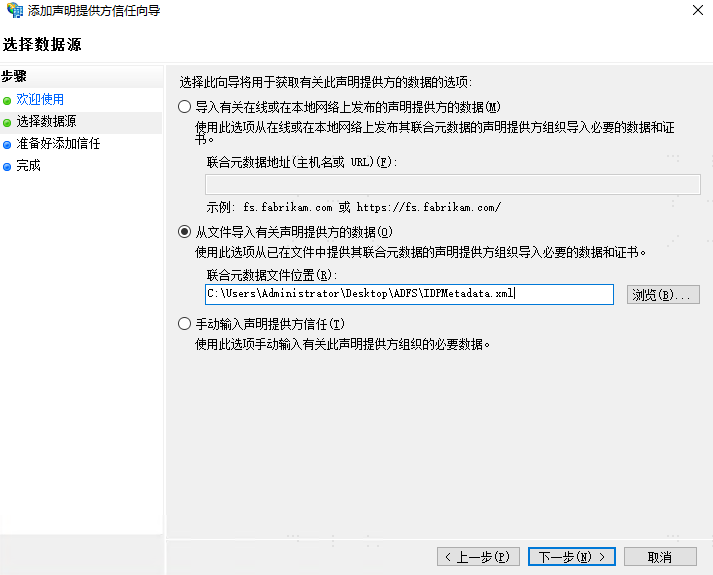
In the Welcome Wizard, click Start. In the data source selection, choose "Import data about the claims provider published online or on a local network", select the IDP metadata file downloaded from IDaaS, and then click Next.
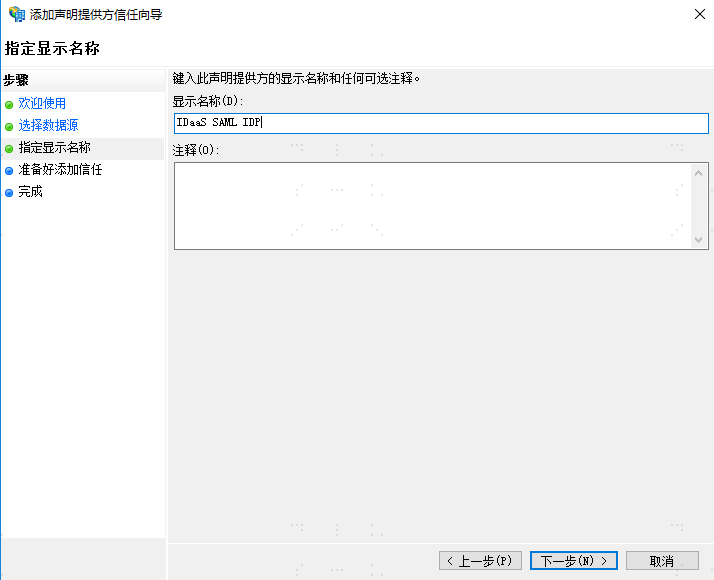
Enter a display name, for example: IDaaS SAML IDP, click Next. In the "Ready to Add Trust" section, you can view the metadata information. Click Next directly. Complete the configuration.
Adding a "Claims Provider Trust" can also be done via command, with the same effect as above.
Add-AdfsClaimsProviderTrust -Name "IDaaS SAML IDP" -ProtocolProfile "SAML" -MetadataFile "C:\IDPMetadata.xml"
After completion, you can see the newly added provider configuration in the "Claims Provider Trusts" list. Select the new provider and click "Edit Claim Rules".


Add the following three rules in sequence. Select "Send Claims Using a Custom Rule" and enter the following code respectively.
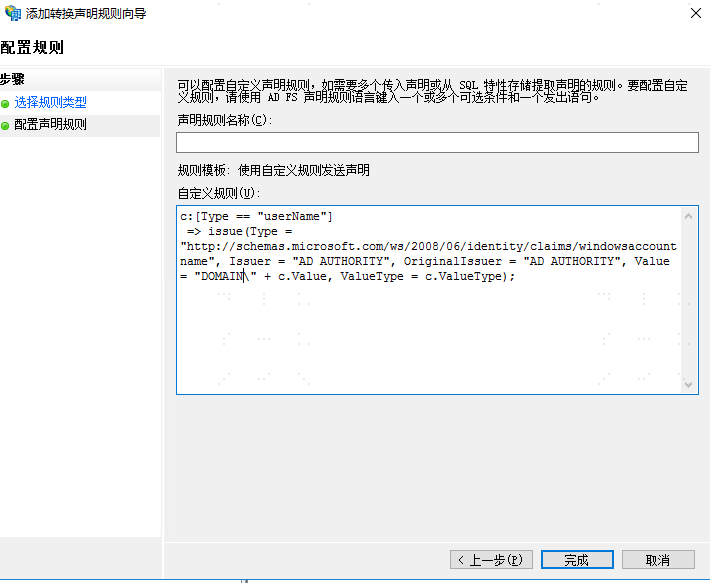
Rule 1: Note: "DOMAIN" in the Value needs to be replaced with the customer's AD domain. This code means concatenating the DOMAIN with the userName value returned in the SAML assertion.
c:[Type == "userName"]
 => issue(Type = "http://schemas.microsoft.com/ws/2008/06/identity/claims/windowsaccountname", Issuer = "AD AUTHORITY", OriginalIssuer = "AD AUTHORITY", Value = "DOMAIN\" + c.Value, ValueType = c.ValueType);

Rule 2: Using the concatenated value from Rule 1 as a query condition to look up the user's UPN in AD.
c:[Type == "http://schemas.microsoft.com/ws/2008/06/identity/claims/windowsaccountname"]
 => issue(store = "Active Directory", types = ("http://schemas.xmlsoap.org/ws/2005/05/identity/claims/upn"), query = ";userPrincipalName;{0}", param = c.Value);

Rule 3: Using a query condition to look up the AD user's SID.
c:[Type == "http://schemas.microsoft.com/ws/2008/06/identity/claims/windowsaccountname", Issuer == "AD AUTHORITY"]
 => issue(store = "Active Directory", types = ("http://schemas.microsoft.com/ws/2008/06/identity/claims/primarysid"), query = ";objectSID;{0}", param = c.Value);
2
3
4
5
6
7
8
9
10
11
- At this point, the SAML mutual trust configuration between IDaaS and ADFS is complete.
# Verification
Access the ADFS integrated application. The application redirects to ADFS for authentication. The ADFS login page displays two login methods: AD account/password login, and the configured IDaaS SAML IDP login method.
Select the IDaaS SAML IDP login method. It redirects to the IDaaS login page. After successful login, it redirects back to the application, and the login is successful.

If after successful login to IDaaS, it does not successfully redirect to the application, you may need to execute the following script.
set-adfsclaimsprovidertrust -TargetName "IDaaS SAML IDP" -AnchorClaimType "http://schemas.microsoft.com/ws/2008/06/identity/claims/windowsaccountname"

get-adfsclaimsprovidertrust
2
3
- In the
set-adfsclaimsprovidertrustcommand, theTargetNameparameter is the display name of the "Claims Provider Trust". get-adfsclaimsprovidertrustcan be used to check if the addition was successful.
# Default IDaaS Login (Extension)
If you need to hide the ADFS login selection page to achieve default login via IDaaS, you can implement it through the following operations.
- On the ADFS server, the process for modifying the login page theme:
New-AdfsWebTheme -Name "newTheme" -SourceName default
Create a new directory, for example
c:\adfs-theme, then execute the following to export the new web theme files to this directory. Export-AdfsWebTheme –Name newTheme –DirectoryPath c:\adfs-themeIn the exported
scriptdirectory, there isonload.js. Back it up before modifying it, and add the following code at the bottom. (Note: In the following code,"https://domain.bccastle.com/api/ams/saml/idp"should be consistent with the identifier in the claim.)
var myCheckHRD = document.getElementById('hrdArea') ;
if (myCheckHRD) {
HRD.selection('https://domain.bccastle.com/api/ams/saml/idp')
}
2
3
4
After modification, continue to update: Set-AdfsWebTheme -TargetName newTheme -OnLoadScriptPath "C:\adfs-theme\script\onload.js"
Finally, activate it. Set-AdfsWebConfig -ActiveThemeName newTheme
After successful activation, when logging into the application again, the page will automatically select the IDaaS SAML IDP method for login.