Alipay Login
# Documentation Description
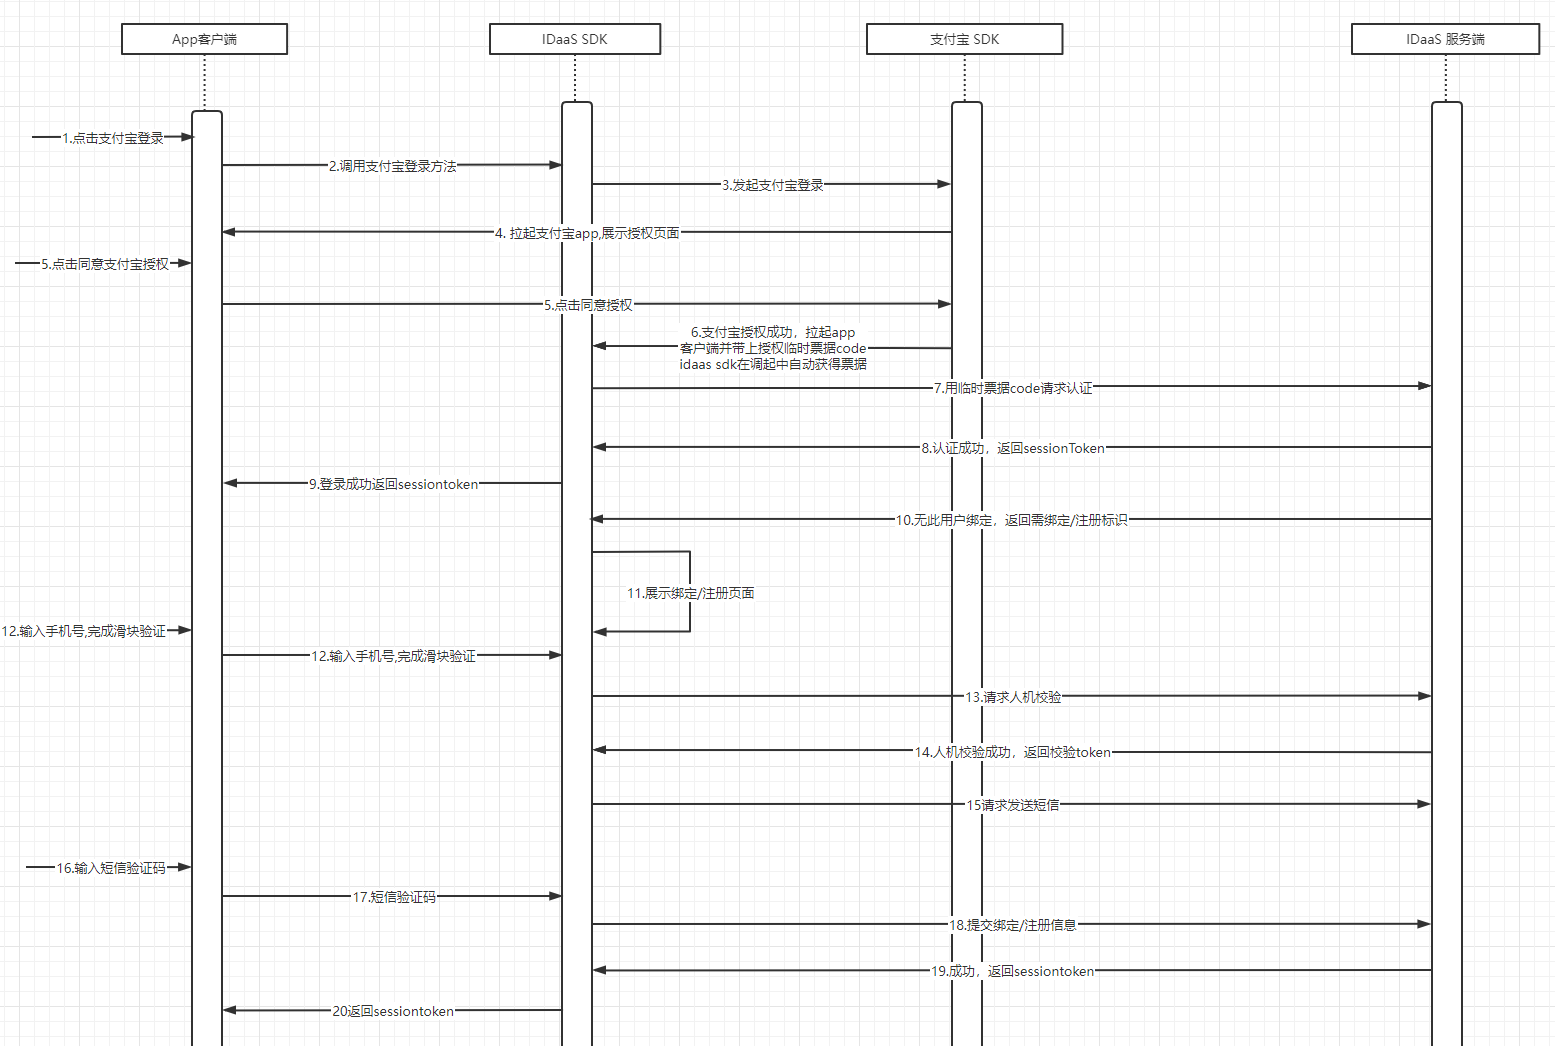
This document explains how to integrate the Alipay authorization login function into an Android client. In the scenario of using Alipay login, the user has the Alipay APP installed on their phone. When the user clicks the Alipay login button on the client APP, the IDaaS SDK launches the authorization page within the Alipay APP. After the user clicks the "Authorize Login" button and authorization is successful, the Alipay APP redirects back to the client APP. At this point, the IDaaS SDK automatically receives a temporary ticket and uses it to request authentication from the IDaaS server. The final authentication result is returned to the client APP.
# Process Description
# Login Flow
Integration Flow Description
The user clicks the Alipay login button on the APP client.
The APP client invokes the IDaaS SDK's Alipay login method.
The IDaaS SDK sends a login authorization request to the Alipay SDK.
The Alipay SDK launches the Alipay APP on the phone and displays the authorization login page.
The user clicks the authorize login button.
Alipay authorization is successful, and the client APP is launched, carrying the Alipay authorization ticket. At this point, the IDaaS SDK automatically obtains the Alipay authorization ticket during the launch.
IDaaS uses the Alipay authorization ticket to request authentication from the IDaaS server.
The IDaaS server checks if a mobile phone number is bound. If a mobile phone number is already bound, the IDaaS server authentication succeeds and returns a sessionToken to the IDaaS SDK.
The IDaaS SDK returns the sessionToken to the APP client.
If the IDaaS server finds that no mobile phone number is bound, it returns an identifier indicating that binding or registration is required.
The IDaaS server displays the binding or registration page.
The user enters their mobile phone number, clicks to get the verification code, and completes the slider verification.
The IDaaS SDK sends the slider verification code to the IDaaS server to request slider verification.
The IDaaS server successfully verifies the slider and returns a token to the IDaaS SDK.
The IDaaS SDK uses the token and mobile phone number to request the IDaaS server to send an SMS verification code.
The user receives the SMS verification code, enters it into the verification code input field, and clicks the bind or register button.
The IDaaS SDK submits the binding or registration data to the IDaaS server.
Binding or registration is successful. The IDaaS server returns a sessionToken to the IDaaS SDK.
The IDaaS SDK returns the sessionToken to the client APP.
# Preparation
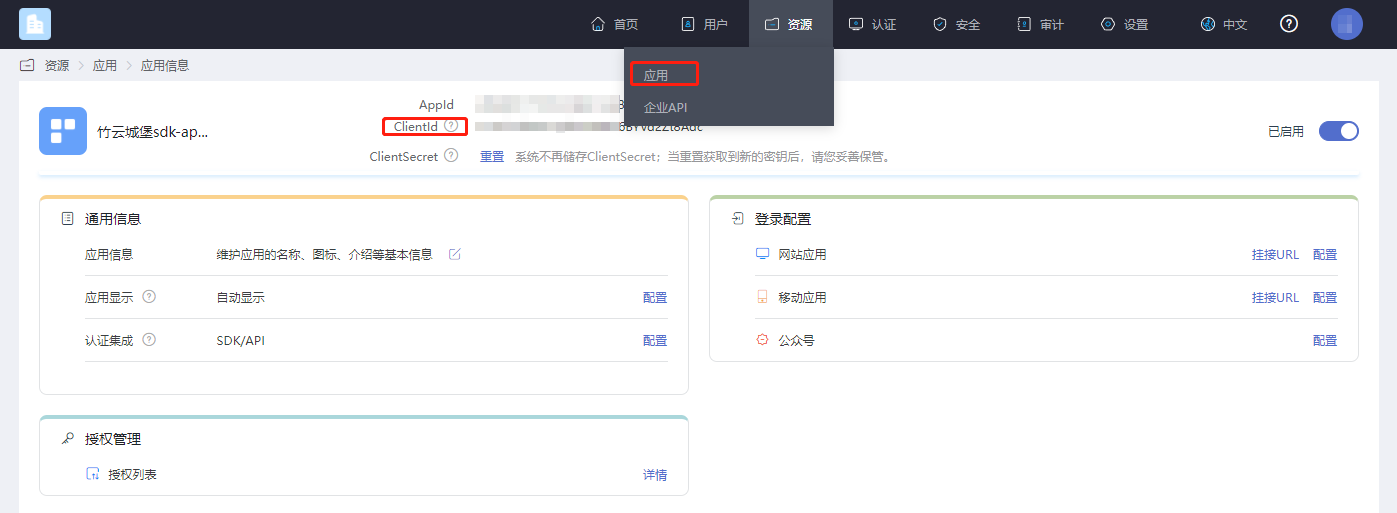
# Obtain Application clientId
Log in to the IDaaS Enterprise Center platform, click "Resources -> Applications", select the relevant application, and click to view it.
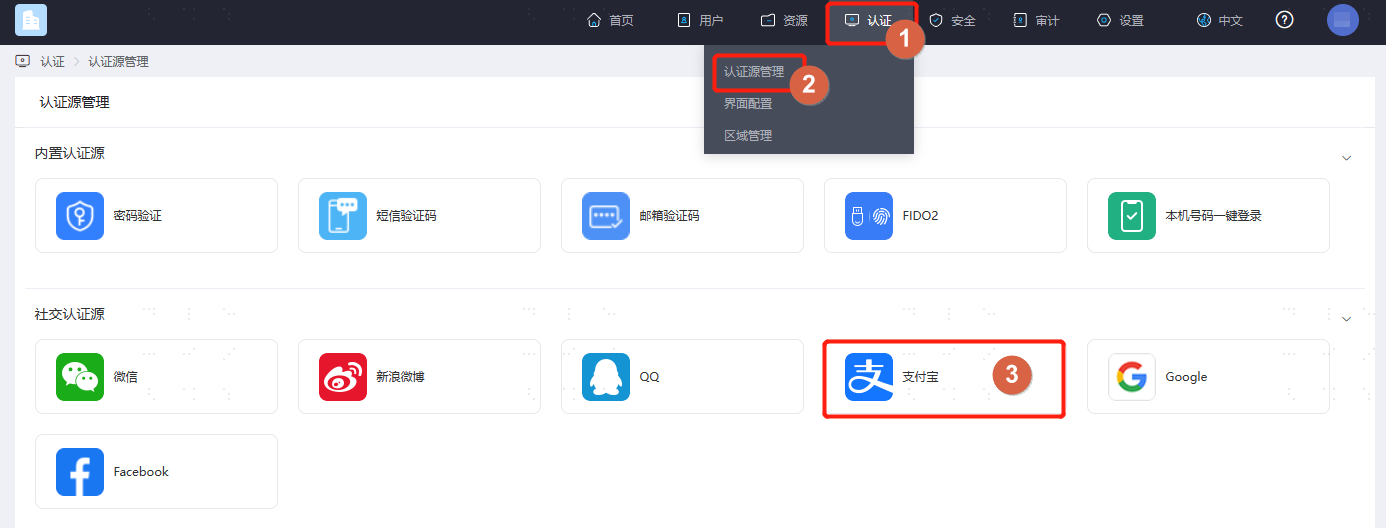
# Configure Authentication Source
Log in to the IDaaS Enterprise Center platform, click "Authentication -> Authentication Source Management -> Alipay".
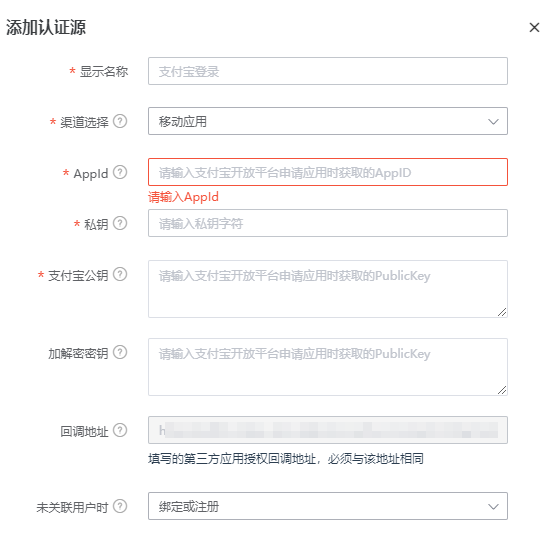
Click "Add Authentication Source", fill in the AppId and public key obtained after registering the application on the Alipay Open Platform (opens new window). Select 'Mobile Application' for the channel selection box. Enter a name in the display name field.
Click on the newly created application under "App". After the application creation is complete, select "Login Configuration -> Mobile Application -> Configure".
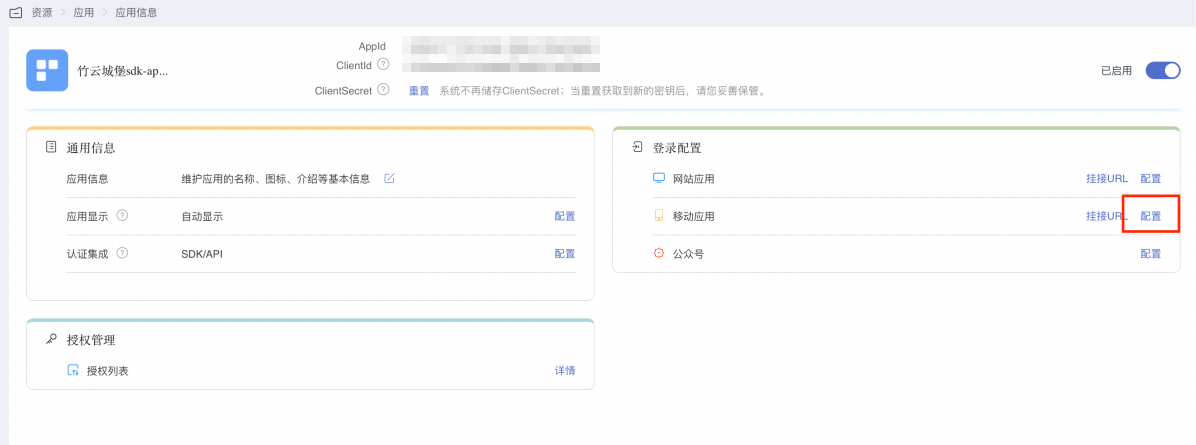
You will reach the window as shown below. Click the "Enable" button next to the Alipay entry.
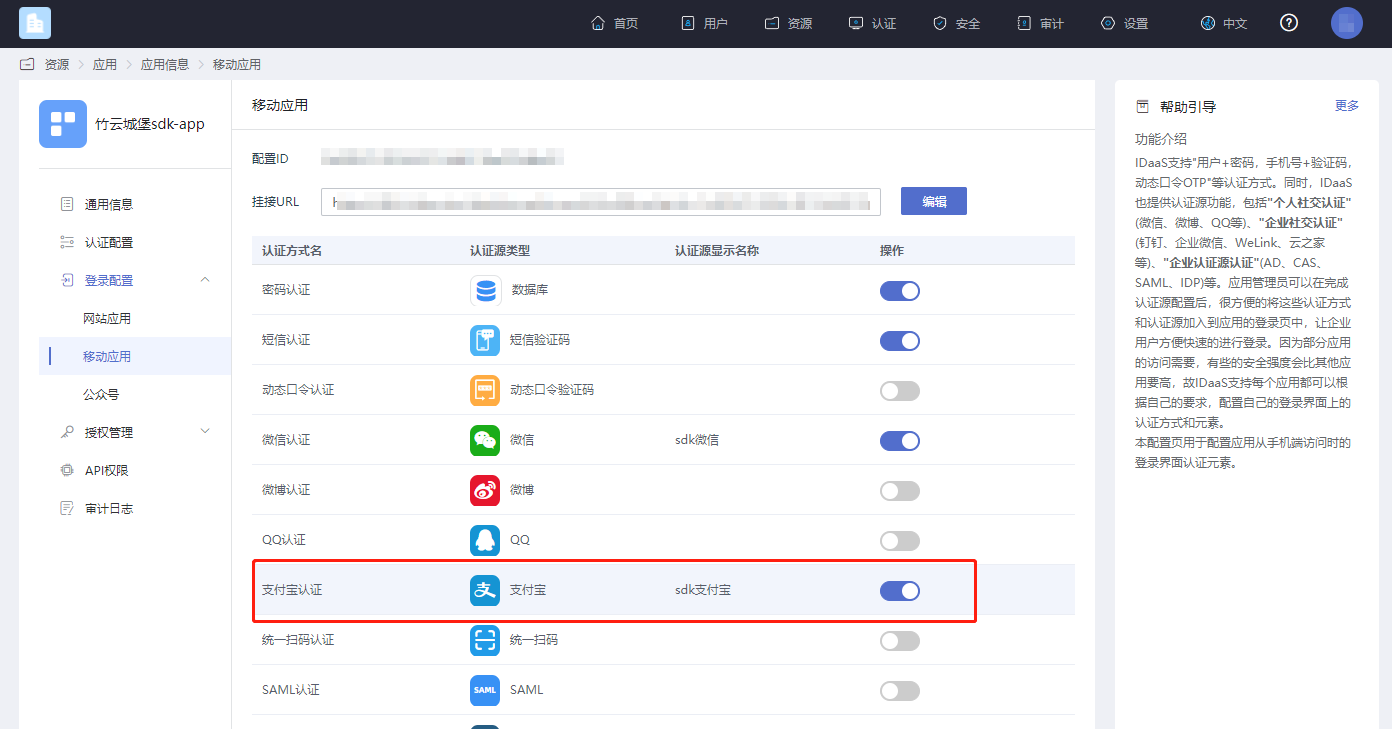
Select the previously configured authentication source and save the configuration.
# Import Dependencies
Before proceeding with Alipay OAuth authorization login integration, you need to register a developer account on the Alipay Open Platform (opens new window), have a reviewed and approved mobile application, and obtain the corresponding AppID and application public key. After enabling Alipay login and passing the review, you can begin the integration process.
Import the aar package into the lib, as shown in the figure below:

# Configuring build.gradle {/configuring-buildgradle/}
/*begin*/
/*  rxjava2 +  okhttp + retrofit2  */
api 'io.reactivex.rxjava2:rxjava:2.2.10'
api 'io.reactivex.rxjava2:rxandroid:2.1.1'
api 'com.squareup.retrofit2:retrofit:2.6.0'
api 'com.squareup.retrofit2:adapter-rxjava2:2.6.0'
api 'com.squareup.retrofit2:converter-gson:2.6.0'
api 'com.squareup.okhttp3:okhttp:4.3.1'
api 'com.squareup.okhttp3:logging-interceptor:3.6.0'
api 'com.jakewharton.retrofit:retrofit2-rxjava2-adapter:1.0.0'
api 'com.trello.rxlifecycle2:rxlifecycle-components:2.1.0'
api 'com.alibaba:fastjson:1.2.61'
 /*end*/

//Common library, required
implementation(name: 'AuthnCenter_Common-1.5.3', ext: 'aar')
//Alipay Login SDK, required
implementation(name: ''AuthnCenter_Login_AliPay-1.5.3', ext: 'aar')
//Alipay official dependency library, required
implementation(name: 'alipaySdk-15.7.9-20200727142846', ext: 'aar')
2
3
4
5
6
7
8
9
10
11
12
13
14
15
16
17
18
19
20
# Configuring AndroidManifest {/configuring-androidmanifest/}
  <!--Permissions-->
<uses-permission android:name="android.permission.INTERNET" />
<!--Write permission for external storage-->
<uses-permission android:name="android.permission.WRITE_EXTERNAL_STORAGE" />
<!--Read permission for external storage-->
<uses-permission android:name="android.permission.READ_EXTERNAL_STORAGE" />
<uses-permission android:name="android.permission.CAMERA" />
<uses-permission android:name="android.permission.RECORD_AUDIO" />
<uses-permission android:name="android.permission.READ_PHONE_STATE" />

        <!--  Alipay redirection must be registered -->
<!-- To use the capability of the "Universal Redirection SDK", you need to add this item to your App's AndroidManifest.xml -->
<!-- and set the value of android:scheme appropriately -->
<activity
    android:name="com.alipay.sdk.app.AlipayResultActivity"
    tools:node="merge">
    <intent-filter tools:node="replace">
        <action android:name="android.intent.action.VIEW" />
        <category android:name="android.intent.category.DEFAULT" />
        <category android:name="android.intent.category.BROWSABLE" />
        <data android:scheme="__alipaysdklogin__" />
    </intent-filter>
</activity>

        <!-- Country code interface, register as needed -->
<activity
    android:name="com.authncenter.loginalipay.view.CountryCodeListActivity"
    android:launchMode="singleTask"
    android:screenOrientation="portrait" />

        <!-- SMS verification interface, register as needed -->
<activity
    android:name="com.authncenter.loginalipay.view.MsgActivity"
    android:launchMode="singleTask"
    android:screenOrientation="portrait" />
2
3
4
5
6
7
8
9
10
11
12
13
14
15
16
17
18
19
20
21
22
23
24
25
26
27
28
29
30
31
32
33
34
35
# Development Integration
# Built-in API Introduction
Basic configuration initialization main class AuthnCenterAPI method overview:
/**
 * SMS Verification Code -- Send SMS
 */
public void smsSend(Context context, SendSmsReq req, RequestListener listener)

/**
 * Get Country Calling Codes     Note: If country calling codes are configured, this interface must be called to obtain them.
 */
public void getCountryCode(Context context, RequestListener listener)

/**
 * Social Account Binding Interface
 * @param context      Context
 * @param stateToken   Temporary token returned after the current login
 * @param otpsmsReq    Binding object information
 * @param listener     Event callback
 */
public void socialBind(Context context, String stateToken, OTPSMSReq otpsmsReq, RequestListener listener)

/**
 *  Register
 * @param context      Context
 * @param stateToken   Temporary token returned after the current login
 * @param otpsmsReq    Registration object information
 * @param listener     Event callback
 */
public void register(Context context, String stateToken, OTPSMSReq otpsmsReq, RequestListener listener)
2
3
4
5
6
7
8
9
10
11
12
13
14
15
16
17
18
19
20
21
22
23
24
25
26
27
Alipay login initialization main class AuthnCenterLoginAliPay method overview:
/**
 *   Alipay Login
 * @param context   Context
 * @param loginListener  Event listener
 * @param loginType      LoginType.DEFAULT (Built-in), LoginType.CUSTOM (Custom)
 */
public void loginByAliPay(Context context, WeChatLoginListener loginListener, LoginType loginType)
2
3
4
5
6
7
8
# Mobile International Calling Code Retrieval
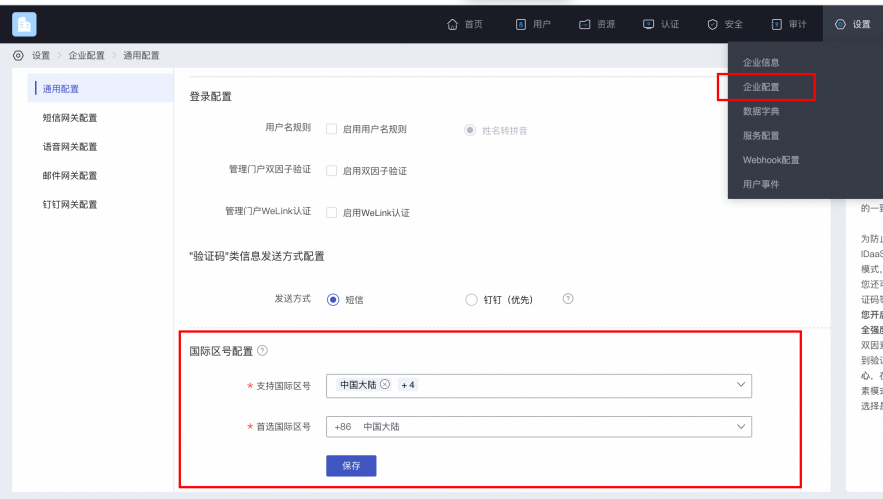
If international phone number support is enabled, you must first call the international calling code retrieval interface. This interface returns a configured list of international calling codes, along with regular expressions for phone numbers. The image below shows how to configure the international calling code list and the preferred calling code.
Example code for retrieving the international calling code list:
AuthnCenterAPI.Builder().getCountryCode(this, new RequestListener<CountryCodeInfoRsp>() {
    @Override
    public void success(CountryCodeInfoRsp codeInfoRsp) {

    }

    @Override
    public void error(String code, String errorMessage) {
    }
});
2
3
4
5
6
7
8
9
10
Successful example code=0, data value:
{
	"phoneAreaCodeDefinitions": [
		{
			"areaCode": "86",
			"displayMapping": {
				"zh-TW": "中國大陸",
				"en": "China",
				"zh-CN": "中国大陆"
			},
			"countryCode": "CN",
			"mobileRegex": "^(\\+86){0,1}\\-?1\\d{10}$",
			"areaCodeSuffixes": []
		},
		{
			"areaCode": "852",
			"displayMapping": {
				"zh-TW": "中國香港",
				"en": "Hong Kong",
				"zh-CN": "中国香港"
			},
			"countryCode": "HK",
			"mobileRegex": "^(\\+852){1}\\-?0{0,1}[1,4,5,6,7,8,9](?:\\d{7}|\\d{8}|\\d{12})$",
			"areaCodeSuffixes": []
		},
		{
			"areaCode": "886",
			"displayMapping": {
				"zh-TW": "中國臺灣",
				"en": "Taiwan",
				"zh-CN": "中国台湾"
			},
			"countryCode": "TW",
			"mobileRegex": "^(\\+886){1}\\-?[6,7,9](?:\\d{7}|\\d{8})$",
			"areaCodeSuffixes": []
		},
		{
			"areaCode": "853",
			"displayMapping": {
				"zh-TW": "中國澳門",
				"en": "Macau",
				"zh-CN": "中国澳门"
			},
			"countryCode": "MO",
			"mobileRegex": "^(\\+853){1}\\-?0{0,1}[1,4,5,6,7,8,9](?:\\d{7}|\\d{8}|\\d{12})$",
			"areaCodeSuffixes": []
		},
		{
			"areaCode": "93",
			"displayMapping": {
				"zh-TW": "阿富汗",
				"en": "Afghanistan",
				"zh-CN": "阿富汗"
			},
			"countryCode": "AF",
			"mobileRegex": "^(\\+93){1}\\-\\d{6,11}",
			"areaCodeSuffixes": []
		}
	],
	"preferredAreaCode": "CN"
}
2
3
4
5
6
7
8
9
10
11
12
13
14
15
16
17
18
19
20
21
22
23
24
25
26
27
28
29
30
31
32
33
34
35
36
37
38
39
40
41
42
43
44
45
46
47
48
49
50
51
52
53
54
55
56
57
58
59
60
Return Parameters:
| Parameter Name | Chinese Name | Type | Description |
|---|---|---|---|
| preferredAreaCode | Preferred International Code | String | The preferred international code configured for the current enterprise center. |
| countryCode | Country/Region Code | String | Country/Region Code |
| areaCode | International Calling Code | String | International Calling Code |
| areaCodeSuffixes | International Calling Code Suffix | String | International Calling Code Suffix |
| mobileRegex | Mobile Number Format Regex | String | Mobile Number Format Regex |
| displayMapping | Multi-language Display Name Mapping | String | Multi-language Display Name Mapping |
# Built-in Sliding Verification
Human-machine interaction verification is required when sending verification codes.
BlockPuzzleDialog mBlockPuzzleDialog = new BlockPuzzleDialog(mContext);
mBlockPuzzleDialog.setOnResultsListener(new OnResultsListener() {
        @Override
        public void onResultsClick(String result) {
            LogUtil.getInstance().d("Secondary verification callback result mCaptchaToken:" + result);
            // This callback result is the captchaToken parameter for SMS verification.
        }
        @Override
        public void onError(String code, String msg) {
            ToastUtils.ShowToast(mContext, String.format("Error Code: %s  Error Message: %s", code, msg));
        }
    });
}
2
3
4
5
6
7
8
9
10
11
12
13
# Sending Verification Code
The App client needs to have its own UI interface, which should contain several necessary components: a phone number input field, a verification code input field, a button (or event trigger) to initiate getting the verification code, and a login button (or event trigger).
After the user enters their phone number, before clicking (triggering) the "Send Verification Code" event, the App client should perform a phone number format check.
Click (trigger) the "Send Verification Code" event. The App client calls the IDaaS SDK's method to send the verification code. An example is as follows:
//Send verification code
SendSmsReq sendSmsReq = new SendSmsReq();
sendSmsReq.setMobile(getPhoneNum());
sendSmsReq.setType(SendSmsType.login);//Type enumeration
sendSmsReq.setCaptcha_token("Result returned after successful slide captcha verification");
AuthnCenterAPI.Builder().smsSend(mContext, sendSmsReq
        , new RequestListener<BaseResponse>() {
            @Override
            public void success(BaseResponse rsp) {
            }
            @Override
            public void error(String code, String errorMessage) {
            }
        });
2
3
4
5
6
7
8
9
10
11
12
13
14
# Built-in UI Development Integration
# Initialization
AuthnCenterSDK.Builder()
                .init(this)
                .setBaseUrl("https://xxx.xxx.com")      //Tenant domain name
                .setClientId("xxxx") //Application client-id from the tenant backend
                .isCheckSSL(false) //Whether to check SSL certificate
                .logEnable(false).build(); //Whether to enable HTTP request logging
PlatformConfig.Builder().init(this).setAlipayAppId(alipayAppId); //Set Alipay APPID
2
3
4
5
6
7
# UI Customization
The caller can set the text, descriptions, colors, etc., for the binding interface via BindThemeConfig. The specific attributes are as follows:
//Customize interface
BindThemeConfig.Builder().setBindTitle("I am the title")
        .setBindDes("I am the details")
        .setBindButtonText("I just want to change the button text")
        .setBindButtonTextDefaultColor("#367517")
        .setBindButtonTextColor("#C8E2B1")
        .setBindButtonTextOnPressColor("#F9F400")
        .setSendMsgColor("#976D00")
        .setSendMsgNoActiviColor("#50A625")
        .setDialogTitle("I just want to customize")
        .setDialogBtnConfirmColor("#FFB6C1");
2
3
4
5
6
7
8
9
10
11
# Attribute Description
| Parameter | Type | Description | Example |
|---|---|---|---|
| setBackFont | String | Change back text | None |
| setBackFontColor | String | Change back text color | Hexadecimal color, e.g., #FFFFFF |
| setBackImg | int | Set back icon | Resource file R |
| setBackFontSize | int | Set back text size | 14sp |
| setCountryCodeVisibility | boolean | Set whether to display international dialing code | Default is true |
| setBindTitle | String | Binding interface title | None |
| setBindDes | String | Binding interface description | None |
| setBindButtonText | String | Binding button text | None |
| setBindButtonTextDefaultColor | String | Binding button text background default color | Hexadecimal color, e.g., #FFFFFF |
| setBindButtonTextColor | String | Binding button text color | Hexadecimal color, e.g., #FFFFFF |
| setBindButtonTextOnPressColor | String | Binding button text background color after click | Hexadecimal color, e.g., #FFFFFF |
| setSendMsgColor | String | Send SMS button text color | Hexadecimal color, e.g., #FFFFFF |
| setSendMsgNoActiviColor | String | Countdown text color | Hexadecimal color, e.g., #FFFFFF |
| setDialogTitle | String | Unbind popup dialog title | None |
| setDialogBtnConfirmColor | String | Unbind popup dialog confirm button color | Hexadecimal color, e.g., #FFFFFF |
| sendMsgNoActiveBackground | int | Send SMS button background resource | Android color or background resource file (R) |
| setButtonBackground | int | Send SMS button default background resource | Android color or background resource file (R) |
| setSendMsgBackground | int | Binding button background resource | Android color or background resource file (R) |
# Alipay Login Built-in Interface
 AuthnCenterLoginAliPay.Builder().loginByAliPay(this, new AlipayLoginListener() {
            @Override
            public void success(String code, String data) {
                 //Success callback
            }

            @Override
            public void error(String code, String errorMessage) {
               //Failure callback
            }
        }, LoginType.DEFAULT);
2
3
4
5
6
7
8
9
10
11
# Integration via API Development
If you choose this integration method, after the login returns, you need to handle the binding or registration business and verify basic operations related to the phone number yourself based on the returned status.
Also, for the relevant registration information in the AndroidManifest file, you can fill in your own.
# Calling Sequence Instructions
After a successful login, if the returned status is binding, then you need to call:
Get country code (call this based on whether internationalization support is configured) (getCountryCode)
Sliding verification (BlockPuzzleDialog)
Send SMS (smsSend)
Bind or register (socialBind/register)
# Initialization
AuthnCenterSDK.Builder()
                .init(this)
                .setBaseUrl("https://xxx.xxx.com")      //Tenant domain name
                .setClientId("xxxx") //Application client-id from the tenant backend
                .isCheckSSL(false) //Whether to check SSL certificate
                .logEnable(false).build(); //Whether to enable HTTP request logs
PlatformConfig.Builder().init(this).setAlipayAppId(alipayAppId); //Set Alipay APPID
2
3
4
5
6
7
# Alipay Login (Custom Interface)
AuthnCenterLoginAliPay.Builder().loginByAliPay(this, new WeChatLoginListener() {
    @Override
    public void success(String code, String data) {
//Based on the code return value, navigate to your own interface here for binding or registration operations
        Intent intent = new Intent(MainActivity.this, AliPayActivity.class);
        intent.putExtra(SocialType.STATETOKEN, data);
        intent.putExtra(SocialType.BINDTYPE, SocialType.WX);
        switch (code) {
   case "10002":   //Login successful
ToastUtils.ShowToast(MainActivity.this, "Login successful : " + data);
                return;
            case "10003":   //Bind user
               intent.putExtra(SocialType.ACTIONTYPE, ActionType.BIND);
                break;
            case "10004": //Register user
                intent.putExtra(SocialType.ACTIONTYPE, ActionType.REGISTER);
                break;
        }
        intent.setFlags(Intent.FLAG_ACTIVITY_NEW_TASK);
        startActivity(intent);
    }

    @Override
    public void error(String code, String errorMessage) {
        ToastUtils.ShowToast(MainActivity.this, "SDK callback  code : " + code + "---- msg " + errorMessage);
    }
}, LoginType.CUSTOM);
2
3
4
5
6
7
8
9
10
11
12
13
14
15
16
17
18
19
20
21
22
23
24
25
26
27
28
Here, judgment is based on the returned code:
| Code | Description |
|---|---|
| 10001 | AuthCenter server error |
| 10002 | Success |
| 10003 | User binding required |
| 10004 | User registration required |
# Return Codes
| Status Code | Error Code (error_code) | Error Description (error_msg) | Action |
|---|---|---|---|
| 400 | IDAAS.SDK.COMMON.1001 | Parameter {0} cannot be left blank | |
| Parameter {0} cannot be left blank | |||
| 400 | IDAAS.SDK.COMMON.1002 | The {0} parameter format is incorrect | |
| Parameter {0} format error | |||
| 400 | IDAAS.SDK.COMMON.1003 | Device information is incomplete | |
| Device information incomplete | |||
| 400 | IDAAS.SDK.COMMON.1004 | Signature decryption error | |
| Signature decryption error | |||
| 400 | IDAAS.SDK.COMMON.1005 | The {0} has failed | |
| {0} has expired | |||
| 400 | IDAAS.SDK.COMMON.1006 | The {0} parameter error | |
| {0} parameter error | |||
| 400 | IDAAS.SDK.COMMON.1007 | The {0} parameter type error | |
| {0} parameter type error | |||
| 500 | IDAAS.SDK.COMMON.1008 | The system is busy. Try again later | |
| System busy. Please try again later | |||
| 400 | IDAAS.SDK.COMMON.1009 | Unknown authentication configuration | |
| Unknown authentication configuration | |||
| 400 | IDAAS.SDK.COMMON.1010 | Failed to obtain the enterprise center global configuration | |
| Failed to obtain enterprise center global configuration | |||
| 400 | IDAAS.SDK.COMMON.1011 | Failed to obtain the international area code configuration | |
| Failed to obtain international area code configuration | |||
| 400 | IDAAS.SDK.COMMON.1012 | The x-client-ID is incorrect and the corresponding application cannot be found | |
| X-client-id error, cannot find corresponding application | |||
| 400 | IDAAS.SDK.COMMON.1013 | The corresponding user is not found | |
| Corresponding user not found | |||
| 400 | IDAAS.SDK.COMMON.1014 | Application private key not found | |
| Application private key not found | |||
| 400 | IDAAS.SDK.LOGIN.1001 | Error calling interface {0} | |
| Error calling interface {0} | |||
| 400 | IDAAS.SDK.LOGIN.1002 | User not bound | |
| User not bound | |||
| 400 | IDAAS.SDK.LOGIN.1003 | The user has been locked due to too many unsuccessful login attempts. It will be unlocked in {0} minutes and {1} seconds | |
| User locked due to multiple failed login attempts. Will unlock in {0} minutes and {1} seconds | |||
| 400 | IDAAS.SDK.LOGIN.1004 | Failed to obtain the password policy | |
| Error obtaining password policy | |||
| 400 | IDAAS.SDK.LOGIN.1005 | Invalid username or password. Remaining login attempts: {0} | |
| Invalid username or password. Remaining login attempts: {0} | |||
| 400 | IDAAS.SDK.LOGIN.1006 | Configuration error, unable to find wechat authentication source | |
| Configuration error, cannot find Alipay authentication source | |||
| 400 | IDAAS.SDK.LOGIN.1007 | Configuration error, unable to find alipay authentication source | |
| Configuration error, cannot find Alipay authentication source | |||
| 400 | IDAAS.SDK.LOGIN.1008 | The configuration is incorrect. The one-click login authentication source cannot be found | |
| Configuration error, cannot find one-click login authentication source | |||
| 400 | IDAAS.SDK.SMS.1001 | {0} slide base map is not initialized successfully, please check the path | |
| {0} slide base map initialization failed, please check the path | |||
| 400 | IDAAS.SDK.SMS.1002 | {0} verification code coordinate resolution failed | |
| {0} verification code coordinate parsing failed | |||
| 400 | IDAAS.SDK.SMS.1003 | {0} verification code coordinate verification fails | |
| {0} verification code coordinate verification failed | |||
| 400 | IDAAS.SDK.SMS.1004 | The graphic verification code is incorrect | |
| Graphic verification code verification error | |||
| 400 | IDAAS.SDK.SMS.1005 | SMS verification code verification is incorrect | |
| SMS verification code verification error | |||
| 400 | IDAAS.SDK.SMS.1006 | The email verification code is incorrect | |
| Email verification code verification error | |||
| 400 | IDAAS.SDK.SMS.1007 | Sending scenario does not exist | |
| Sending scenario does not exist | |||
| 400 | IDAAS.SDK.SMS.1008 | Failed to send the verification code | |
| Failed to send verification code | |||
| 400 | IDAAS.SDK.SOCIAL.1001 | The social account is unbound incorrectly | |
| Social account unbinding error | |||
| 400 | IDAAS.SDK.SOCIAL.1002 | The social account has been bound, please unbind it first | |
| Social account already bound, please unbind first | |||
| 400 | IDAAS.SDK.PWD.1001 | The password length is incorrect | |
| Password length error | |||
| 400 | IDAAS.SDK.PWD.1002 | The password cannot be the username | |
| Password cannot be the username | |||
| 400 | IDAAS.SDK.PWD.1003 | Your password complexity is low | |
| Your password complexity is low | |||
| 400 | IDAAS.SDK.PWD.1004 | The password is weak | |
| Password is weak | |||
| 400 | IDAAS.SDK.PWD.1005 | The password is used before, cannot be used again | |
| This password has been used before and cannot be reused | |||
| 400 | IDAAS.SDK.PWD.1006 | Password cannot username in reverse order | |
| Password cannot be the username in reverse order | |||
| 400 | IDAAS.SDK.PWD.1007 | The number of repeated password characters exceeded the upper limit | |
| Number of repeated password characters exceeds limit | |||
| 400 | IDAAS.SDK.PWD.1008 | Password cannot contain :username, phone number, email prefix, name in PinYing | |
| Password cannot contain: username, phone number, email prefix, name in Pinyin | |||
| 400 | IDAAS.SDK.MFA.1001 | The mobile doesn't match the user | |
| Mobile number does not match the user | |||
| 400 | IDAAS.SDK.MFA.1002 | The access control policy is incorrect | |
| Access control policy configuration error | |||
| 400 | IDAAS.SDK.MFA.1003 | Access control authentication source type conversion error | |
| Access control authentication source type conversion error |
I am ready to proceed. Please paste the Markdown content you need translated.