QQ登录
# 文档说明
本文为您介绍Android客户端如何接入QQ授权登录功能。用户点击客户端APP上QQ登录按钮,IDaaS SDK调起QQ APP里的授权页面,用户点击“授权登录”按钮,授权成功后,QQAPP跳转回到客户端APP,此时IDaaS SDK自动接收到临时票据,带着票据到IDaaS服务端请求认证。最终认证结果返回给客户端APP。
# 流程说明
# 登录流程
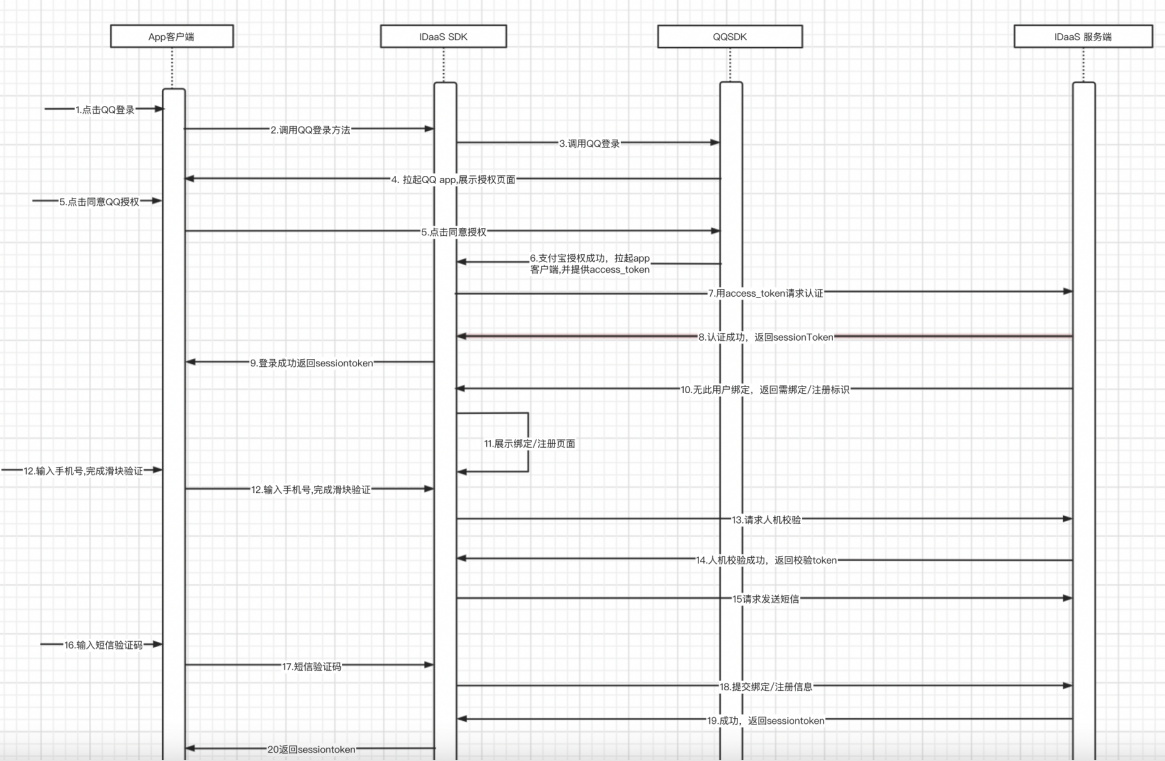
集成流程说明
用户点击APP客户端的QQ登录按钮。
APP客户端调用IDaaS SDK的QQ登录方法。
IDaaS SDK调用QQ SDK的登录方法。
QQSDK拉起手机上的QQAPP,并显示授权登录页面。
用户点击授权登录按钮。
QQ授权成功,拉起客户端APP,并且带上QQ授权票据,此时,IDaaS SDK在调起中自动获取到QQ授权票据。
IDaaS用QQ授权票据请求IDaaS服务端认证。
IDaaS服务端查询是否绑定手机号,如果已经绑定手机号,IDaaS服务端认证成功,返回sessionToken给IDaaS SDK。
IDaaS SDK将sessionToken返回给APP 客户端。
如果IDaaS服务端查询到未绑定手机号,返回需要绑定或注册的标识。
IDaaS服务端展示绑定或注册页面。
用户输入手机号,点击获取验证码,完成滑块验证。
IDaaS SDK带着滑块验证码到IDaaS服务端请求滑块验证。
IDaaS 服务端校验滑块成功,返回token给IDaaS SDK。
IDaaS SDK用token和手机号到IDaaS 服务端请求发送短信验证码。
用户收到短信验证码,填入验证码输入框,并且点击绑定或注册按钮。
IDaaS SDK提交绑定或登录数据到IDaaS 服务端。
绑定或注册成功,IDaaS服务端返回sessionToken给IDaaS SDK。
IDaaS SDK返回sessionToken给客户端APP。
# 准备工作
# QQ开放平台创建应用
开发者登录QQ开放平台 (opens new window),创建自己的开发账号,参考官方文档 (opens new window)新建应用,待审核通过。
环境搭建请参考:https://wiki.connect.qq.com/qq%e7%99%bb%e5%bd%95。
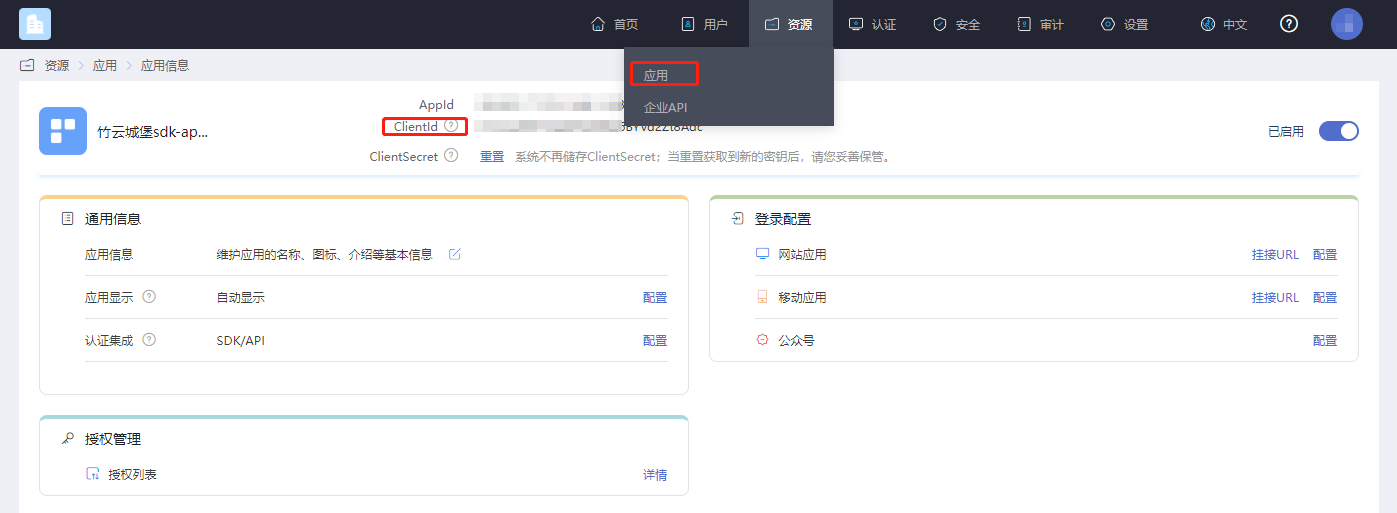
# 获取应用clientId
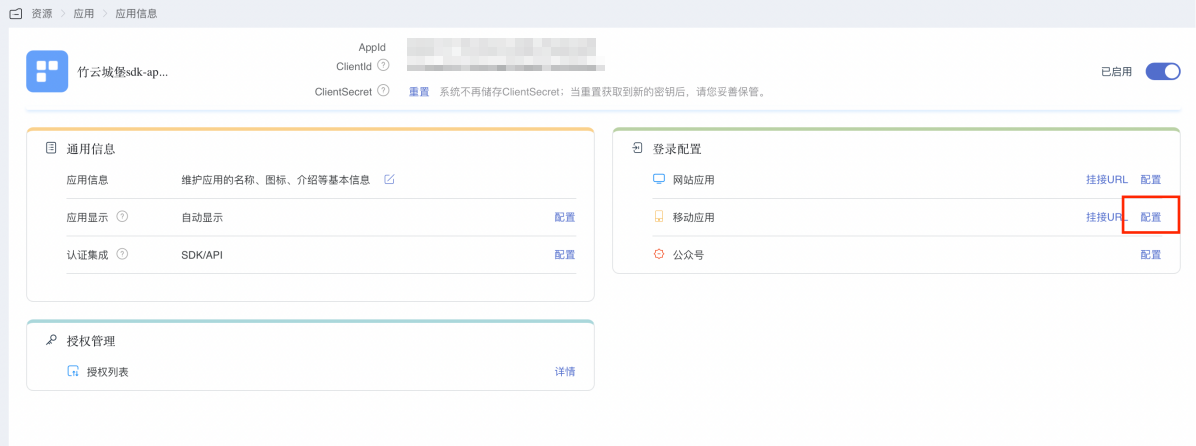
登录IDaaS企业中心平台,点击 “资源-->应用” 选择跟自己相关的应用点击即可查看到。
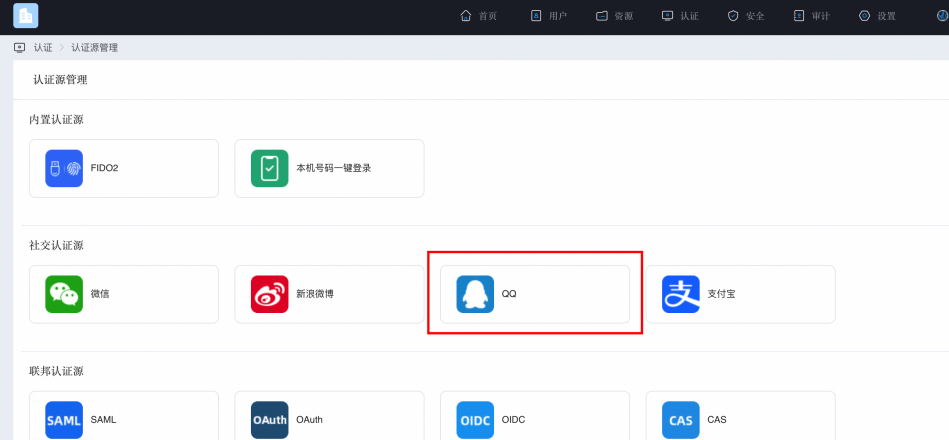
# 配置认证源
登录到IDaaS企业中心平台,点击 “认证—>认证源管理—>QQ” 。
点击添加认证源,填入QQ开发平台注册应用后得到的AppKey和AppSecrete。并且渠道选择框为‘移动应用’。显示名称填入名称。
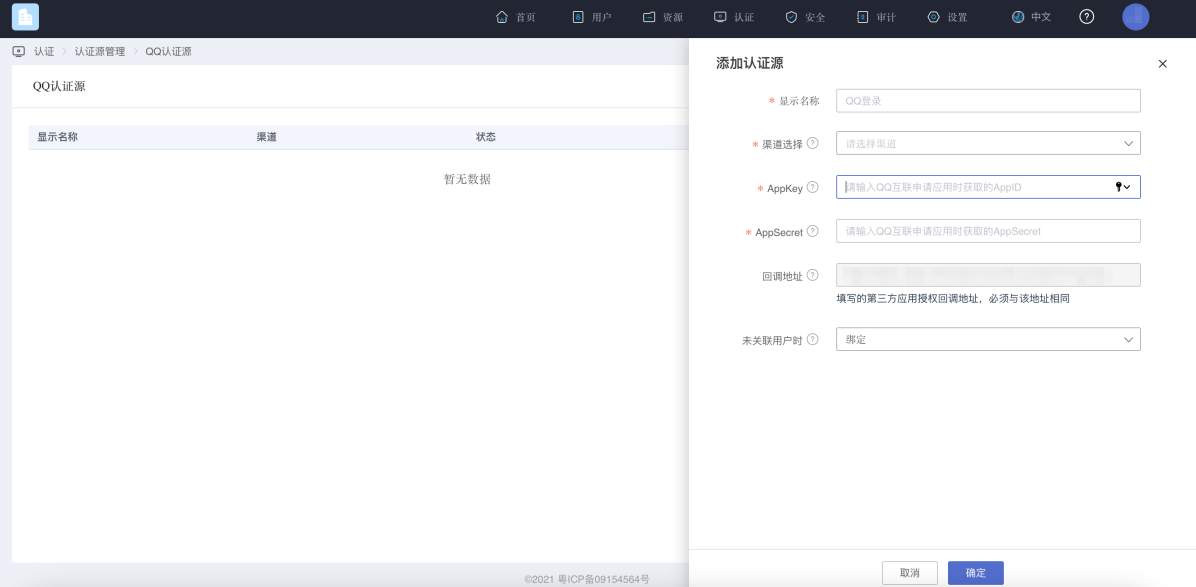
点击确定,就会得到如下图的一条认证源。访问到资源-->应用,点击App新建的应用。应用创建完成后,进入登录配置—>移动应用—>配置。
会到如下图窗口,QQ的那一条点击后面开启的按钮。
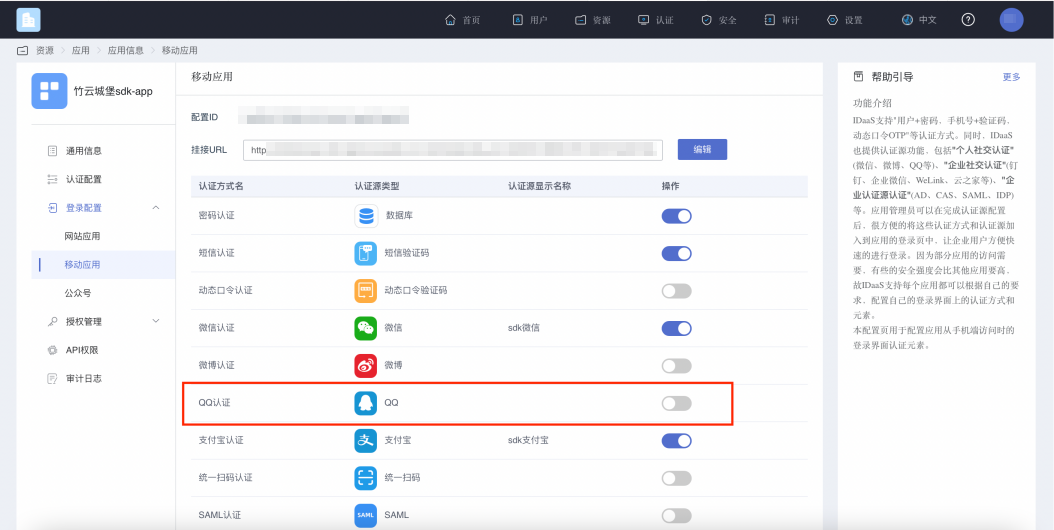
选择刚才配置好的认证源保存即可。
# 引入依赖包
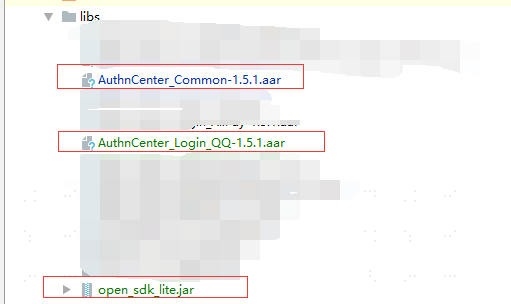
将 aar包导入 lib,如下图所示:
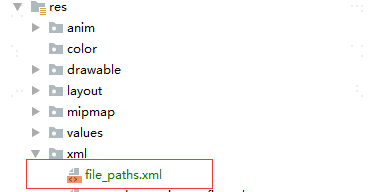
在你的资源目录下新建一个 xml目录,并在该 目录下新增一个 file_path.xml文件(可直接复制DEMO中):
# 配置build.gradle
/*begin*/
/*  rxjava2 +  okhttp + retrofit2  */
api 'io.reactivex.rxjava2:rxjava:2.2.10'
api 'io.reactivex.rxjava2:rxandroid:2.1.1'
api 'com.squareup.retrofit2:retrofit:2.6.0'
api 'com.squareup.retrofit2:adapter-rxjava2:2.6.0'
api 'com.squareup.retrofit2:converter-gson:2.6.0'
api 'com.squareup.okhttp3:okhttp:4.3.1'
api 'com.squareup.okhttp3:logging-interceptor:3.6.0'
api 'com.jakewharton.retrofit:retrofit2-rxjava2-adapter:1.0.0'
api 'com.trello.rxlifecycle2:rxlifecycle-components:2.1.0'
api 'com.alibaba:fastjson:1.2.61'
 /*end*/

//公共库,必选
implementation(name: 'AuthnCenter_Common-1.5.3', ext: 'aar')
//QQ登录SDK,必选
implementation(name: ''AuthnCenter_LoginQQ-1.5.3', ext: 'aar')
//QQ官方依赖库,必选
implementation(name: 'open_sdk_lite', ext: 'jar')
2
3
4
5
6
7
8
9
10
11
12
13
14
15
16
17
18
19
20
# 配置AndroidManifest
  <!--权限-->
    <uses-permission android:name="android.permission.INTERNET" />
    <uses-permission android:name="android.permission.WRITE_EXTERNAL_STORAGE" />
    <uses-permission android:name="android.permission.READ_EXTERNAL_STORAGE" />
    <uses-permission android:name="android.permission.CAMERA" />
    <uses-permission android:name="android.permission.RECORD_AUDIO" />
    <uses-permission android:name="android.permission.READ_PHONE_STATE" />
    <uses-permission android:name="android.permission.MOUNT_UNMOUNT_FILESYSTEM"/>


        <!-- 国际区号界面 按需注册 -->
        <activity
            android:name="com.authncenter.wechat.view.CountryCodeListActivity"
            android:launchMode="singleTask"
            android:screenOrientation="portrait" />
        <!-- 短信验证界面 按需注册 -->
        <activity
            android:name="com.authncenter.loginqq.view.MsgActivity"
            android:launchMode="singleTask"
            android:screenOrientation="portrait" />

  <!--QQ登录相关配置-->
<activity
    android:name="com.tencent.tauth.AuthActivity"
    android:launchMode="singleTask"
    android:noHistory="true">
    <intent-filter>
        <action android:name="android.intent.action.VIEW" />
        <category android:name="android.intent.category.DEFAULT" />
        <category android:name="android.intent.category.BROWSABLE" />
        <data android:scheme="tencent申请的APPID" />
    </intent-filter>
</activity>

<activity
    android:name="com.tencent.connect.common.AssistActivity"
    android:configChanges="orientation|keyboardHidden"
    android:screenOrientation="behind"
    android:theme="@android:style/Theme.Translucent.NoTitleBar" />

<provider
    android:name="android.support.v4.content.FileProvider"
    android:authorities="com.authncenter.authncentersdk.fileprovider"
    android:exported="false"
    android:grantUriPermissions="true">
    <meta-data
        android:name="android.support.FILE_PROVIDER_PATHS"
        android:resource="@xml/file_paths" />
</provider>
2
3
4
5
6
7
8
9
10
11
12
13
14
15
16
17
18
19
20
21
22
23
24
25
26
27
28
29
30
31
32
33
34
35
36
37
38
39
40
41
42
43
44
45
46
47
48
49
# 开发集成
# 内置API介绍
基本配置初始化主类AuthnCenterAPI方法简介:
/**
 * 短信验证码 -- 发送短信
 */
public void smsSend(Context context, SendSmsReq req, RequestListener listener)

/**
 * 获取国家区号    注意 如果配置了国家区号需要调用此接口获取国家区号
 */
public void getCountryCode(Context context, RequestListener listener)

/**
 * 社交账号绑定接口
 * @param context      上下文
 * @param stateToken   当前登录之后返回临时token
 * @param otpsmsReq    绑定对象信息
 * @param listener     事件回调
 */
public void socialBind(Context context, String stateToken, OTPSMSReq otpsmsReq, RequestListener listener)

/**
 *  注册
 * @param context      上下文
 * @param stateToken   当前登录之后返回临时token
 * @param otpsmsReq    注册对象信息
 * @param listener     事件回调
 */
public void register(Context context, String stateToken, OTPSMSReq otpsmsReq, RequestListener listener)
2
3
4
5
6
7
8
9
10
11
12
13
14
15
16
17
18
19
20
21
22
23
24
25
26
27
QQ登录初始化主类AuthnCenterLoginWeChat方法简介:
/**
 *   QQ登录
 * @param context  上下文
 * @param qqLoginListener事件监听
 * @param loginType       LoginType.DEFAULT(内置) ,LoginType.CUSTOM(自定义)
 */
public void loginByQQ(Context context, QQLoginListener qqLoginListener, LoginType loginType)
2
3
4
5
6
7
8
# 手机国际区号获取
如果开启了国际号码支持 请自行先行调用国际区号获取接口,国际区号获取接口返回配置好的国际区号列表,并附有电话号码的正则表达式。下图中就是如何配置国际区号列表和首选区号。

获取国际区号列表示例代码:
AuthnCenterAPI.Builder().getCountryCode(this, new RequestListener<CountryCodeInfoRsp>() {
    @Override
    public void success(CountryCodeInfoRsp codeInfoRsp) {

    }

    @Override
    public void error(String code, String errorMessage) {
    }
});
2
3
4
5
6
7
8
9
10
成功示例code=0,data的值:
{
	"phoneAreaCodeDefinitions": [
		{
			"areaCode": "86",
			"displayMapping": {
				"zh-TW": "中國大陸",
				"en": "China",
				"zh-CN": "中国大陆"
			},
			"countryCode": "CN",
			"mobileRegex": "^(\\+86){0,1}\\-?1\\d{10}$",
			"areaCodeSuffixes": []
		},
		{
			"areaCode": "852",
			"displayMapping": {
				"zh-TW": "中國香港",
				"en": "Hong Kong",
				"zh-CN": "中国香港"
			},
			"countryCode": "HK",
			"mobileRegex": "^(\\+852){1}\\-?0{0,1}[1,4,5,6,7,8,9](?:\\d{7}|\\d{8}|\\d{12})$",
			"areaCodeSuffixes": []
		},
		{
			"areaCode": "886",
			"displayMapping": {
				"zh-TW": "中國臺灣",
				"en": "Taiwan",
				"zh-CN": "中国台湾"
			},
			"countryCode": "TW",
			"mobileRegex": "^(\\+886){1}\\-?[6,7,9](?:\\d{7}|\\d{8})$",
			"areaCodeSuffixes": []
		},
		{
			"areaCode": "853",
			"displayMapping": {
				"zh-TW": "中國澳門",
				"en": "Macau",
				"zh-CN": "中国澳门"
			},
			"countryCode": "MO",
			"mobileRegex": "^(\\+853){1}\\-?0{0,1}[1,4,5,6,7,8,9](?:\\d{7}|\\d{8}|\\d{12})$",
			"areaCodeSuffixes": []
		},
		{
			"areaCode": "93",
			"displayMapping": {
				"zh-TW": "阿富汗",
				"en": "Afghanistan",
				"zh-CN": "阿富汗"
			},
			"countryCode": "AF",
			"mobileRegex": "^(\\+93){1}\\-\\d{6,11}",
			"areaCodeSuffixes": []
		}
	],
	"preferredAreaCode": "CN"
}
2
3
4
5
6
7
8
9
10
11
12
13
14
15
16
17
18
19
20
21
22
23
24
25
26
27
28
29
30
31
32
33
34
35
36
37
38
39
40
41
42
43
44
45
46
47
48
49
50
51
52
53
54
55
56
57
58
59
60
返回参数:
| 参数名 | 中文名称 | 类型 | 描述 |
|---|---|---|---|
| preferredAreaCode | 首选国际区号 | String | 当前企业中心配置的首选国际区号 |
| countryCode | 国家地区代码 | String | 国家地区代码 |
| areaCode | 国际电话区号 | String | 国际电话区号 |
| areaCodeSuffixes | 国际电话区号后缀 | String | 国际电话区号后缀 |
| mobileRegex | 手机号格式正则 | String | 手机号格式正则 |
| displayMapping | 多语言显示名映射 | String | 多语言显示名映射 |
# 内置滑动校验
在发送验证码时需要调用人机交互验证
BlockPuzzleDialog mBlockPuzzleDialog = new BlockPuzzleDialog(mContext);
mBlockPuzzleDialog.setOnResultsListener(new OnResultsListener() {
        @Override
        public void onResultsClick(String result) {
            LogUtil.getInstance().d("二次校验回调结果 mCaptchaToken:" + result);
            //这个回调结果就是短信校验的captchaToken参数
        }
        @Override
        public void onError(String code, String msg) {
            ToastUtils.ShowToast(mContext, String.format("错误码 : %s  错误信息 : %s", code, msg));
        }
    });
}
2
3
4
5
6
7
8
9
10
11
12
13
14
# 发送验证码
App客户端需要有自己的UI界面,界面包含几个必要组件:手机号输入框,验证码输入框,触发获取验证码的按钮(或者事件),登录的按钮(或者事件)。
在用户填入手机号码后,点击(触发)发送验证码事件之前,App客户端做手机号格式检查。
点击(触发)发送验证码事件,App客户端调用IDaaS SDK的发送验证码方法,示例如下:
//发送验证码
SendSmsReq sendSmsReq = new SendSmsReq();
sendSmsReq.setMobile(getPhoneNum());
sendSmsReq.setType(SendSmsType.login);//类型枚举
sendSmsReq.setCaptcha_token(“滑动验证码成功之后返回结果”);
AuthnCenterAPI.Builder().smsSend(mContext, sendSmsReq
        , new RequestListener<BaseResponse>() {
            @Override
            public void success(BaseResponse rsp) {
            }
            @Override
            public void error(String code, String errorMessage) {
            }
        });
2
3
4
5
6
7
8
9
10
11
12
13
14
# 内置UI开发集成
# 初始化
AuthnCenterSDK.Builder()
                .init(this)
                .setBaseUrl("https://xxx.xxx.com")      //租户域名
                .setClientId("xxxx") //租户后台应用client-id
                .isCheckSSL(false) //是否检测SSL证书
                .logEnable(false).build(); //是否打开http请求log
PlatformConfig.Builder().init(this).setQQAppId("xxx");//设置QQ APPID
PlatformConfig.Builder().init(this).setQQAppAuthorities("xx.xx.xx.fileprovider");  //设置QQ fileprovider
2
3
4
5
6
7
8
9
# UI定制化
调用方通过 BindThemeConfig 可设置绑定界面的 文字 ,说明以及颜色等,具体属性如下:
//自定义界面
BindThemeConfig.Builder().setBindTitle("我是标题")
        .setBindDes("我是详情")
        .setBindButtonText("我就想改变一下按钮得文字")
        .setBindButtonTextDefaultColor("#367517")
        .setBindButtonTextColor("#C8E2B1")
        .setBindButtonTextOnPressColor("#F9F400")
        .setSendMsgColor("#976D00")
        .setSendMsgNoActiviColor("#50A625")
        .setDialogTitle("我就是想自定义")
        .setDialogBtnConfirmColor("#FFB6C1");
2
3
4
5
6
7
8
9
10
11
# 属性说明
| 参数 | 类型 | 说明 | 示例 |
|---|---|---|---|
| setBackFont | String | 更改返回文字 | 无 |
| setBackFontColor | String | 更改返回文字颜色 | 16进制颜色 例如: #FFFFFF |
| setBackImg | int | 设置返回图标 | 资源文件R |
| setBackFontSize | int | 设置返回文字大小 | 14sp |
| setCountryCodeVisibility | boolean | 设置国际区号是否展示 | 默认为true |
| setBindTitle | String | 绑定界面标题 | 无 |
| setBindDes | String | 绑定界面说明 | 无 |
| setBindButtonText | String | 绑定按钮文字 | 无 |
| setBindButtonTextDefaultColor | String | 绑定按钮文字背景默认颜色 | 16进制颜色 例如: #FFFFFF |
| setBindButtonTextColor | String | 绑定按钮文字颜色 | 16进制颜色 例如: #FFFFFF |
| setBindButtonTextOnPressColor | String | 绑定按钮文字背景点击之后颜色 | 16进制颜色 例如: #FFFFFF |
| setSendMsgColor | String | 发送短信按钮文字颜色 | 16进制颜色 例如: #FFFFFF |
| setSendMsgNoActiviColor | String | 倒计时文字颜色 | 16进制颜色 例如: #FFFFFF |
| setDialogTitle | String | 解绑弹出框标题 | 无 |
| setDialogBtnConfirmColor | String | 解绑弹出框确认按钮颜色 | 16进制颜色 例如: #FFFFFF |
| sendMsgNoActiveBackground | int | 发送短信按钮背景资源 | Android 颜色或者背景资源文件 (R) |
| setButtonBackground | int | 发送短信按钮默认背景资源 | Android 颜色或者背景资源文件 (R) |
| setSendMsgBackground | int | 绑定按钮钮背景资源 | Android 颜色或者背景资源文件 (R) |
# QQ登录内置界面
AuthnCenterLoginQQ.Builder().loginByQQ(this, new QQLoginListener() {
    @Override
    public void success(String code, String data) {
  //成功回调
    }
    @Override
    public void error(String code, String errorMessage) {
//失败回调
    }
}, LoginType.DEFAULT);
2
3
4
5
6
7
8
9
10
# 以API开发集成
选择此方式集成的话在登录返回之后需要根据返回的状态自行处理绑定或者注册业务同时验证手机号相关的基础操作。
同时 AndroidManifest 文件 相关注册信息可填写自己的即可。
# 调用顺序说明
在登录成功之后如果返回状态为绑定,那么此时需要调用
获取国家区号(这个根据是否配置支持国际化选择调用) (getCountryCode)
滑动校验 (BlockPuzzleDialog )
发送短信 (smsSend)
绑定或者注册 (socialBind/register)
# 初始化
AuthnCenterSDK.Builder()
                .init(this)
                .setBaseUrl("https://xxx.xxx.com")      //租户域名
                .addGlobalHeader("X-client-id", "xxxx") //租户后台应用client-id
                .isCheckSSL(false) //是否检测SSL证书
                .logEnable(false).build(); //是否打开http请求log
PlatformConfig.Builder().init(this).setQQAppId("xxx");//设置QQ APPID
PlatformConfig.Builder().init(this).setQQAppAuthorities("xx.xx.xx.fileprovider");  //设置QQ fileprovider
2
3
4
5
6
7
8
# QQ登录(自定义界面)
AuthnCenterLoginQQ.Builder().loginByQQ(this, new QQLoginListener() {
    @Override
    public void success(String code, String data) {
//此处根据 code 返回值进行跳转到自己的界面进行绑定或者注册操作
        Intent intent = new Intent(MainActivity.this, QQActivity.class);
        intent.putExtra(SocialType.STATETOKEN, data);
        intent.putExtra(SocialType.BINDTYPE, SocialType.WX);
        switch (code) {
   case "10002":   //登录成功
ToastUtils.ShowToast(MainActivity.this, "登录成功 : " + data);
                return;
            case "10003":   //绑定用户
               intent.putExtra(SocialType.ACTIONTYPE, ActionType.BIND);
                break;
            case "10004": //注册用户
                intent.putExtra(SocialType.ACTIONTYPE, ActionType.REGISTER);
                break;
        }
        intent.setFlags(Intent.FLAG_ACTIVITY_NEW_TASK);
        startActivity(intent);
    }

    @Override
    public void error(String code, String errorMessage) {
        ToastUtils.ShowToast(MainActivity.this, "SDK 回调  code : " + code + "---- msg " + errorMessage);
    }
}, LoginType.CUSTOM);
2
3
4
5
6
7
8
9
10
11
12
13
14
15
16
17
18
19
20
21
22
23
24
25
26
27
此处根据返回code进行判断:
| code码 | 说明 |
|---|---|
| 10001 | AuthCenter服务器错误 |
| 10002 | 成功 |
| 10003 | 需要绑定用户 |
| 10004 | 需要注册用户 |
# 返回码
| 状态码 | 错误码 (error_code) | 错误说明 (error_msg) | 处理措施 |
|---|---|---|---|
| 400 | IDAAS.SDK.COMMON.1001 | Parameter {0} cannot be left blank | |
| 参数 {0} 不能为空 | |||
| 400 | IDAAS.SDK.COMMON.1002 | The {0} parameter format is incorrect | |
| 参数 {0} 格式错误 | |||
| 400 | IDAAS.SDK.COMMON.1003 | Device information is incomplete | |
| 设备信息不完整 | |||
| 400 | IDAAS.SDK.COMMON.1004 | Signature decryption error | |
| 签名解密错误 | |||
| 400 | IDAAS.SDK.COMMON.1005 | The {0} has failed | |
| {0} 已失效 | |||
| 400 | IDAAS.SDK.COMMON.1006 | The {0} parameter error | |
| {0} 参数错误 | |||
| 400 | IDAAS.SDK.COMMON.1007 | The {0} parameter type error | |
| {0}参数类型错误 | |||
| 500 | IDAAS.SDK.COMMON.1008 | The system is busy. Try again later | |
| 系统繁忙。稍后再试 | |||
| 400 | IDAAS.SDK.COMMON.1009 | Unknown authentication configuration | |
| 未知的认证配置 | |||
| 400 | IDAAS.SDK.COMMON.1010 | Failed to obtain the enterprise center global configuration | |
| 获取企业中心全局配置失败 | |||
| 400 | IDAAS.SDK.COMMON.1011 | Failed to obtain the international area code configuration | |
| 获取国际区号配置失败 | |||
| 400 | IDAAS.SDK.COMMON.1012 | The x-client-ID is incorrect and the corresponding application cannot be found | |
| X-client-id错误,找不到对应的应用 | |||
| 400 | IDAAS.SDK.COMMON.1013 | The corresponding user is not found | |
| 未找到对应的用户 | |||
| 400 | IDAAS.SDK.COMMON.1014 | Application private key not found | |
| 未找到应用私钥 | |||
| 400 | IDAAS.SDK.LOGIN.1001 | Error calling interface {0} | |
| 调用 {0} 接口出错 | |||
| 400 | IDAAS.SDK.LOGIN.1002 | User not bound | |
| 用户未绑定 | |||
| 400 | IDAAS.SDK.LOGIN.1003 | The user has been locked due to too many unsuccessful login attempts. It will be unlocked in {0} minutes and {1} seconds | |
| 由于多次登录失败,用户已被锁定。 它将在 {0} 分钟和 {1} 秒内解锁 | |||
| 400 | IDAAS.SDK.LOGIN.1004 | Failed to obtain the password policy | |
| 获取密码策略错误 | |||
| 400 | IDAAS.SDK.LOGIN.1005 | Invalid username or password. Remaining login attempts: {0} | |
| 无效的用户名或密码。 其余登录尝试次数:{0} | |||
| 400 | IDAAS.SDK.LOGIN.1006 | Configuration error, unable to find wechat authentication source | |
| 配置错误,找不到微信认证源 | |||
| 400 | IDAAS.SDK.LOGIN.1007 | Configuration error, unable to find alipay authentication source | |
| 配置错误,找不到支付宝认证源 | |||
| 400 | IDAAS.SDK.LOGIN.1008 | The configuration is incorrect. The one-click login authentication source cannot be found | |
| 配置错误,无法找到一键登录认证源 | |||
| 400 | IDAAS.SDK.SMS.1001 | {0} slide base map is not initialized successfully, please check the path | |
| {0} 滑动底图未初始化成功,请检查路径 | |||
| 400 | IDAAS.SDK.SMS.1002 | {0} verification code coordinate resolution failed | |
| {0} 验证码坐标解析失败 | |||
| 400 | IDAAS.SDK.SMS.1003 | {0} verification code coordinate verification fails | |
| {0} 验证码坐标校验失败 | |||
| 400 | IDAAS.SDK.SMS.1004 | The graphic verification code is incorrect | |
| 图形验证码校验错误 | |||
| 400 | IDAAS.SDK.SMS.1005 | SMS verification code verification is incorrect | |
| 短信验证码验证错误 | |||
| 400 | IDAAS.SDK.SMS.1006 | The email verification code is incorrect | |
| 邮件验证码验证错误 | |||
| 400 | IDAAS.SDK.SMS.1007 | Sending scenario does not exist | |
| 发送场景不存在 | |||
| 400 | IDAAS.SDK.SMS.1008 | Failed to send the verification code | |
| 发送验证码失败 | |||
| 400 | IDAAS.SDK.SOCIAL.1001 | The social account is unbound incorrectly | |
| 社交账号解绑错误 | |||
| 400 | IDAAS.SDK.SOCIAL.1002 | The social account has been bound, please unbind it first | |
| 社交账号已绑定,请先解绑 | |||
| 400 | IDAAS.SDK.PWD.1001 | The password length is incorrect | |
| 密码长度错误 | |||
| 400 | IDAAS.SDK.PWD.1002 | The password cannot be the username | |
| 密码不能为用户名 | |||
| 400 | IDAAS.SDK.PWD.1003 | Your password complexity is low | |
| 你的密码复杂度过低 | |||
| 400 | IDAAS.SDK.PWD.1004 | The password is weak | |
| 密码很弱 | |||
| 400 | IDAAS.SDK.PWD.1005 | The password is used before, cannot be used again | |
| 该密码已被使用过,不能再次使用 | |||
| 400 | IDAAS.SDK.PWD.1006 | Password cannot username in reverse order | |
| 密码不能是用户名的倒序 | |||
| 400 | IDAAS.SDK.PWD.1007 | The number of repeated password characters exceeded the upper limit | |
| 密码重复字符数超过限制 | |||
| 400 | IDAAS.SDK.PWD.1008 | Password cannot contain :username, phone number, email prefix, name in PinYing | |
| 密码不能包含:用户名、电话号码、邮件前缀、拼音名 | |||
| 400 | IDAAS.SDK.MFA.1001 | The mobile doesn't match the user | |
| 手机号和用户不匹配 | |||
| 400 | IDAAS.SDK.MFA.1002 | The access control policy is incorrect | |
| 访问控制策略配置错误 | |||
| 400 | IDAAS.SDK.MFA.1003 | Access control authentication source type conversion error | |
| 访问控制身份验证源类型转换错误 |